> ## Documentation Index
> Fetch the complete documentation index at: https://help.broadstripes.com/llms.txt
> Use this file to discover all available pages before exploring further.
# Assessment codes
> Configure assessment codes to track where workers stand in relation to your organizing campaign goals using numeric scales.
## Overview
An essential piece of any organizing campaign is figuring out where the workers stand in relation to the campaign's goals.
This is usually done using a numeric assessment scale, with 1 indicating strong support, and the highest number in the scale (usually 5) indicating hostility. The 5-point scale is useful because it gives you a neutral position (3) and two "leaning" options (2 and 4).
Broadstripes makes it easy to set up assessment codes to match your campaign's style. You can create as many codes as you want, and supply descriptive text for each.
**What's the difference between "Assessment codes," "Assessments," and "Codes"?**
Absolutely nothing! "Assessment codes," "Assessments," and "Codes" all refer to the exact same piece of employment information in Broadstripes; it's just a matter of how it is labeled.
In your [general settings](/docs/project-settings/general-settings), you can choose whether you want Broadstripes to refer to the numbers on the assessment scale as "Codes" or "Assessments," and you can go back to your general settings to change this label at any time.
## The assessment codes table
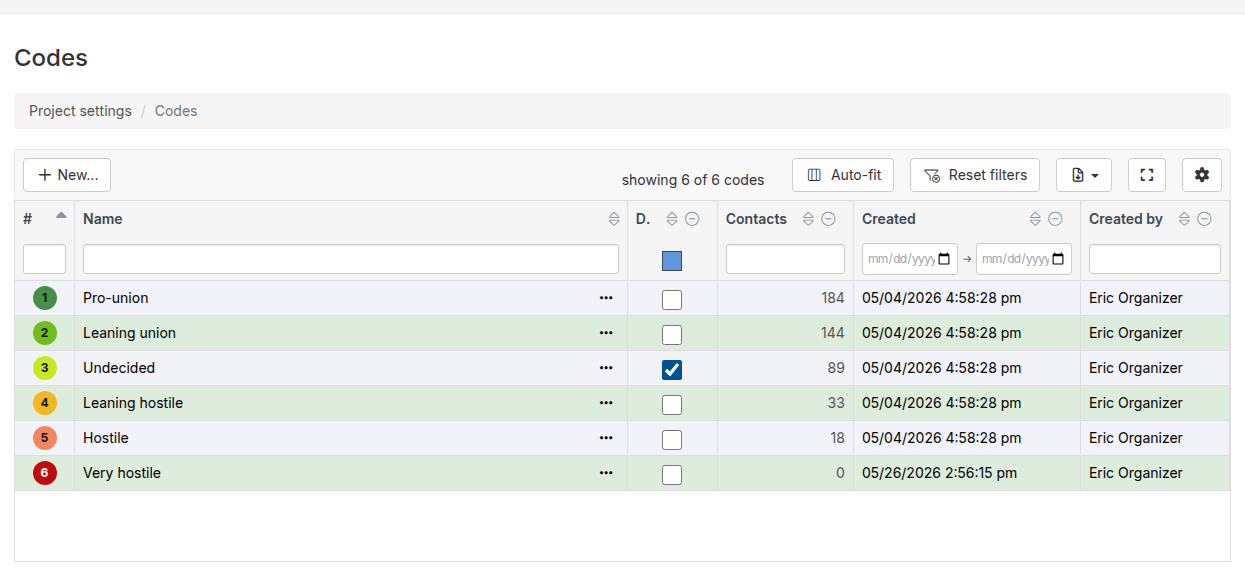
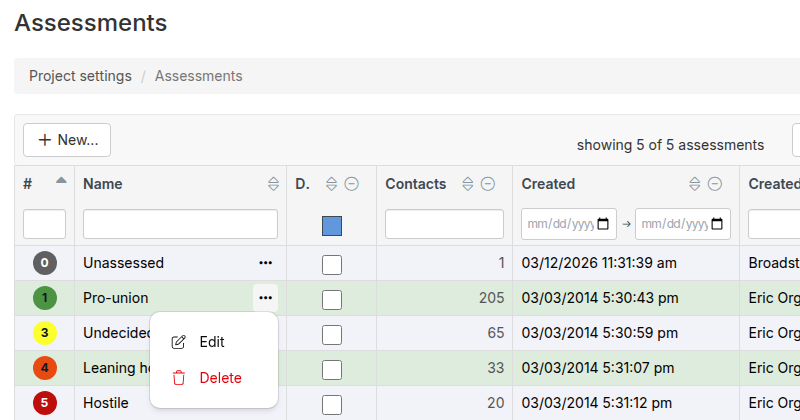
The assessment codes page displays your codes in an interactive data grid with sortable, filterable columns:
* **#** — The code number, shown as a colored circle
* **Name** — The code description, with an actions menu (⋯) for editing and deleting
* **Default** — A checkbox indicating the default code; click it to set or clear the project default directly in the table
* **Contacts** — The number of contacts assigned this code (click to view them in search results)
* **Created** and **Created by** — When the code was created and who created it
You can click any column header to sort, and use the filter row below the headers to narrow down codes. The table also includes **Export** buttons to download your codes as a file.
 ## Configure new assessment codes
You can create your whole assessment scale in one step:
1. Go to **Settings** and select **Assessments** (or **Codes**, depending on your [General settings](/docs/project-settings/general-settings) label).
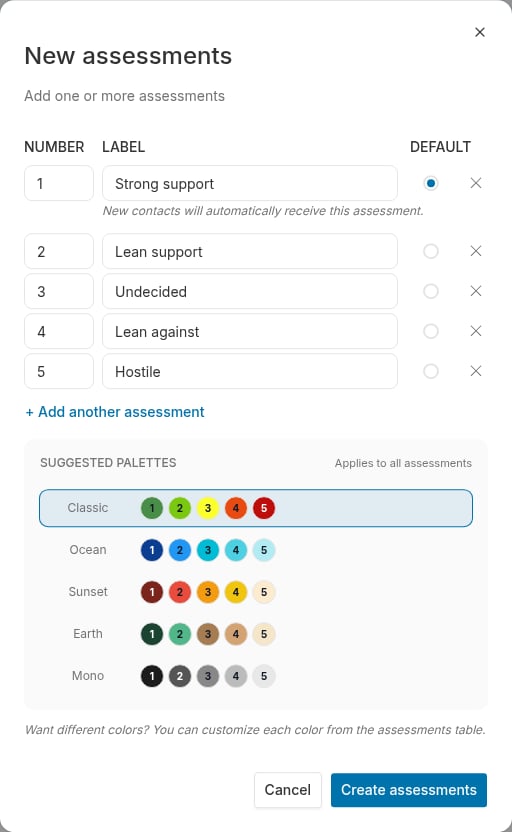
2. Click the **New\...** button in the table toolbar. The **New assessments** dialog opens with one empty row.
3. Each row is one assessment code. Enter a **number** and a short one- or two-word **label** that will appear on-screen and in reports (most projects use codes 1-5, but you can have as many or as few as you want).
**Note:** Assessment codes must be numbers, and each number can only be used once — the dialog flags duplicates as you type.
4. Click **+ Add another assessment** to add a row for each remaining code on your scale.
5. If you want one code to be selected automatically when your end users enter a new contact in Broadstripes, click the **Default** button on its row.
6. To color your scale, pick one of the **Suggested Palettes** (Classic, Ocean, Sunset, Earth, or Mono) — the swatches preview how the colors will be spread across your codes. You can fine-tune individual colors later; see [Customize assessment colors](#customize-assessment-colors).
7. Click **Create assessments**. The dialog closes, a confirmation appears, and your new codes appear in the table.
## Configure new assessment codes
You can create your whole assessment scale in one step:
1. Go to **Settings** and select **Assessments** (or **Codes**, depending on your [General settings](/docs/project-settings/general-settings) label).
2. Click the **New\...** button in the table toolbar. The **New assessments** dialog opens with one empty row.
3. Each row is one assessment code. Enter a **number** and a short one- or two-word **label** that will appear on-screen and in reports (most projects use codes 1-5, but you can have as many or as few as you want).
**Note:** Assessment codes must be numbers, and each number can only be used once — the dialog flags duplicates as you type.
4. Click **+ Add another assessment** to add a row for each remaining code on your scale.
5. If you want one code to be selected automatically when your end users enter a new contact in Broadstripes, click the **Default** button on its row.
6. To color your scale, pick one of the **Suggested Palettes** (Classic, Ocean, Sunset, Earth, or Mono) — the swatches preview how the colors will be spread across your codes. You can fine-tune individual colors later; see [Customize assessment colors](#customize-assessment-colors).
7. Click **Create assessments**. The dialog closes, a confirmation appears, and your new codes appear in the table.
 ## Assessment options
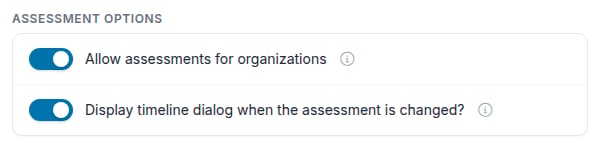
Below the assessment codes table, the **Assessment options** panel contains toggle switches that control how assessments work in your project. Flip a switch to change a setting — each change saves automatically and a confirmation message appears, so there's no separate save button. Click the **info icon** () next to an option for a short explanation. Read-only users can see the options, but the switches are disabled.
**Allow assessments for organizations**
People (workers) can always be assessed, but by default organizations (workplaces) cannot. Turn this option on to allow organizations to be assessed as well. When enabled, the assessment disc and code selector appear on organization records just as they do on worker records, and organization assessment codes appear in search results and exports.
**Display timeline dialog when the assessment is changed?**
When this option is on, the timeline dialog appears any time someone using the app changes a record's assessment, asking them to provide more information about why the assessment changed. The dialog does not appear during data imports or other automated processes.
Like the rest of the page, the panel and its option labels follow your project's terminology preference — you'll see **Code options**, **Allow codes for organizations**, and so on if your [General settings](/docs/project-settings/general-settings) label is "Codes."
## Assessment options
Below the assessment codes table, the **Assessment options** panel contains toggle switches that control how assessments work in your project. Flip a switch to change a setting — each change saves automatically and a confirmation message appears, so there's no separate save button. Click the **info icon** () next to an option for a short explanation. Read-only users can see the options, but the switches are disabled.
**Allow assessments for organizations**
People (workers) can always be assessed, but by default organizations (workplaces) cannot. Turn this option on to allow organizations to be assessed as well. When enabled, the assessment disc and code selector appear on organization records just as they do on worker records, and organization assessment codes appear in search results and exports.
**Display timeline dialog when the assessment is changed?**
When this option is on, the timeline dialog appears any time someone using the app changes a record's assessment, asking them to provide more information about why the assessment changed. The dialog does not appear during data imports or other automated processes.
Like the rest of the page, the panel and its option labels follow your project's terminology preference — you'll see **Code options**, **Allow codes for organizations**, and so on if your [General settings](/docs/project-settings/general-settings) label is "Codes."
 ## Customize assessment colors
Broadstripes automatically assigns colors to your assessment codes. You can customize these colors to match your campaign's preferences or to make certain codes more visually distinct.
### Change a code's color
1. Go to **Settings** and select **Assessments** (or **Codes**).
2. Find the assessment code you want to customize and open its **actions menu** (⋯) in the **Name** column, then click **Edit**. The **Edit assessments** dialog opens with that code selected.
3. In the **Color** field, click the button to open the color picker. Choose a color using any of these methods:
* Click one of the six **Default Colors** swatches (green, light green, yellow, orange, red, or gray)
* Type a custom hex color code (e.g., `#488E48`) into the **Hex** field, or adjust the **R**, **G**, and **B** values individually
* Click the eye-dropper icon to open your browser's color selection tool, where you can pick any color from the full color gamut
* Click **Reset to default** to revert to the automatically assigned color
4. Click **Save changes**.
## Customize assessment colors
Broadstripes automatically assigns colors to your assessment codes. You can customize these colors to match your campaign's preferences or to make certain codes more visually distinct.
### Change a code's color
1. Go to **Settings** and select **Assessments** (or **Codes**).
2. Find the assessment code you want to customize and open its **actions menu** (⋯) in the **Name** column, then click **Edit**. The **Edit assessments** dialog opens with that code selected.
3. In the **Color** field, click the button to open the color picker. Choose a color using any of these methods:
* Click one of the six **Default Colors** swatches (green, light green, yellow, orange, red, or gray)
* Type a custom hex color code (e.g., `#488E48`) into the **Hex** field, or adjust the **R**, **G**, and **B** values individually
* Click the eye-dropper icon to open your browser's color selection tool, where you can pick any color from the full color gamut
* Click **Reset to default** to revert to the automatically assigned color
4. Click **Save changes**.
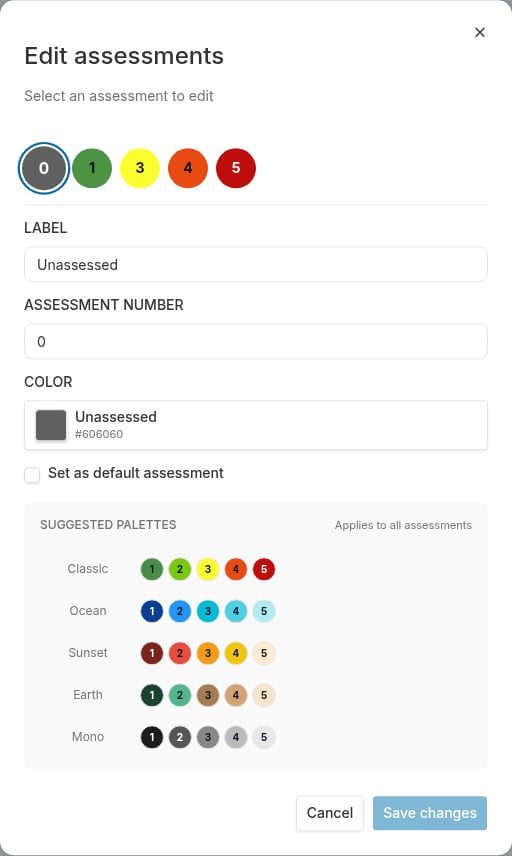
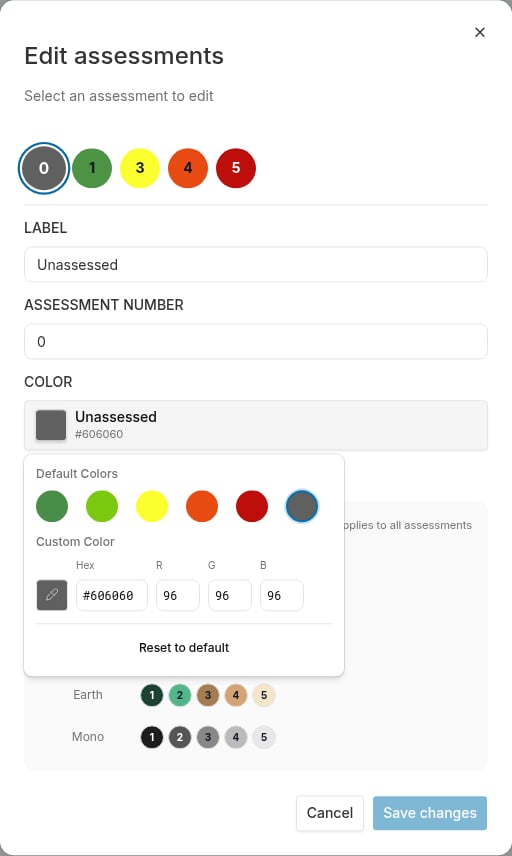 To recolor your whole scale at once, pick one of the **Suggested Palettes** at the bottom of the dialog instead of setting each color by hand. The scale preview at the top of the dialog shows the new colors before you save.
### Color best practices
* Use distinct colors that are easy to differentiate at a glance
* Consider using a color gradient that reflects the assessment scale (e.g., green for strong support, red for hostile)
* Ensure colors have sufficient contrast for accessibility
* Keep colors consistent across your campaign materials
## Edit or delete your assessment codes
### Edit
1. Find the assessment code you want to change in the table. Click the **actions menu** (⋯) in the **Name** column and select **Edit**.
To recolor your whole scale at once, pick one of the **Suggested Palettes** at the bottom of the dialog instead of setting each color by hand. The scale preview at the top of the dialog shows the new colors before you save.
### Color best practices
* Use distinct colors that are easy to differentiate at a glance
* Consider using a color gradient that reflects the assessment scale (e.g., green for strong support, red for hostile)
* Ensure colors have sufficient contrast for accessibility
* Keep colors consistent across your campaign materials
## Edit or delete your assessment codes
### Edit
1. Find the assessment code you want to change in the table. Click the **actions menu** (⋯) in the **Name** column and select **Edit**.
 2. The **Edit assessments** dialog opens, showing your full scale as a row of colored discs at the top. The code you chose is selected — click any other disc to switch to that code, so you can edit several codes in one sitting.
3. Change the **label**, **number**, **color**, or **default** setting for each code you want to update. If you change a code's number, the dialog tells you how many contacts will receive the new number.
4. Click **Save changes**. All of your edits are saved at once, and you'll see a confirmation.
2. The **Edit assessments** dialog opens, showing your full scale as a row of colored discs at the top. The code you chose is selected — click any other disc to switch to that code, so you can edit several codes in one sitting.
3. Change the **label**, **number**, **color**, or **default** setting for each code you want to update. If you change a code's number, the dialog tells you how many contacts will receive the new number.
4. Click **Save changes**. All of your edits are saved at once, and you'll see a confirmation.
 ### Delete
1. Find the assessment code you want to remove. Click the **actions menu** (⋯) in the **Name** column and select **Delete**.
2. Confirm that you want to delete the assessment by clicking **OK** when prompted.
3. The assessment code will be removed from your project, and all contacts who were previously assigned that code will have no code (i.e. their assessment field will now be blank).
### Delete
1. Find the assessment code you want to remove. Click the **actions menu** (⋯) in the **Name** column and select **Delete**.
2. Confirm that you want to delete the assessment by clicking **OK** when prompted.
3. The assessment code will be removed from your project, and all contacts who were previously assigned that code will have no code (i.e. their assessment field will now be blank).