> ## Documentation Index
> Fetch the complete documentation index at: https://help.broadstripes.com/llms.txt
> Use this file to discover all available pages before exploring further.
# Tag lists
> Create, manage, and use tag lists to manually group contacts for tracking and organizing.
## Overview
Tag lists let you manually group contacts for any reason — people who go on break together, key targets for outreach, volunteers who handed out flyers last week, or any other ad-hoc grouping.
Once you create a tag list, you can open it at any time, add or remove members, share it with other users, or make it inactive when you're done.
## The tag lists table
Click **Lists** in the left navigation panel to open the tag lists page.
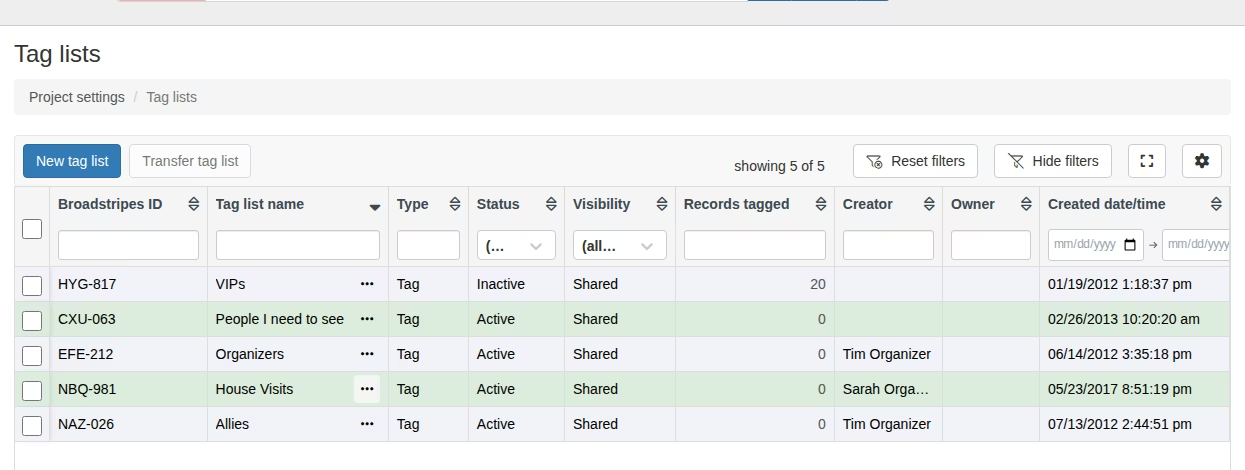 The table is an interactive data grid with sortable, filterable columns:
| Column | Description |
| --------------------- | -------------------------------------------------------------------------------- |
| **Broadstripes ID** | The list's unique identifier |
| **Tag list name** | The list name, with an **actions menu** (⋯) for Edit and Delete |
| **Type** | Always "Tag" for tag lists |
| **Status** | Active or Inactive — use the dropdown filter to show one or the other |
| **Visibility** | Shared (visible to all users) or Personal (visible only to the owner) |
| **Records tagged** | Number of contacts in the list — click the number to view them as search results |
| **Creator** | The user who created the list |
| **Owner** | The user who owns a personal list (blank for shared lists) |
| **Created date/time** | When the list was created |
The toolbar includes a **New tag list** button and a **Transfer tag list** button (enabled when you select one or more lists using the checkboxes).
## Create a tag list
1. On the tag lists page, click **New tag list**.
2. Fill in the form:
The table is an interactive data grid with sortable, filterable columns:
| Column | Description |
| --------------------- | -------------------------------------------------------------------------------- |
| **Broadstripes ID** | The list's unique identifier |
| **Tag list name** | The list name, with an **actions menu** (⋯) for Edit and Delete |
| **Type** | Always "Tag" for tag lists |
| **Status** | Active or Inactive — use the dropdown filter to show one or the other |
| **Visibility** | Shared (visible to all users) or Personal (visible only to the owner) |
| **Records tagged** | Number of contacts in the list — click the number to view them as search results |
| **Creator** | The user who created the list |
| **Owner** | The user who owns a personal list (blank for shared lists) |
| **Created date/time** | When the list was created |
The toolbar includes a **New tag list** button and a **Transfer tag list** button (enabled when you select one or more lists using the checkboxes).
## Create a tag list
1. On the tag lists page, click **New tag list**.
2. Fill in the form:
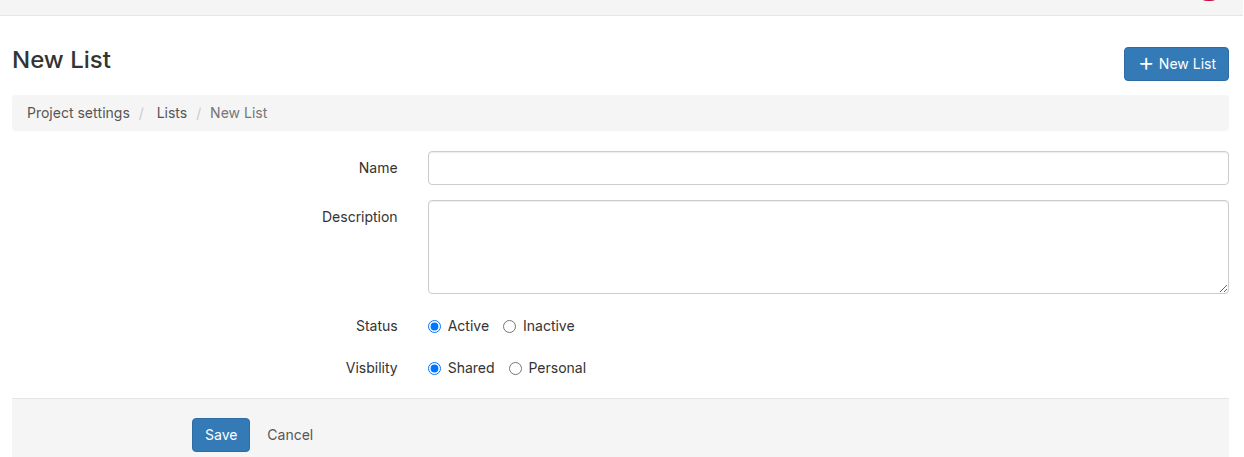 * **Name** — A descriptive name for the list.
* **Color** (Optional): Choose a badge color from the preset palette, or switch to the **Custom** tab to enter any hex code. Leave blank to derive the color automatically from the tag name.
* **Description** — Optional notes about the list's purpose.
* **Status** — **Active** (default) or **Inactive**.
* **Visibility** — **Shared** (visible to all project users) or **Personal** (visible only to you).
3. Click **Save**.
## Add or remove people
The most common way to add or remove people from a tag list is through bulk actions on search results. Search for the contacts you want, select them, and use the bulk action to add or remove them from a list.
See [Actions — Add to/Remove from list](/docs/viewing-search-results-and-edit/bulk-actions/bulk-actions-list) for step-by-step instructions.
## View list members
Click the number in the **Records tagged** column to view all contacts in the list. This opens a search results page filtered to show just the list's members.
From the search results, you can apply a layout to see the columns most useful to your work. See [Create and save a layout](/docs/customize/save-a-layout) for more on layouts.
## Search for a list
You can search for a list by typing `list = [name or ID]` into the search bar. This returns the contacts who are members of that list.
## Edit a tag list
1. Click the **actions menu** (⋯) next to the list name and select **Edit**.
* **Name** — A descriptive name for the list.
* **Color** (Optional): Choose a badge color from the preset palette, or switch to the **Custom** tab to enter any hex code. Leave blank to derive the color automatically from the tag name.
* **Description** — Optional notes about the list's purpose.
* **Status** — **Active** (default) or **Inactive**.
* **Visibility** — **Shared** (visible to all project users) or **Personal** (visible only to you).
3. Click **Save**.
## Add or remove people
The most common way to add or remove people from a tag list is through bulk actions on search results. Search for the contacts you want, select them, and use the bulk action to add or remove them from a list.
See [Actions — Add to/Remove from list](/docs/viewing-search-results-and-edit/bulk-actions/bulk-actions-list) for step-by-step instructions.
## View list members
Click the number in the **Records tagged** column to view all contacts in the list. This opens a search results page filtered to show just the list's members.
From the search results, you can apply a layout to see the columns most useful to your work. See [Create and save a layout](/docs/customize/save-a-layout) for more on layouts.
## Search for a list
You can search for a list by typing `list = [name or ID]` into the search bar. This returns the contacts who are members of that list.
## Edit a tag list
1. Click the **actions menu** (⋯) next to the list name and select **Edit**.
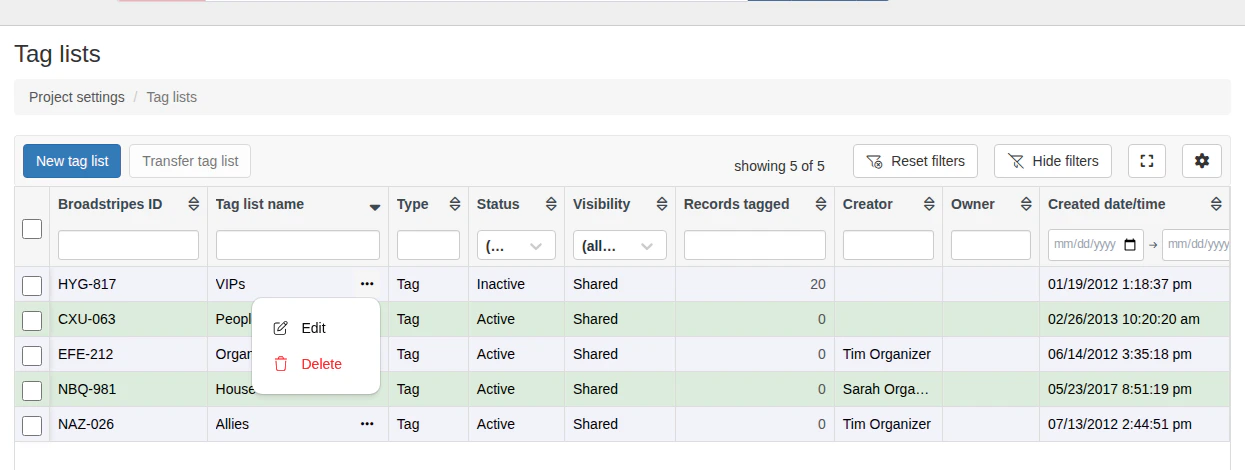 2. Update the name, color, description, status, or visibility as needed.
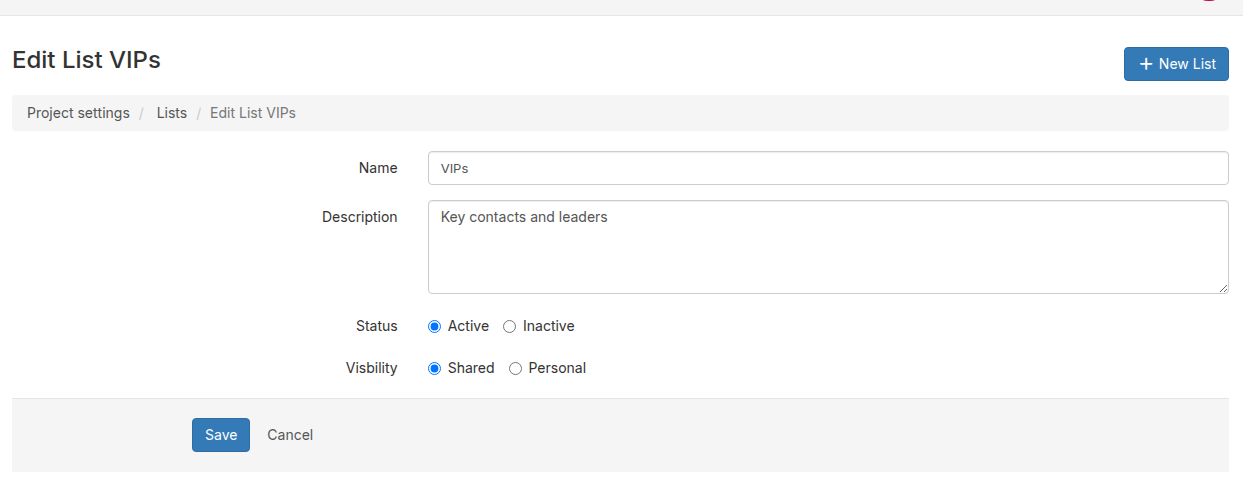 3. Click **Save**.
You can only change the visibility of lists you created. If you're editing a list created by another user, the visibility field shows a message instead of the Shared/Personal options.
## Make a tag list inactive
If a list is no longer useful for daily work, you can make it inactive rather than deleting it. Inactive lists are hidden from dropdown menus and navigation, but their members are preserved.
1. Click the **actions menu** (⋯) next to the list and select **Edit**.
2. Under **Status**, select **Inactive**.
3. Click **Save**.
To find inactive lists, use the **Status** column filter on the tag lists page and select **Inactive**. You can reactivate a list by editing it and changing the status back to **Active**.
## Transfer a tag list
You can transfer one or more tag lists to another user. The transferred list becomes a personal list owned by that user and disappears from your view.
1. Select the lists you want to transfer using the checkboxes.
2. Click the **Transfer tag list** button in the toolbar.
3. Search for and select the target user.
3. Click **Save**.
You can only change the visibility of lists you created. If you're editing a list created by another user, the visibility field shows a message instead of the Shared/Personal options.
## Make a tag list inactive
If a list is no longer useful for daily work, you can make it inactive rather than deleting it. Inactive lists are hidden from dropdown menus and navigation, but their members are preserved.
1. Click the **actions menu** (⋯) next to the list and select **Edit**.
2. Under **Status**, select **Inactive**.
3. Click **Save**.
To find inactive lists, use the **Status** column filter on the tag lists page and select **Inactive**. You can reactivate a list by editing it and changing the status back to **Active**.
## Transfer a tag list
You can transfer one or more tag lists to another user. The transferred list becomes a personal list owned by that user and disappears from your view.
1. Select the lists you want to transfer using the checkboxes.
2. Click the **Transfer tag list** button in the toolbar.
3. Search for and select the target user.
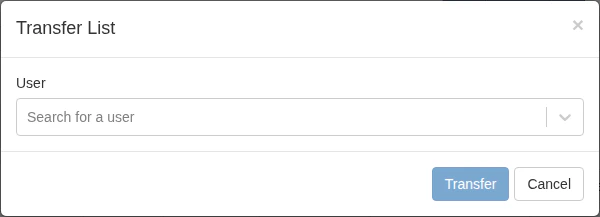 4. Click **Transfer**.
## Tag lists in search results
When a layout includes the **Tag lists** column, each row shows colored badge buttons for every tag list that person belongs to, grouped into **Personal lists** and **Shared lists** sections. Lists appear with the most recently assigned first.
### View a tag's details
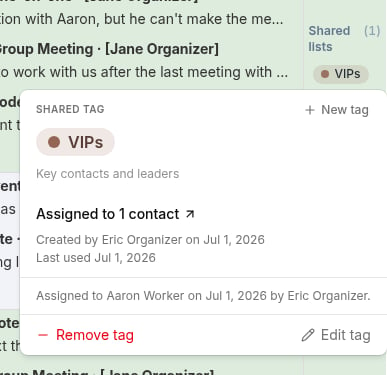
Click any tag badge to open a **summary card** for that tag. The card shows:
* How many contacts are currently assigned to the tag, with a link to view them in a new tab.
* When the tag was created and by whom, and when it was last used.
* When the tag was applied to this specific contact, and by whom (for assignments made after assigner tracking was introduced).
4. Click **Transfer**.
## Tag lists in search results
When a layout includes the **Tag lists** column, each row shows colored badge buttons for every tag list that person belongs to, grouped into **Personal lists** and **Shared lists** sections. Lists appear with the most recently assigned first.
### View a tag's details
Click any tag badge to open a **summary card** for that tag. The card shows:
* How many contacts are currently assigned to the tag, with a link to view them in a new tab.
* When the tag was created and by whom, and when it was last used.
* When the tag was applied to this specific contact, and by whom (for assignments made after assigner tracking was introduced).
 ### Add or remove tags from a contact
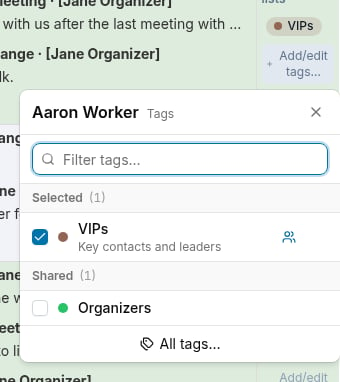
Users with edit permission see an **Add/edit tags...** button below the badges in each row. Clicking it opens the tag picker for that contact.
The tag picker groups tags into bands: **Selected** (already assigned), **Recently used** (your recent tags), **Personal** (your unassigned personal tags), and **Shared** (unassigned shared tags). Click a row to assign or unassign a tag. Type in the filter field to search by name.
### Add or remove tags from a contact
Users with edit permission see an **Add/edit tags...** button below the badges in each row. Clicking it opens the tag picker for that contact.
The tag picker groups tags into bands: **Selected** (already assigned), **Recently used** (your recent tags), **Personal** (your unassigned personal tags), and **Shared** (unassigned shared tags). Click a row to assign or unassign a tag. Type in the filter field to search by name.
 You can also remove a tag by clicking its badge to open the summary card, then clicking **Remove tag**. A confirmation toast with an **Undo** button appears so you can reverse the removal within a few seconds.
### Create a tag from search results
To create a new tag directly from the search results page:
* In the tag picker, type a name that does not match any existing tag and press **Enter**, or click the **Add...** row that appears below your typed text.
* In a badge's summary card, click **New tag** in the top corner.
Both paths open the tag editor where you set the tag's name, color, visibility, and description. After saving, the new tag is automatically assigned to the contact you opened it from.
### Edit a tag from search results
Click any tag badge to open its summary card, then click **Edit tag** (non-readonly users only). This opens the tag editor where you can update the tag's name, color, visibility, or description. Changes apply everywhere the tag appears.
### Expand or collapse badges in a row
If a person belongs to more than 12 lists, the cell shows the first 12 badges and a **+N more** button. Click **+N more** to reveal all badges for that row, then click **Show less** to collapse back.
### Expand or collapse all rows at once
The **Tag lists** column header includes two icon buttons:
* **Collapse all** — collapses every row to show only the first 12 badges.
* **Expand all** — expands every row to show all badges.
Your choice is saved so it persists when you reload the page. Individual rows can still be toggled independently after setting the column-wide default.
You can also remove a tag by clicking its badge to open the summary card, then clicking **Remove tag**. A confirmation toast with an **Undo** button appears so you can reverse the removal within a few seconds.
### Create a tag from search results
To create a new tag directly from the search results page:
* In the tag picker, type a name that does not match any existing tag and press **Enter**, or click the **Add...** row that appears below your typed text.
* In a badge's summary card, click **New tag** in the top corner.
Both paths open the tag editor where you set the tag's name, color, visibility, and description. After saving, the new tag is automatically assigned to the contact you opened it from.
### Edit a tag from search results
Click any tag badge to open its summary card, then click **Edit tag** (non-readonly users only). This opens the tag editor where you can update the tag's name, color, visibility, or description. Changes apply everywhere the tag appears.
### Expand or collapse badges in a row
If a person belongs to more than 12 lists, the cell shows the first 12 badges and a **+N more** button. Click **+N more** to reveal all badges for that row, then click **Show less** to collapse back.
### Expand or collapse all rows at once
The **Tag lists** column header includes two icon buttons:
* **Collapse all** — collapses every row to show only the first 12 badges.
* **Expand all** — expands every row to show all badges.
Your choice is saved so it persists when you reload the page. Individual rows can still be toggled independently after setting the column-wide default.
 ## Tag lists in the Quick view
The **Quick view** panel (opened by clicking the Quick view icon next to a contact's name in search results) includes a **Tags** section showing that contact's tag badges.
Users with edit permission see the **Tags** heading as a clickable button with a pencil icon (). Clicking it opens the full tag picker for that contact (the same picker as the **Add/edit tags...** button in the search results row). Readonly users see the tags but no edit affordances.
Clicking any tag badge in the Quick view opens the same summary card described in [View a tag's details](#view-a-tags-details) above, with the same **Remove tag**, **Edit tag**, and **New tag** actions available for users with edit permission.
## Delete a tag list
1. Click the **actions menu** (⋯) next to the list name and select **Delete**.
2. Confirm the deletion in the dialog that appears.
Deleting a tag list removes it permanently. The contacts themselves are not deleted, but the list cannot be recovered.
## Tag lists in the Quick view
The **Quick view** panel (opened by clicking the Quick view icon next to a contact's name in search results) includes a **Tags** section showing that contact's tag badges.
Users with edit permission see the **Tags** heading as a clickable button with a pencil icon (). Clicking it opens the full tag picker for that contact (the same picker as the **Add/edit tags...** button in the search results row). Readonly users see the tags but no edit affordances.
Clicking any tag badge in the Quick view opens the same summary card described in [View a tag's details](#view-a-tags-details) above, with the same **Remove tag**, **Edit tag**, and **New tag** actions available for users with edit permission.
## Delete a tag list
1. Click the **actions menu** (⋯) next to the list name and select **Delete**.
2. Confirm the deletion in the dialog that appears.
Deleting a tag list removes it permanently. The contacts themselves are not deleted, but the list cannot be recovered.