> ## Documentation Index
> Fetch the complete documentation index at: https://help.broadstripes.com/llms.txt
> Use this file to discover all available pages before exploring further.
# Standard fields tab
> Learn how to configure basic data fields for your public forms using the Standard fields tab
## Choosing the basic data fields for your form
It's possible to capture many different types of Broadstripes data using public forms. The **Standard fields** tab of the public form editor allows you to indicate which of your project's most common data items you want on your form.
By default, the **Standard fields** tab is open and visible when you first create a public form and each time you open it for editing after that. Let's look at what it offers.
## Understanding the Standard Fields Interface
The Standard fields tab has two panels:
**Left Panel - Available Fields**: Shows all fields you can add to your form, organized by category
**Right Panel - Selected Fields**: Shows fields you've added, in the order they'll appear on the form
## Step 1: Match existing records?
The first option you encounter on the Standard fields tab is a checkbox labeled **Attempt to match existing contact**.
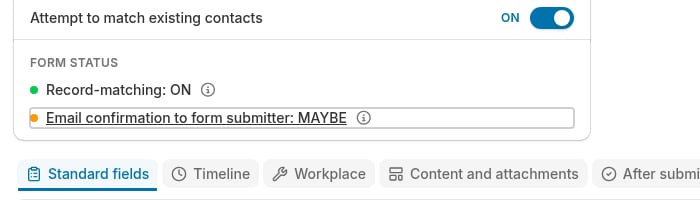 When enabled (recommended for most forms):
* Broadstripes searches for existing contacts with matching email and/or phone
* If found, updates the existing contact in place instead of creating a duplicate
* If not found, creates a new contact
* The name fields and at least one of the two contact info types must match for a record match to be found
* Name-matching is done using "fuzzy logic;" for example, "Thomas" will match "Tom" and "Tommy"
**How matched records are updated**
When Broadstripes finds a match, the matched contact is updated directly. The contact's existing Broadstripes ID, timeline history, and any references from other parts of the app (search results, reports, leadership relationships, etc.) are preserved.
* **Addresses, phone numbers, and emails** in the submission are deduplicated against the existing record. New values are added; values that already exist are not duplicated.
* **Custom field values** that already exist on the record are deduplicated against the submission. Multi-value fields gain new values from the submission; existing values are preserved.
* **Single-value fields** (for example, an assessment, a date custom field, or general notes) on the matched record are kept unless the form explicitly submits a new value, in which case the new submitted value is written in.
When disabled:
* Always creates a new contact
* May result in duplicates if someone submits multiple times
* Useful for event registrations where you want each submission tracked separately
## Step 2: Choose the basic data fields
Next, you can **select any fields** you want to appear on the public form by checking the box next to the field name in the left panel.
When enabled (recommended for most forms):
* Broadstripes searches for existing contacts with matching email and/or phone
* If found, updates the existing contact in place instead of creating a duplicate
* If not found, creates a new contact
* The name fields and at least one of the two contact info types must match for a record match to be found
* Name-matching is done using "fuzzy logic;" for example, "Thomas" will match "Tom" and "Tommy"
**How matched records are updated**
When Broadstripes finds a match, the matched contact is updated directly. The contact's existing Broadstripes ID, timeline history, and any references from other parts of the app (search results, reports, leadership relationships, etc.) are preserved.
* **Addresses, phone numbers, and emails** in the submission are deduplicated against the existing record. New values are added; values that already exist are not duplicated.
* **Custom field values** that already exist on the record are deduplicated against the submission. Multi-value fields gain new values from the submission; existing values are preserved.
* **Single-value fields** (for example, an assessment, a date custom field, or general notes) on the matched record are kept unless the form explicitly submits a new value, in which case the new submitted value is written in.
When disabled:
* Always creates a new contact
* May result in duplicates if someone submits multiple times
* Useful for event registrations where you want each submission tracked separately
## Step 2: Choose the basic data fields
Next, you can **select any fields** you want to appear on the public form by checking the box next to the field name in the left panel.
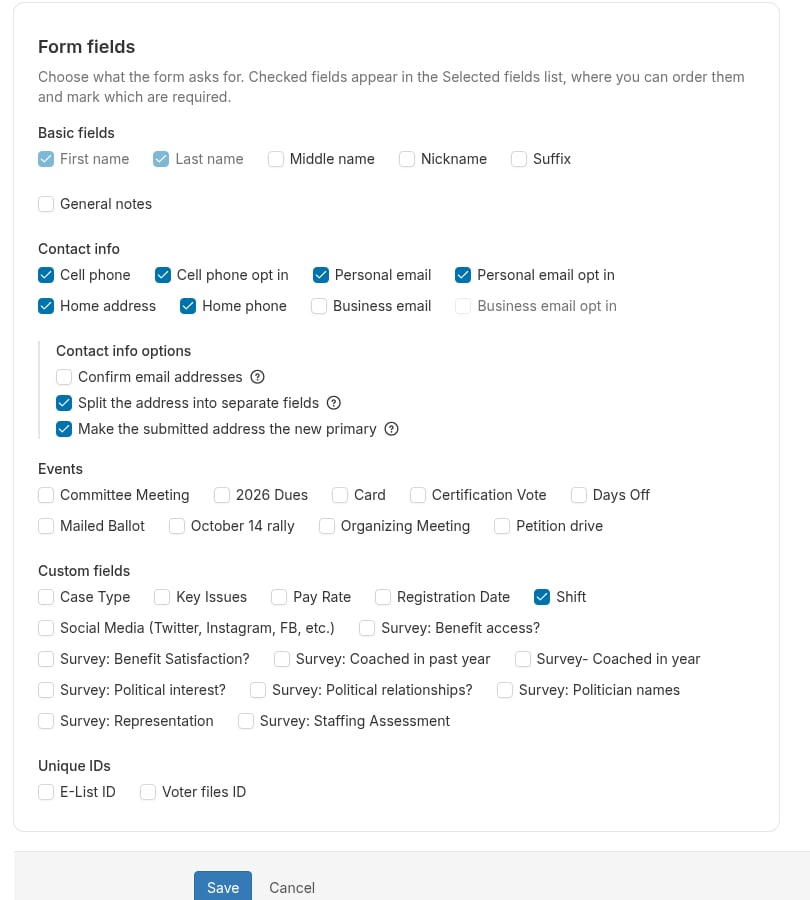 The fields are organized into categories:
### Basic Fields Category
These fields capture fundamental information about the contact.
#### For Person Forms
**First name**
* Worker's first (given) name
* Text input field
* Usually marked as required
**Last name**
* Worker's last (family) name
* Text input field
* Usually marked as required
**Middle name**
* Worker's middle name or initial
* Text input field
**Nickname**
* Preferred name or alias
* Text input field
**Suffix**
* Name suffix like Jr., Sr., III
* Text input field
**General notes**
* Free-form notes about the person
* Large text area
#### For Organization Forms
**Name**
* Organization's full name
* Text input field
* Usually marked as required
**Nickname**
* Abbreviated or informal name
* Text input field
**General notes**
* Free-form notes about the organization
* Large text area
### Contact Info Category
These fields collect contact information like phone numbers, email addresses, and physical addresses.
#### For Person Forms
**Cell phone**
* Mobile/cellular phone number
* Telephone input field
* Includes "Preferred phone" checkbox
**Cell phone opt in**
* Permission to send text messages
* Checkbox (checked by default)
* Text: "Opt in to receiving texts to this phone number"
**Personal email**
* Primary email address
* Email input field (validates email format)
* Most commonly used email field
**Personal email opt in**
* Permission to send emails
* Checkbox (checked by default)
* Text: "Opt in to receiving email to this email address"
**Home address**
* Residential mailing address
* Can display as single textarea OR split fields (see Contact Info Options below)
**Home phone**
* Landline/home telephone number
* Telephone input field
* Includes "Preferred phone" checkbox
**Business email**
* Work email address
* Email input field
* Includes confirmation option if enabled
**Business email opt in**
* Permission to send emails to work address
* Checkbox (checked by default)
#### For Organization Forms
**Business address**
* Organization's physical address
* Can display as single textarea OR split fields (see Contact Info Options below)
**Business cell phone**
* Organization's mobile phone
* Telephone input field
* Includes "Preferred phone" checkbox
**Business cell phone opt in**
* Permission to send texts
* Checkbox (checked by default)
**Business email**
* Organization's email address
* Email input field
**Business email opt in**
* Permission to send emails
* Checkbox (checked by default)
**Business phone**
* Organization's main phone line
* Telephone input field
* Includes "Preferred phone" checkbox
### Events Category
If your campaign has active events configured, they appear in this category. Each event becomes a field on the form.
**Single-choice events**:
* Display as radio buttons (user can select only one option)
* Example: "Which shift would you like?" with options for morning/afternoon/evening
**Multi-choice events**:
* Display as checkboxes (user can select multiple options)
* Example: "Which trainings are you interested in?" with multiple training options
To add an event to your form:
1. Check the box next to the event name
2. The event and all its steps will appear on the public form
3. When submitted, the contact's event status is updated automatically
### Custom Fields Category
Custom fields you've created for your campaign appear here. Only certain custom field types can be used in public forms:
**Supported custom field types**:
* **Text field**: Single-line text input (can be configured as Text, Number, or Date)
* **Text area**: Multi-line text input
* **Checkbox**: Yes/no checkbox
* **Select (dropdown)**: Choose one option from a list
* **Multiselect**: Choose multiple options from a list
* **Sortable list**: Drag-and-drop ranking of options
Custom fields display with their name or their "Long display name" (if configured) and behave according to their type.
The "Time of day" custom field type is NOT available for public forms and won't appear in this list. Custom fields marked "Editable by admins only" are also excluded from public forms.
### Unique IDs Category
External system identifiers configured for your campaign appear here.
**For Organization Forms**:
* **Broadstripes ID**: The unique identifier generated by Broadstripes
* Plus any external system IDs you've configured
**For Person Forms**:
* External system IDs only
These fields allow submitters to provide identifiers from other systems you use (payroll IDs, member numbers, etc.).
### Employment Settings Category
These fields are NOT directly visible in this section. They're configured in the **Workplace tab** (person forms only) but appear here for reference. See the [Workplace tab](./employment-tab) guide for details.
### Timeline Settings Category
These fields are NOT directly visible in this section. They're configured in the **Timeline tab** but appear here for reference. See the [Timeline Tab](./timeline-tab.md) guide for details.
## Step 3: Configure Contact Info Options
Below the Contact Info fields, you'll see **Contact info options** with three important checkboxes:
### Confirm email addresses
When any type of **email** is selected, you have the option of having recipients enter their email twice for accuracy by checking the **"Include email confirmation input?"** checkbox.
When enabled:
* A second input box appears below each email field
* The submitter must enter the email address twice
* Form validation checks that both entries match
* Reduces email typos but may frustrate users
When disabled:
* Single email input field
* Faster for users but higher risk of typos
**Recommendation**: Enable for critical campaigns where email accuracy is essential (NLRB elections, card signing, certification votes). Disable for general sign-ups where you can follow up if email bounces.
### Split the address into separate fields
When enabled:
* Address displays as four separate fields:
* Street address and unit
* City
* State
* Postal code
* All four fields are required if the address field is marked required
When disabled:
* Address displays as a single large text box
* User types the complete address in free-form
**Recommendation**: Enable split fields for most forms. This improves data quality and makes it easier for users on mobile devices. Disable only if your users need to enter addresses in non-standard formats.
### Make the submitted address the new primary
This option controls what happens when matching is enabled and the form submission matches an existing contact who already has a primary address.
When enabled (default):
* The address submitted with the form becomes the new primary address
* The existing primary address remains but is demoted to non-primary
* Useful when you want the most recent address to be primary
When disabled:
* The existing primary address stays primary
* The submitted address is added as a non-primary address
* Useful when the form address is temporary (like a campaign office) or less reliable than the existing data
This only affects MATCHED contacts. For new contacts, the submitted address always becomes primary regardless of this setting.
## Step 4: Set the order of the fields
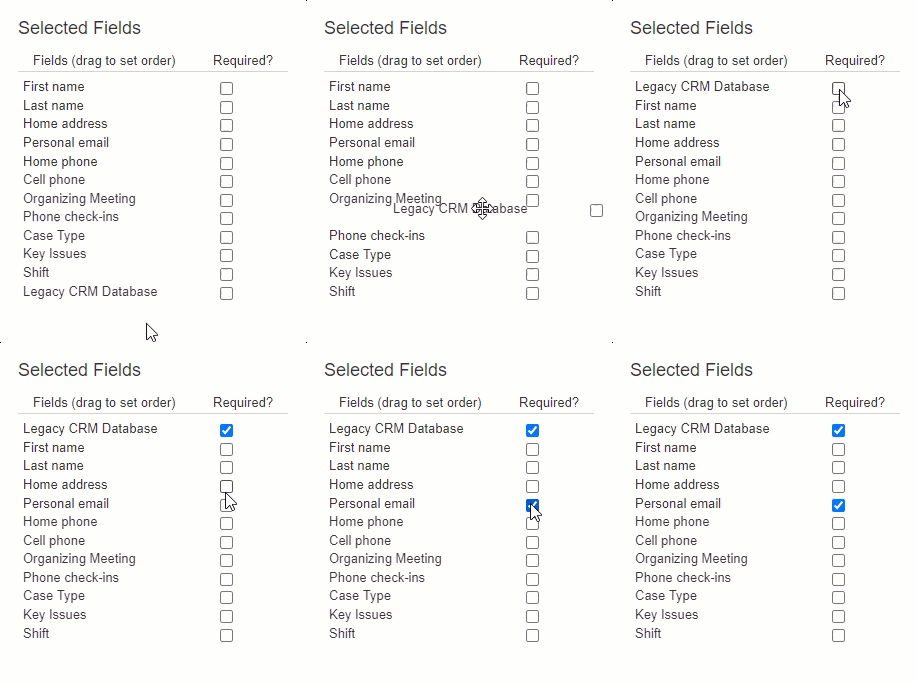
Whenever a field is checked, it will show up at the bottom of the **Selected fields** column on the right side of the page. Once fields are in the **Selected fields** column, you can drag and drop them to **reorder** their appearance on the form as in the animation below.
To reorder fields:
1. In the "Selected fields" panel (right side), click and drag a field
2. Drop it in the desired position
3. Fields appear on the public form in this exact order, top to bottom
The fields are organized into categories:
### Basic Fields Category
These fields capture fundamental information about the contact.
#### For Person Forms
**First name**
* Worker's first (given) name
* Text input field
* Usually marked as required
**Last name**
* Worker's last (family) name
* Text input field
* Usually marked as required
**Middle name**
* Worker's middle name or initial
* Text input field
**Nickname**
* Preferred name or alias
* Text input field
**Suffix**
* Name suffix like Jr., Sr., III
* Text input field
**General notes**
* Free-form notes about the person
* Large text area
#### For Organization Forms
**Name**
* Organization's full name
* Text input field
* Usually marked as required
**Nickname**
* Abbreviated or informal name
* Text input field
**General notes**
* Free-form notes about the organization
* Large text area
### Contact Info Category
These fields collect contact information like phone numbers, email addresses, and physical addresses.
#### For Person Forms
**Cell phone**
* Mobile/cellular phone number
* Telephone input field
* Includes "Preferred phone" checkbox
**Cell phone opt in**
* Permission to send text messages
* Checkbox (checked by default)
* Text: "Opt in to receiving texts to this phone number"
**Personal email**
* Primary email address
* Email input field (validates email format)
* Most commonly used email field
**Personal email opt in**
* Permission to send emails
* Checkbox (checked by default)
* Text: "Opt in to receiving email to this email address"
**Home address**
* Residential mailing address
* Can display as single textarea OR split fields (see Contact Info Options below)
**Home phone**
* Landline/home telephone number
* Telephone input field
* Includes "Preferred phone" checkbox
**Business email**
* Work email address
* Email input field
* Includes confirmation option if enabled
**Business email opt in**
* Permission to send emails to work address
* Checkbox (checked by default)
#### For Organization Forms
**Business address**
* Organization's physical address
* Can display as single textarea OR split fields (see Contact Info Options below)
**Business cell phone**
* Organization's mobile phone
* Telephone input field
* Includes "Preferred phone" checkbox
**Business cell phone opt in**
* Permission to send texts
* Checkbox (checked by default)
**Business email**
* Organization's email address
* Email input field
**Business email opt in**
* Permission to send emails
* Checkbox (checked by default)
**Business phone**
* Organization's main phone line
* Telephone input field
* Includes "Preferred phone" checkbox
### Events Category
If your campaign has active events configured, they appear in this category. Each event becomes a field on the form.
**Single-choice events**:
* Display as radio buttons (user can select only one option)
* Example: "Which shift would you like?" with options for morning/afternoon/evening
**Multi-choice events**:
* Display as checkboxes (user can select multiple options)
* Example: "Which trainings are you interested in?" with multiple training options
To add an event to your form:
1. Check the box next to the event name
2. The event and all its steps will appear on the public form
3. When submitted, the contact's event status is updated automatically
### Custom Fields Category
Custom fields you've created for your campaign appear here. Only certain custom field types can be used in public forms:
**Supported custom field types**:
* **Text field**: Single-line text input (can be configured as Text, Number, or Date)
* **Text area**: Multi-line text input
* **Checkbox**: Yes/no checkbox
* **Select (dropdown)**: Choose one option from a list
* **Multiselect**: Choose multiple options from a list
* **Sortable list**: Drag-and-drop ranking of options
Custom fields display with their name or their "Long display name" (if configured) and behave according to their type.
The "Time of day" custom field type is NOT available for public forms and won't appear in this list. Custom fields marked "Editable by admins only" are also excluded from public forms.
### Unique IDs Category
External system identifiers configured for your campaign appear here.
**For Organization Forms**:
* **Broadstripes ID**: The unique identifier generated by Broadstripes
* Plus any external system IDs you've configured
**For Person Forms**:
* External system IDs only
These fields allow submitters to provide identifiers from other systems you use (payroll IDs, member numbers, etc.).
### Employment Settings Category
These fields are NOT directly visible in this section. They're configured in the **Workplace tab** (person forms only) but appear here for reference. See the [Workplace tab](./employment-tab) guide for details.
### Timeline Settings Category
These fields are NOT directly visible in this section. They're configured in the **Timeline tab** but appear here for reference. See the [Timeline Tab](./timeline-tab.md) guide for details.
## Step 3: Configure Contact Info Options
Below the Contact Info fields, you'll see **Contact info options** with three important checkboxes:
### Confirm email addresses
When any type of **email** is selected, you have the option of having recipients enter their email twice for accuracy by checking the **"Include email confirmation input?"** checkbox.
When enabled:
* A second input box appears below each email field
* The submitter must enter the email address twice
* Form validation checks that both entries match
* Reduces email typos but may frustrate users
When disabled:
* Single email input field
* Faster for users but higher risk of typos
**Recommendation**: Enable for critical campaigns where email accuracy is essential (NLRB elections, card signing, certification votes). Disable for general sign-ups where you can follow up if email bounces.
### Split the address into separate fields
When enabled:
* Address displays as four separate fields:
* Street address and unit
* City
* State
* Postal code
* All four fields are required if the address field is marked required
When disabled:
* Address displays as a single large text box
* User types the complete address in free-form
**Recommendation**: Enable split fields for most forms. This improves data quality and makes it easier for users on mobile devices. Disable only if your users need to enter addresses in non-standard formats.
### Make the submitted address the new primary
This option controls what happens when matching is enabled and the form submission matches an existing contact who already has a primary address.
When enabled (default):
* The address submitted with the form becomes the new primary address
* The existing primary address remains but is demoted to non-primary
* Useful when you want the most recent address to be primary
When disabled:
* The existing primary address stays primary
* The submitted address is added as a non-primary address
* Useful when the form address is temporary (like a campaign office) or less reliable than the existing data
This only affects MATCHED contacts. For new contacts, the submitted address always becomes primary regardless of this setting.
## Step 4: Set the order of the fields
Whenever a field is checked, it will show up at the bottom of the **Selected fields** column on the right side of the page. Once fields are in the **Selected fields** column, you can drag and drop them to **reorder** their appearance on the form as in the animation below.
To reorder fields:
1. In the "Selected fields" panel (right side), click and drag a field
2. Drop it in the desired position
3. Fields appear on the public form in this exact order, top to bottom
 ## Step 5: Require specific fields
Check the **"Required?"** checkbox to indicate which fields will be required to complete a submission. If a user leaves a required field blank, they will receive a warning and will be prevented from submitting the form until the required field is completed.
To make a field required:
1. Find the field in the "Selected fields" panel (right side)
2. Check the **Required?** checkbox next to the field
3. Required fields must be filled out before the form can be submitted
4. Required fields display with an asterisk (\*) on the public form
Organizers often find that required fields prevent workers who don't know or don't want to share certain information from submitting forms. We often hear that, in the end, it's not worth it to require fields because you lose data you might otherwise receive. It's your choice — consider carefully.
## Step 6: Save your work
When you've selected all of the fields you want, click **Save.** This will close the form editor. To continue customizing your public form, click the edit link again on the contact type for your public form.
**NOTE:** Instead of clicking **Save**, you can simply move on to other tabs to make additional changes to the form. Clicking **Save** will preserve the changes from all tabs at once. Be careful to do so at least once before you stop editing the form or allow your Broadstripes session to time out.
## Best Practices for Field Selection
**Keep forms short**: Only ask for information you truly need. Long forms reduce completion rates.
**Mark truly required fields**: Every required field increases abandonment risk. Only mark fields as required if you absolutely need the information.
**Use logical order**: Group related fields together (name fields together, contact info together, etc.).
**Test your form**: Fill it out yourself on both desktop and mobile before sharing widely.
## Next Steps
The following articles discuss the functional details of each tab on the public form editor:
**Configure what information to collect:**
* [The "Timeline" tab](./timeline-tab/) - Create timeline entries for organizing interactions
* [The "Workplace" tab](./employment-tab/) - Collect employer/workplace information
**Customize appearance and communications:**
* [The "Content and attachments" tab](./form-content-tab/) - Add logo, header text, introduction, legal agreement, signature field, and file attachments
* [The "Confirmation email" tab](./email-tab/) - Set up confirmation emails with optional PDF attachments
**Configure after-submission options:**
* [The "After submission" tab](./other-options-tab/) - Set the confirmation message, event steps, contact types, and PDF settings
**Manage and share your form:**
* [Viewing and downloading public forms](./viewing-and-downloading-public-forms/) - Access the public URL, test the form, and track submissions
## Step 5: Require specific fields
Check the **"Required?"** checkbox to indicate which fields will be required to complete a submission. If a user leaves a required field blank, they will receive a warning and will be prevented from submitting the form until the required field is completed.
To make a field required:
1. Find the field in the "Selected fields" panel (right side)
2. Check the **Required?** checkbox next to the field
3. Required fields must be filled out before the form can be submitted
4. Required fields display with an asterisk (\*) on the public form
Organizers often find that required fields prevent workers who don't know or don't want to share certain information from submitting forms. We often hear that, in the end, it's not worth it to require fields because you lose data you might otherwise receive. It's your choice — consider carefully.
## Step 6: Save your work
When you've selected all of the fields you want, click **Save.** This will close the form editor. To continue customizing your public form, click the edit link again on the contact type for your public form.
**NOTE:** Instead of clicking **Save**, you can simply move on to other tabs to make additional changes to the form. Clicking **Save** will preserve the changes from all tabs at once. Be careful to do so at least once before you stop editing the form or allow your Broadstripes session to time out.
## Best Practices for Field Selection
**Keep forms short**: Only ask for information you truly need. Long forms reduce completion rates.
**Mark truly required fields**: Every required field increases abandonment risk. Only mark fields as required if you absolutely need the information.
**Use logical order**: Group related fields together (name fields together, contact info together, etc.).
**Test your form**: Fill it out yourself on both desktop and mobile before sharing widely.
## Next Steps
The following articles discuss the functional details of each tab on the public form editor:
**Configure what information to collect:**
* [The "Timeline" tab](./timeline-tab/) - Create timeline entries for organizing interactions
* [The "Workplace" tab](./employment-tab/) - Collect employer/workplace information
**Customize appearance and communications:**
* [The "Content and attachments" tab](./form-content-tab/) - Add logo, header text, introduction, legal agreement, signature field, and file attachments
* [The "Confirmation email" tab](./email-tab/) - Set up confirmation emails with optional PDF attachments
**Configure after-submission options:**
* [The "After submission" tab](./other-options-tab/) - Set the confirmation message, event steps, contact types, and PDF settings
**Manage and share your form:**
* [Viewing and downloading public forms](./viewing-and-downloading-public-forms/) - Access the public URL, test the form, and track submissions