> ## Documentation Index
> Fetch the complete documentation index at: https://help.broadstripes.com/llms.txt
> Use this file to discover all available pages before exploring further.
# Send email
> How to compose and send bulk email messages to contacts in Broadstripes, and track delivery status.
Broadstripes makes it easy to send a single email to multiple contacts at once. You can compose a rich HTML email or choose from a pre-built [email template](/docs/communications/creating-email-templates), personalize messages with dynamic [merge fields](/docs/communications/using-merge-fields), add attachments, and schedule delivery for later.
## Before you begin
* You need **permission to send bulk emails**. If you don't see the **Send email** option in the **Communications** menu, ask your admin to enable it.
* Contacts must have a valid email address that is [opted in](/docs/communications/email-messaging-opted-in-permissions) to receive email. Contacts without an opted-in email will be skipped.
* Your organization's email domain must be authenticated with the Broadstripes bulk email service. If you see a "Bulk email unavailable" message when you try to send, contact your Broadstripes administrator.
## Open the email drawer
1. Run a [search](/docs/getting-started/search-by-workplace) to find the contacts you want to email.
2. From the **Search Results** page, [select the contacts](/docs/viewing-search-results-and-edit/selecting-deselecting-contacts) you want to email. You can select up to 10,000 contacts at a time.
3. Open the **Communications** dropdown menu and select **Send email**.
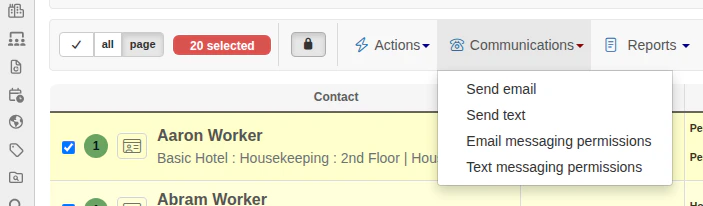 The **Send email** drawer opens from the right side of the screen. The header shows how many contacts are selected. You can minimize the drawer to a bottom bar at any time -- your draft is preserved while you continue working. Click the bar to restore the drawer, or click **Discard** in the bar to close the draft entirely.
## Compose your email
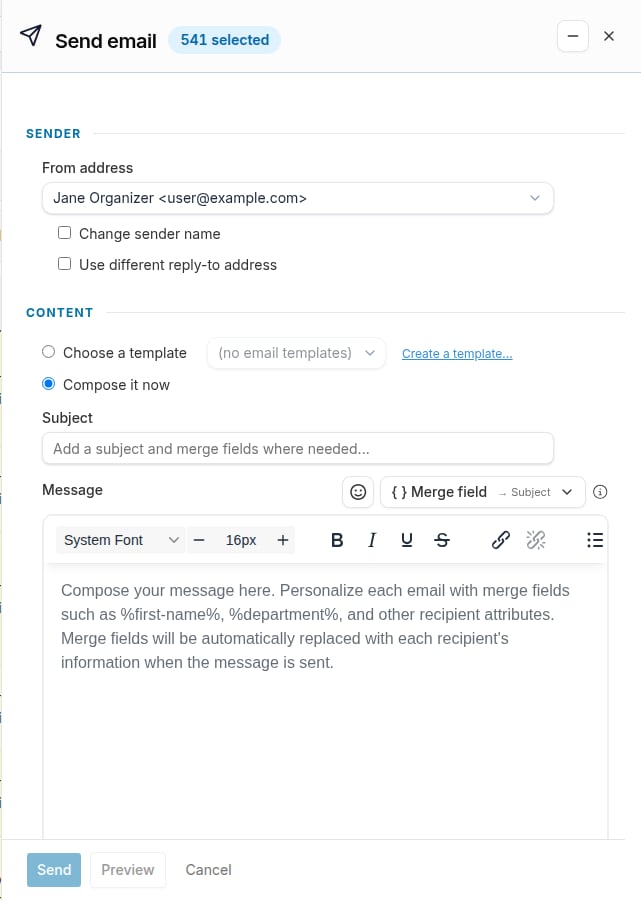
The email drawer has four sections: **Sender**, **Content**, **Attachments**, and **Schedule**.
The **Send email** drawer opens from the right side of the screen. The header shows how many contacts are selected. You can minimize the drawer to a bottom bar at any time -- your draft is preserved while you continue working. Click the bar to restore the drawer, or click **Discard** in the bar to close the draft entirely.
## Compose your email
The email drawer has four sections: **Sender**, **Content**, **Attachments**, and **Schedule**.
 ### Sender
* **From address** — Choose the email address that will appear as the sender. The dropdown includes your personal email and any project-level outgoing email addresses that have been set up by your admin.
* **Change sender name** — Check this box to override the sender display name for this message only.
* **Use different reply-to address** — Check this box to set a different email address for replies.
### Content
You have two options for composing your email content:
* **Choose a template** — Select a pre-built email template from the dropdown. Templates are created on the [Email Templates](/docs/communications/creating-email-templates) page and can include formatted content with merge fields already configured.
* **Compose it now** — Write a rich HTML email using a full-featured editor. This option gives you a **Subject** field and a **Message** editor with a formatting toolbar (bold, italic, font size, alignment, color, links, images, lists, tables, and more).
When composing with **Compose it now**, use the toolbar above the form to personalize each email:
* **{ } Merge field** — Opens a searchable picker to insert a dynamic merge field (such as "First name" or "Department") into the Subject or Message. A context label on the button shows which field the insertion will target based on where you last clicked. See [Using merge fields](/docs/communications/using-merge-fields) for details.
* **Emoji button** — Inserts an emoji at the last cursor position in the Subject or Message.
To preview how your email will look before sending, click **Preview**. The preview pane shows the rendered email with its subject, from address, recipient count, and your project's email footer. You can send directly from the preview pane.
### Attachments
Click **Add attachment** to attach files to your email. You can also drag and drop files onto the form or paste from your clipboard. The total size of all attachments must be 10 MB or less.
### Schedule
By default, your email is sent immediately when you click **Send**. To schedule it for a later time, expand the **Schedule** section and choose when to send:
* **One-time** — Pick a specific date and time.
* **Recurring** — Set up a repeating schedule. This option is only available when all contacts in your current search are selected.
**How scheduling affects recipients:**
* **One-time scheduled emails** lock in the recipients at the time of scheduling. The contacts who match your search at that moment are the ones who will receive the email.
* **Recurring emails** re-run your search each time the email is sent. Make sure your search criteria will continue to return the correct set of recipients.
## Preview your email
When composing an email directly (not using a template), you can preview how the message will look before sending it.
Click **Preview** at the bottom of the compose panel. The preview pane shows:
* How many contacts will receive the email (and how many are excluded)
* The **From** address and **Subject** line
* A rendered view of your message body, including the unsubscribe footer
From the preview pane, click **Send** to send immediately, or click **Edit** to return to the compose form. All your settings -- sender, schedule, and recipient address filter -- are preserved when you go back to edit.
**Preview** is only available when you compose the email directly. If you selected a template, use the template editor's built-in preview instead.
## Send the email
1. Review your email content and settings.
2. Click **Send** (or **Schedule** if you set a scheduled time).
3. A confirmation dialog appears showing how many contacts will receive the email. If any contacts in your selection don't have a valid opted-in email address, the dialog shows how many will be excluded.
4. Click **OK** to confirm. Broadstripes queues the email for delivery and displays a confirmation message.
## Limiting recipients by address type
Project admins can restrict bulk email so that only certain contact info types are eligible to receive it — for example, sending only to **personal email** addresses and excluding **business email**, or vice versa. This is useful when:
* A campaign should only contact members at home, not at work
* Your project keeps separate consent records for personal vs. business addresses
* You want to avoid emailing employer-controlled inboxes for sensitive organizing communications
When a recipient address-type restriction is in place, contacts with only an excluded address type are skipped during sending and counted in the **Not valid** column on the [Sent Email page](#view-sent-emails-and-delivery-stats), even if they are otherwise opted in.
Address-type eligibility is configured at the project level. Contact your Broadstripes administrator if you need a type added to or removed from the eligible list.
## View sent emails and delivery stats
After sending, you can track delivery status from the **Sent Email** page.
1. Navigate to the **Email** section by clicking the **Sent Email** tab in the left sidebar, or go to **Communications** in the navigation.
2. The **Sent Email** tab shows an interactive data grid with sortable, filterable columns.
### Sender
* **From address** — Choose the email address that will appear as the sender. The dropdown includes your personal email and any project-level outgoing email addresses that have been set up by your admin.
* **Change sender name** — Check this box to override the sender display name for this message only.
* **Use different reply-to address** — Check this box to set a different email address for replies.
### Content
You have two options for composing your email content:
* **Choose a template** — Select a pre-built email template from the dropdown. Templates are created on the [Email Templates](/docs/communications/creating-email-templates) page and can include formatted content with merge fields already configured.
* **Compose it now** — Write a rich HTML email using a full-featured editor. This option gives you a **Subject** field and a **Message** editor with a formatting toolbar (bold, italic, font size, alignment, color, links, images, lists, tables, and more).
When composing with **Compose it now**, use the toolbar above the form to personalize each email:
* **{ } Merge field** — Opens a searchable picker to insert a dynamic merge field (such as "First name" or "Department") into the Subject or Message. A context label on the button shows which field the insertion will target based on where you last clicked. See [Using merge fields](/docs/communications/using-merge-fields) for details.
* **Emoji button** — Inserts an emoji at the last cursor position in the Subject or Message.
To preview how your email will look before sending, click **Preview**. The preview pane shows the rendered email with its subject, from address, recipient count, and your project's email footer. You can send directly from the preview pane.
### Attachments
Click **Add attachment** to attach files to your email. You can also drag and drop files onto the form or paste from your clipboard. The total size of all attachments must be 10 MB or less.
### Schedule
By default, your email is sent immediately when you click **Send**. To schedule it for a later time, expand the **Schedule** section and choose when to send:
* **One-time** — Pick a specific date and time.
* **Recurring** — Set up a repeating schedule. This option is only available when all contacts in your current search are selected.
**How scheduling affects recipients:**
* **One-time scheduled emails** lock in the recipients at the time of scheduling. The contacts who match your search at that moment are the ones who will receive the email.
* **Recurring emails** re-run your search each time the email is sent. Make sure your search criteria will continue to return the correct set of recipients.
## Preview your email
When composing an email directly (not using a template), you can preview how the message will look before sending it.
Click **Preview** at the bottom of the compose panel. The preview pane shows:
* How many contacts will receive the email (and how many are excluded)
* The **From** address and **Subject** line
* A rendered view of your message body, including the unsubscribe footer
From the preview pane, click **Send** to send immediately, or click **Edit** to return to the compose form. All your settings -- sender, schedule, and recipient address filter -- are preserved when you go back to edit.
**Preview** is only available when you compose the email directly. If you selected a template, use the template editor's built-in preview instead.
## Send the email
1. Review your email content and settings.
2. Click **Send** (or **Schedule** if you set a scheduled time).
3. A confirmation dialog appears showing how many contacts will receive the email. If any contacts in your selection don't have a valid opted-in email address, the dialog shows how many will be excluded.
4. Click **OK** to confirm. Broadstripes queues the email for delivery and displays a confirmation message.
## Limiting recipients by address type
Project admins can restrict bulk email so that only certain contact info types are eligible to receive it — for example, sending only to **personal email** addresses and excluding **business email**, or vice versa. This is useful when:
* A campaign should only contact members at home, not at work
* Your project keeps separate consent records for personal vs. business addresses
* You want to avoid emailing employer-controlled inboxes for sensitive organizing communications
When a recipient address-type restriction is in place, contacts with only an excluded address type are skipped during sending and counted in the **Not valid** column on the [Sent Email page](#view-sent-emails-and-delivery-stats), even if they are otherwise opted in.
Address-type eligibility is configured at the project level. Contact your Broadstripes administrator if you need a type added to or removed from the eligible list.
## View sent emails and delivery stats
After sending, you can track delivery status from the **Sent Email** page.
1. Navigate to the **Email** section by clicking the **Sent Email** tab in the left sidebar, or go to **Communications** in the navigation.
2. The **Sent Email** tab shows an interactive data grid with sortable, filterable columns.
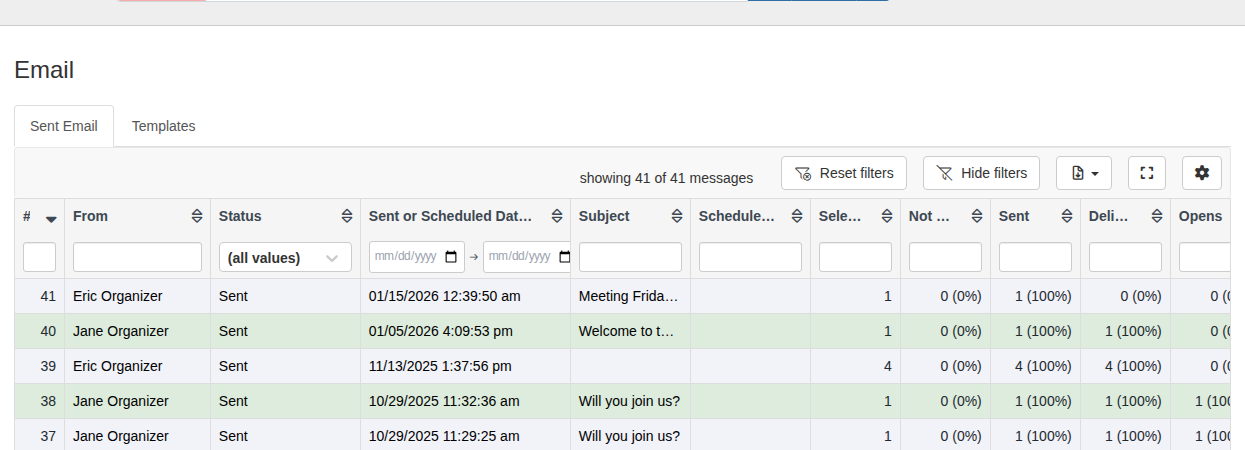 The table includes these columns:
| Column | Description |
| -------------------------- | --------------------------------------------------- |
| **#** | Sequential message number |
| **From** | The user who sent the email |
| **Status** | Current state: Sent, Queued, Scheduled, or Canceled |
| **Sent or Scheduled Date** | When the email was sent or is scheduled to send |
| **Subject** | The email subject line |
| **Selected** | How many contacts were selected |
| **Not valid** | How many contacts didn't have a valid email |
| **Sent** | How many emails were actually sent |
| **Delivered** | How many were confirmed delivered |
| **Opens** | How many recipients opened the email |
| **Clicks** | How many recipients clicked a link |
| **Spam** | How many were marked as spam |
| **Failed** | How many failed to deliver |
| **Unsubscribed** | How many recipients unsubscribed |
Each count in the table is a clickable link that opens a search showing those specific contacts.
### View message details
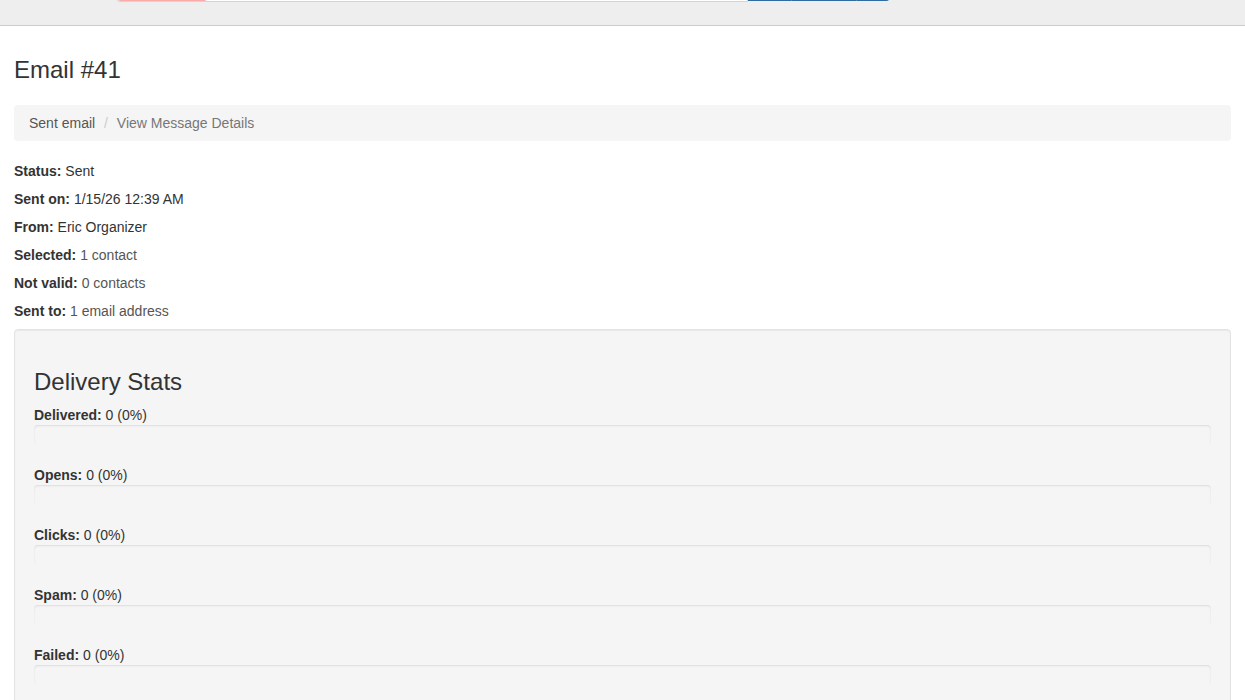
Click the **view** link in the **Actions** column to open the message detail page. This page shows:
* **Status** — The current delivery state, with the option to cancel a scheduled message.
* **Sent on** — The date and time the email was sent.
* **From** — The user who sent the email.
* **Selected / Not valid / Sent to** — Counts of contacts at each stage, with links to search results for each group.
* **Delivery Stats** — Progress bars showing Delivered, Opens, Clicks, Spam, and Failed counts with percentages. These stats update automatically.
* **Subject and Body** — A preview of the email content.
The table includes these columns:
| Column | Description |
| -------------------------- | --------------------------------------------------- |
| **#** | Sequential message number |
| **From** | The user who sent the email |
| **Status** | Current state: Sent, Queued, Scheduled, or Canceled |
| **Sent or Scheduled Date** | When the email was sent or is scheduled to send |
| **Subject** | The email subject line |
| **Selected** | How many contacts were selected |
| **Not valid** | How many contacts didn't have a valid email |
| **Sent** | How many emails were actually sent |
| **Delivered** | How many were confirmed delivered |
| **Opens** | How many recipients opened the email |
| **Clicks** | How many recipients clicked a link |
| **Spam** | How many were marked as spam |
| **Failed** | How many failed to deliver |
| **Unsubscribed** | How many recipients unsubscribed |
Each count in the table is a clickable link that opens a search showing those specific contacts.
### View message details
Click the **view** link in the **Actions** column to open the message detail page. This page shows:
* **Status** — The current delivery state, with the option to cancel a scheduled message.
* **Sent on** — The date and time the email was sent.
* **From** — The user who sent the email.
* **Selected / Not valid / Sent to** — Counts of contacts at each stage, with links to search results for each group.
* **Delivery Stats** — Progress bars showing Delivered, Opens, Clicks, Spam, and Failed counts with percentages. These stats update automatically.
* **Subject and Body** — A preview of the email content.
 ## Emails in a contact's timeline
When you send an email to a contact, it appears as an entry in their timeline. The entry shows the email subject, who sent it, when it was sent, and a delivery status icon. Click the entry to open the full email in a new tab.
## Emails in a contact's timeline
When you send an email to a contact, it appears as an entry in their timeline. The entry shows the email subject, who sent it, when it was sent, and a delivery status icon. Click the entry to open the full email in a new tab.