> ## Documentation Index
> Fetch the complete documentation index at: https://help.broadstripes.com/llms.txt
> Use this file to discover all available pages before exploring further.
# Creating email templates
## What Are Email Templates?
Email templates are pre-designed, reusable email messages that allow you to save time and maintain consistency when sending emails through Broadstripes. Instead of composing the same email repeatedly, you can create a template once and use it whenever needed.
**Benefits of using email templates:**
* Save time by reusing content for common communications
* Maintain consistent branding and messaging across your campaign
* Personalize emails with merge fields (like worker names and organizer information)
* Create professional, mobile-responsive email designs without HTML knowledge
* Easily update templates when your messaging needs to change
**Common use cases:**
* Welcome emails for new workers
* Event invitations and reminders
* Follow-up messages after organizing conversations
* Campaign updates and announcements
* Meeting reminders
## Accessing Email Templates
To view and manage your email templates:
1. Navigate to the **Email** page from the left navigation panel
2. Click on the **Templates** tab at the top of the page
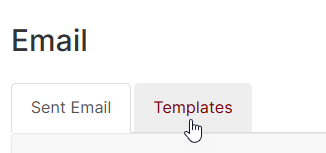 The Templates index page displays a table of all existing templates with the following information:
 * **#** - Template number (for easy reference)
* **Name** - The template's descriptive name
* **Subject** - The email subject line
* **Created/Updated** - When and by whom the template was created or last modified
* **Actions** - Options to edit, duplicate, or delete the template
## Creating an Email Template
### Step 1: Start a New Template
1. From the Templates page, click the **+ New\...** button in the upper left corner of the table
2. You'll be taken to the template editor
* **#** - Template number (for easy reference)
* **Name** - The template's descriptive name
* **Subject** - The email subject line
* **Created/Updated** - When and by whom the template was created or last modified
* **Actions** - Options to edit, duplicate, or delete the template
## Creating an Email Template
### Step 1: Start a New Template
1. From the Templates page, click the **+ New\...** button in the upper left corner of the table
2. You'll be taken to the template editor
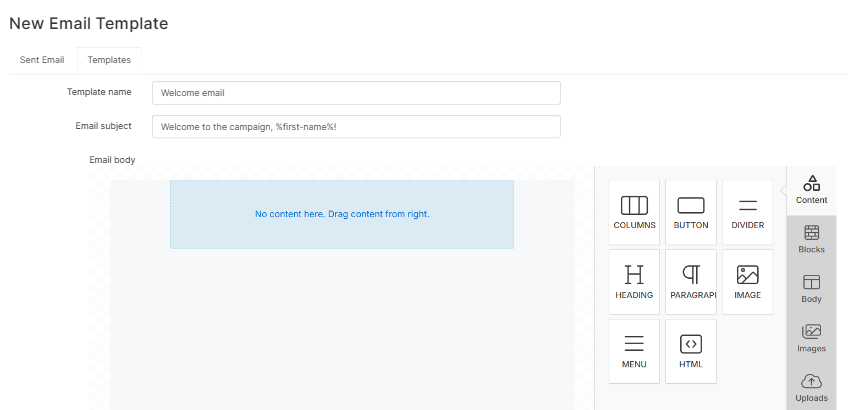 ### Step 2: Enter Basic Information
1. In the **Template name** field, enter a descriptive name for your template (e.g., "Welcome Email" or "Meeting Reminder")
* This name is only for your reference and won't be visible to email recipients
* Choose a name that clearly describes the template's purpose
2. In the **Email subject** field, enter the subject line that will appear in recipients' inboxes
* You can include merge fields in the subject (see section below)
* Example: `Welcome to the campaign, %first-name%!`
### Step 3: Design Your Email
The email body is created using a drag-and-drop visual editor. The editor appears below the template name and subject fields.
**To add content to your email:**
1. On the right side of the editor, you'll see content blocks including:
* **Paragraph** - Text blocks with formatting options
* **Heading** - Large text for section titles
* **Image** - Photos or graphics
* **Button** - Call-to-action buttons with links
* **Divider** - Horizontal lines to separate sections
2. Drag a content block from the right panel into the email canvas on the left
3. Click on the block you added to edit its content:
* For text blocks: Type directly in the editable area
* For images: Upload an image from your computer
* For buttons: Enter button text and the URL it should link to
4. Use the formatting toolbar to customize:
* Font size and color
* Bold, italic, or underline
* Alignment (left, center, right)
* Background colors
* Embed links
**Tips for designing effective emails:**
* Keep your message focused and concise
* Use headings to organize longer emails
* Include a clear call-to-action (what you want recipients to do)
* Test how your email looks by previewing it before saving or send yourself a test email
### Step 4: Add Merge Fields (Personalization)
Merge fields allow you to personalize each email with recipient-specific information. When you send the email, Broadstripes automatically replaces these placeholders with actual data for each recipient.
**To insert a merge field:**
1. Click where you want to insert the field in your text
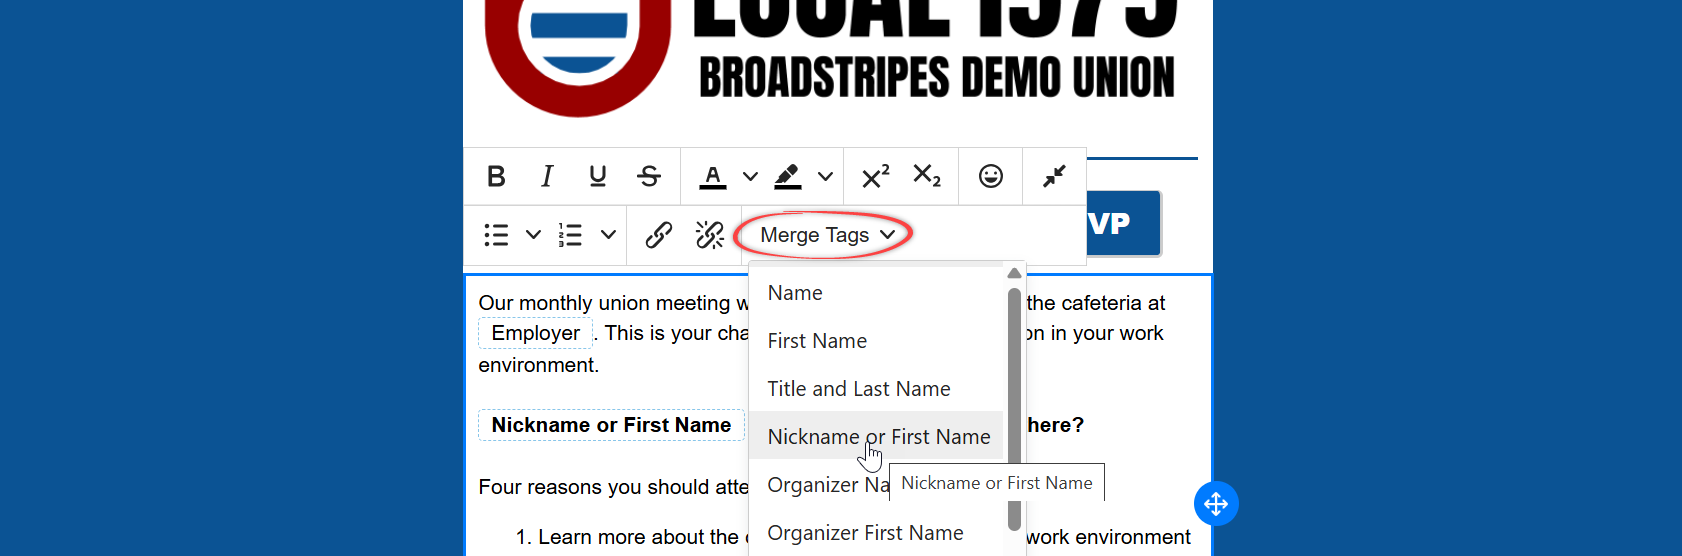
2. Click the **Merge Tags** menu button in the editor toolbar
3. Select the field you want from the dropdown menu
### Step 2: Enter Basic Information
1. In the **Template name** field, enter a descriptive name for your template (e.g., "Welcome Email" or "Meeting Reminder")
* This name is only for your reference and won't be visible to email recipients
* Choose a name that clearly describes the template's purpose
2. In the **Email subject** field, enter the subject line that will appear in recipients' inboxes
* You can include merge fields in the subject (see section below)
* Example: `Welcome to the campaign, %first-name%!`
### Step 3: Design Your Email
The email body is created using a drag-and-drop visual editor. The editor appears below the template name and subject fields.
**To add content to your email:**
1. On the right side of the editor, you'll see content blocks including:
* **Paragraph** - Text blocks with formatting options
* **Heading** - Large text for section titles
* **Image** - Photos or graphics
* **Button** - Call-to-action buttons with links
* **Divider** - Horizontal lines to separate sections
2. Drag a content block from the right panel into the email canvas on the left
3. Click on the block you added to edit its content:
* For text blocks: Type directly in the editable area
* For images: Upload an image from your computer
* For buttons: Enter button text and the URL it should link to
4. Use the formatting toolbar to customize:
* Font size and color
* Bold, italic, or underline
* Alignment (left, center, right)
* Background colors
* Embed links
**Tips for designing effective emails:**
* Keep your message focused and concise
* Use headings to organize longer emails
* Include a clear call-to-action (what you want recipients to do)
* Test how your email looks by previewing it before saving or send yourself a test email
### Step 4: Add Merge Fields (Personalization)
Merge fields allow you to personalize each email with recipient-specific information. When you send the email, Broadstripes automatically replaces these placeholders with actual data for each recipient.
**To insert a merge field:**
1. Click where you want to insert the field in your text
2. Click the **Merge Tags** menu button in the editor toolbar
3. Select the field you want from the dropdown menu
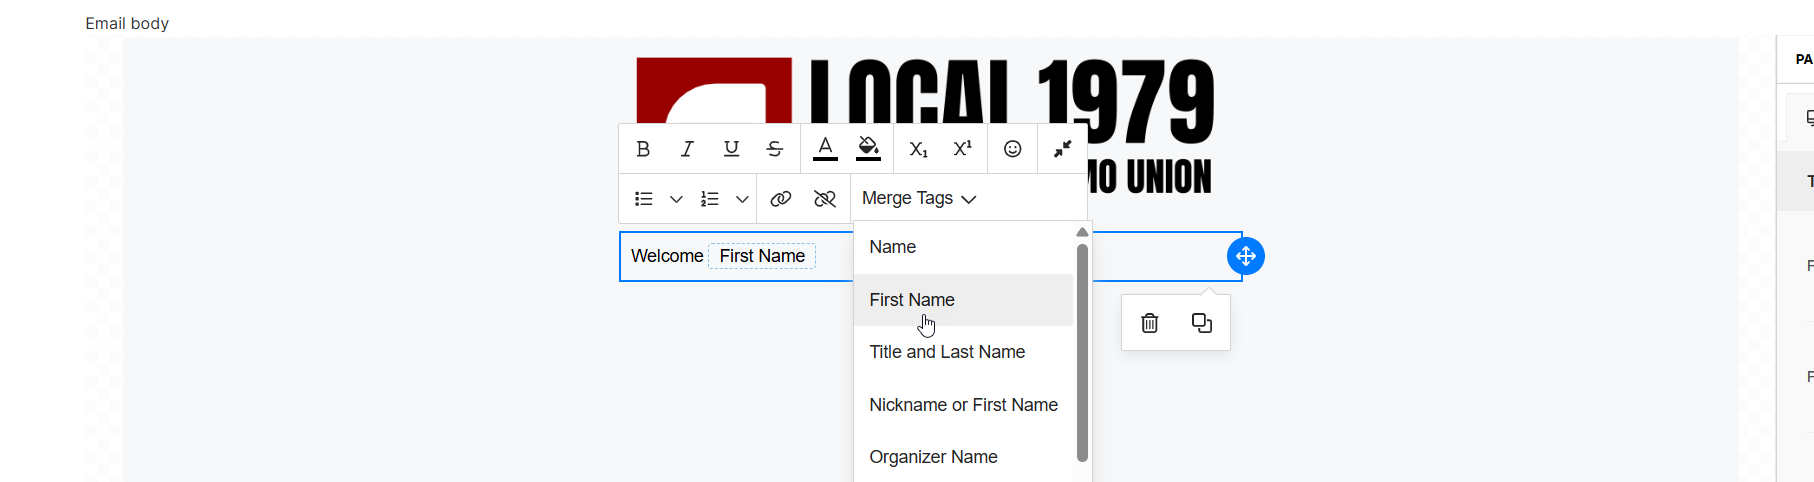 **Available merge fields:**
* **Name** - Full name of the recipient
* **First Name** - Recipient's first name
* **Nickname or First Name** - Uses nickname if available, otherwise first name
* **Title and Last Name** - Recipient's title (if available) and last name
* **Broadstripes ID** - Unique identifier for the recipient
* **Organizer Name** - Full name of the recipient's assigned organizer
* **Organizer First Name** - First name of assigned organizer
* **Department** - Recipient's department (if employment data exists)
* **Employer** - Recipient's employer organization
* **Sender Name** - Your full name (the person sending the email)
* **Sender First Name** - Your first name
* Custom fields specific to your project may also appear
**Example using merge fields:**
```
Subject: Hi %first-name%, let's talk about %employer%
Body:
Hi %first-name%,
My name is %sender-first-name% and I'm an organizer working with workers at %employer%.
I'd love to connect with you to discuss how we can improve conditions in %department%.
Can we set up a time to talk this week?
Thanks,
%sender-name%
```
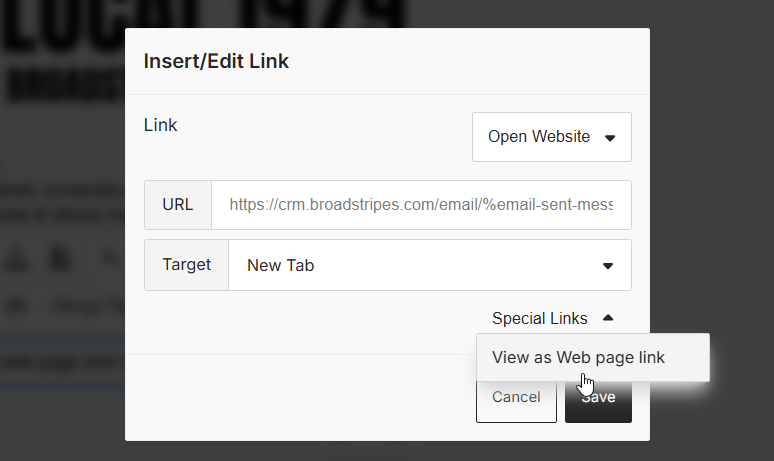
### Step 5: Add Special Links (Optional)
The editor provides pre-configured special links for common use cases:
1. Click the link icon in a text block or button
2. Select **View as Web page link** from the special links menu
3. This creates a link that allows recipients to view the email in their web browser
**Available merge fields:**
* **Name** - Full name of the recipient
* **First Name** - Recipient's first name
* **Nickname or First Name** - Uses nickname if available, otherwise first name
* **Title and Last Name** - Recipient's title (if available) and last name
* **Broadstripes ID** - Unique identifier for the recipient
* **Organizer Name** - Full name of the recipient's assigned organizer
* **Organizer First Name** - First name of assigned organizer
* **Department** - Recipient's department (if employment data exists)
* **Employer** - Recipient's employer organization
* **Sender Name** - Your full name (the person sending the email)
* **Sender First Name** - Your first name
* Custom fields specific to your project may also appear
**Example using merge fields:**
```
Subject: Hi %first-name%, let's talk about %employer%
Body:
Hi %first-name%,
My name is %sender-first-name% and I'm an organizer working with workers at %employer%.
I'd love to connect with you to discuss how we can improve conditions in %department%.
Can we set up a time to talk this week?
Thanks,
%sender-name%
```
### Step 5: Add Special Links (Optional)
The editor provides pre-configured special links for common use cases:
1. Click the link icon in a text block or button
2. Select **View as Web page link** from the special links menu
3. This creates a link that allows recipients to view the email in their web browser
 ### Step 6: Upload Images (Optional)
**To add an image to your email:**
1. Drag the **Image** content block into your email
2. Click on the image block to select it
3. Click **Upload image** to select an image from your computer
4. Supported formats: JPG, PNG, GIF
5. Maximum file size: 5 MB per image
**To reuse a previously uploaded image:**
1. Click on an image block
2. Select the **More images** menu then **Uploads**
3. Choose from images you've uploaded before
**Image best practices:**
* Use images that are already sized appropriately (avoid uploading very large files)
* Ensure images are relevant to your message
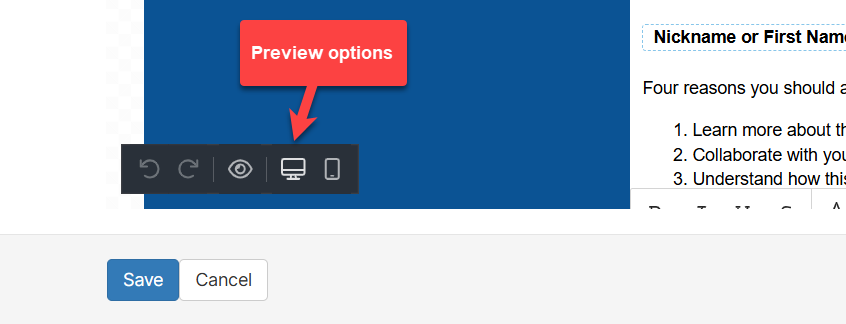
* Test how images appear on mobile devices. This can be done by clicking the preview and mobile buttons at the bottom of the editior.
### Step 6: Upload Images (Optional)
**To add an image to your email:**
1. Drag the **Image** content block into your email
2. Click on the image block to select it
3. Click **Upload image** to select an image from your computer
4. Supported formats: JPG, PNG, GIF
5. Maximum file size: 5 MB per image
**To reuse a previously uploaded image:**
1. Click on an image block
2. Select the **More images** menu then **Uploads**
3. Choose from images you've uploaded before
**Image best practices:**
* Use images that are already sized appropriately (avoid uploading very large files)
* Ensure images are relevant to your message
* Test how images appear on mobile devices. This can be done by clicking the preview and mobile buttons at the bottom of the editior.
 ### Step 7: Save Your Template
1. Click the **Save** button at the bottom of the page
2. You'll see a "Saved!" message confirming your template was created
3. Your template is now ready to use when sending emails
All fields (template name, subject, and body) are required. If you try to save without completing all fields, you'll see an error message indicating what needs to be filled in.
## Editing an Existing Template
To modify a template you've already created:
1. Navigate to the Templates index page
2. Find the template you want to edit in the table
3. In the **Actions** column, click the **edit** link
4. Make your changes to the template name, subject, or email body
5. Click **Save** to update the template
**Important:** Changes to a template do not affect emails that have already been sent. The updated template will only be used for new emails sent after the changes are saved.
## Duplicating a Template
If you want to create a new template based on an existing one:
1. On the Templates index page, find the template you want to copy
2. Click the **copy** link in the Actions column
3. A new template editor will open with the copied content
4. The template name will automatically be prefixed with "Copy of"
5. Modify the name, subject, and content as needed
6. Click **Save** to create the new template
This is useful when you want to create variations of similar emails without starting from scratch.
## Deleting a Template
To permanently remove a template:
1. From the Templates page, locate the template you want to delete
2. Click the **delete** link in the Actions column
3. Confirm the deletion in the popup dialog
4. The template will be removed immediately
**Warning:** Deleting a template cannot be undone. However, emails that were previously sent using this template will not be affected.
## Using Templates When Sending Emails
Once you've created templates, you can use them when sending emails to workers:
**From the Search Page**
1. Search for and select the workers you want to email
2. Click the **Communications** menu at the top of the search results
3. Select **Send Email**
4. In the "Content" section, you'll see two options:
* **Choose a template** - Select from your existing templates
* **Compose it now** - Write a one-time email without using a template
5. Select **Choose a template** and pick your desired template from the dropdown menu
6. The template's subject and content will be used for your email
7. Complete the sender information and any other required fields
8. Click **Send** to deliver the email
**When using a template:**
* You cannot modify the subject or content during sending (you must edit the template itself if changes are needed)
* Merge fields will be automatically replaced with each recipient's information
* All formatting and images from the template will be preserved
## Understanding Merge Fields
Merge fields (also called merge tags) are placeholders that get replaced with actual data when emails are sent. They always appear in the format `%field-name%`.
**How Merge Fields Work**
1. **In the template editor:** You insert merge fields where you want personalized information
2. **When you send the email:** Broadstripes looks at each recipient's data
3. **In the delivered email:** Each recipient sees their own personalized information
You may add merge fields manually by typing them in, but they must be in the format `%field-name%`.
You can also add merge fields using the **Merge Tags** dropdown menu in the formatting toolbar in the editor.
### Step 7: Save Your Template
1. Click the **Save** button at the bottom of the page
2. You'll see a "Saved!" message confirming your template was created
3. Your template is now ready to use when sending emails
All fields (template name, subject, and body) are required. If you try to save without completing all fields, you'll see an error message indicating what needs to be filled in.
## Editing an Existing Template
To modify a template you've already created:
1. Navigate to the Templates index page
2. Find the template you want to edit in the table
3. In the **Actions** column, click the **edit** link
4. Make your changes to the template name, subject, or email body
5. Click **Save** to update the template
**Important:** Changes to a template do not affect emails that have already been sent. The updated template will only be used for new emails sent after the changes are saved.
## Duplicating a Template
If you want to create a new template based on an existing one:
1. On the Templates index page, find the template you want to copy
2. Click the **copy** link in the Actions column
3. A new template editor will open with the copied content
4. The template name will automatically be prefixed with "Copy of"
5. Modify the name, subject, and content as needed
6. Click **Save** to create the new template
This is useful when you want to create variations of similar emails without starting from scratch.
## Deleting a Template
To permanently remove a template:
1. From the Templates page, locate the template you want to delete
2. Click the **delete** link in the Actions column
3. Confirm the deletion in the popup dialog
4. The template will be removed immediately
**Warning:** Deleting a template cannot be undone. However, emails that were previously sent using this template will not be affected.
## Using Templates When Sending Emails
Once you've created templates, you can use them when sending emails to workers:
**From the Search Page**
1. Search for and select the workers you want to email
2. Click the **Communications** menu at the top of the search results
3. Select **Send Email**
4. In the "Content" section, you'll see two options:
* **Choose a template** - Select from your existing templates
* **Compose it now** - Write a one-time email without using a template
5. Select **Choose a template** and pick your desired template from the dropdown menu
6. The template's subject and content will be used for your email
7. Complete the sender information and any other required fields
8. Click **Send** to deliver the email
**When using a template:**
* You cannot modify the subject or content during sending (you must edit the template itself if changes are needed)
* Merge fields will be automatically replaced with each recipient's information
* All formatting and images from the template will be preserved
## Understanding Merge Fields
Merge fields (also called merge tags) are placeholders that get replaced with actual data when emails are sent. They always appear in the format `%field-name%`.
**How Merge Fields Work**
1. **In the template editor:** You insert merge fields where you want personalized information
2. **When you send the email:** Broadstripes looks at each recipient's data
3. **In the delivered email:** Each recipient sees their own personalized information
You may add merge fields manually by typing them in, but they must be in the format `%field-name%`.
You can also add merge fields using the **Merge Tags** dropdown menu in the formatting toolbar in the editor.
 For more info on merge fields, see the [Using merge Fields](/docs/communications/using-merge-fields) page.
## Best Practices for Email Templates
**Template Organization**
* **Use clear, descriptive names** - "New Hire Welcome" is better than "Template 1"
* **Create templates for common scenarios** - Identify emails you send frequently
* **Keep templates focused** - One template per purpose rather than trying to fit multiple uses into one
* **Review templates regularly** - Update outdated information or messaging
**Writing Effective Email Content**
* **Start with a personal greeting** - Use `%first-name%` or `%nickname-or-first-name%`
* **Get to the point quickly** - Recipients often skim emails, so lead with your main message
* **Include a clear call-to-action** - Tell recipients exactly what you want them to do
* **Keep paragraphs short** - Long blocks of text are hard to read on mobile devices
* **Use formatting strategically** - Bold important points, but don't overdo it
* **Proofread carefully** - Templates will be used multiple times, so errors multiply
**Subject Line Tips**
* **Be specific and descriptive** - "Action needed: Vote on contract proposal" is better than "Important message"
* **Use merge fields thoughtfully** - Personalized subjects can improve open rates
* **Keep it concise** - Aim for 50 characters or less for mobile visibility
* **Avoid spam triggers** - Don't use all caps or excessive exclamation points
**Design Considerations**
* **Mobile-first approach** - Most recipients will read on their phones
* **Use a single-column layout** - Easier to read on small screens
* **Make buttons large enough** - At least 44x44 pixels for easy tapping
* **Limit images** - Too many images can slow loading or be blocked
* **Test before using** - Send yourself a test email to check formatting
**Personalization Strategy**
* **Balance personalization with clarity** - Don't overuse merge fields to the point where text feels unnatural
* **Consider what data is available** - Merge fields only work if the data exists in worker records
* **Use organizer fields strategically** - Helps build the personal connection in organizing work
## Troubleshooting Common Issues
**Template won't save**
**Problem:** Clicking Save shows an error message.
**Solutions:**
* Ensure all required fields are filled in (template name, email subject, and email body)
* Check that the template name is unique (no other template has the same name)
* Verify you've added at least one content block to the email body
* If the error persists, try refreshing the page and recreating the template
***
**Merge fields not working**
**Problem:** Merge fields appear as `%field-name%` in sent emails instead of actual data.
**Solutions:**
* This typically means the recipient's record is missing that data
* Check a few recipient records to verify the data exists
* The issue may only affect some recipients, not all
***
**Images not displaying**
**Problem:** Images don't appear in the email editor or sent emails.
**Solutions:**
* Check that the image file is under 5 MB
* Verify the image format is JPG, PNG, or GIF
* Try uploading the image again
* Check your internet connection (images are uploaded to cloud storage)
* Some email clients block images by default - recipients may need to "show images"
***
**Template name error when saving**
**Problem:** Error says template name already exists.
**Solutions:**
* Another template in your campaign has the same name
* Choose a different, unique name
* Template names are case-insensitive, so "Welcome Email" and "welcome email" are considered duplicates
***
**Editor not loading**
**Problem:** The email editor doesn't appear or shows a blank screen.
**Solutions:**
* Refresh the page
* Clear your browser cache
* Try a different browser (Chrome, Firefox, or Safari recommended)
* Check that JavaScript is enabled in your browser
* Disable browser extensions that might interfere (ad blockers, privacy tools)
***
**Can't edit template content during email sending**
**Problem:** Want to modify the template's content when sending an email.
**Solution:**
* By design, templates cannot be modified during the sending process
* If you need to make changes:
* Cancel the email sending process
* Go back to the Templates page
* Edit the template and save your changes
* Return to sending the email
* Alternatively, choose "Compose it now" instead of using a template if you need a one-time custom message
***
**Template looks different on mobile**
**Problem:** Template formatting appears different on phones than on desktop.
**Solutions:**
* This is normal - the editor automatically makes templates mobile-responsive
* Test by sending yourself an email and viewing on your phone
* Use the editor's preview mode to see mobile layout
* Simplify complex layouts that don't translate well to mobile
* Avoid narrow columns or small text sizes
***
## Permission Requirements
To work with email templates, you need:
* **Mass Email feature enabled** for your project
* **Can send bulk emails** permission enabled on your project membership
For more info on merge fields, see the [Using merge Fields](/docs/communications/using-merge-fields) page.
## Best Practices for Email Templates
**Template Organization**
* **Use clear, descriptive names** - "New Hire Welcome" is better than "Template 1"
* **Create templates for common scenarios** - Identify emails you send frequently
* **Keep templates focused** - One template per purpose rather than trying to fit multiple uses into one
* **Review templates regularly** - Update outdated information or messaging
**Writing Effective Email Content**
* **Start with a personal greeting** - Use `%first-name%` or `%nickname-or-first-name%`
* **Get to the point quickly** - Recipients often skim emails, so lead with your main message
* **Include a clear call-to-action** - Tell recipients exactly what you want them to do
* **Keep paragraphs short** - Long blocks of text are hard to read on mobile devices
* **Use formatting strategically** - Bold important points, but don't overdo it
* **Proofread carefully** - Templates will be used multiple times, so errors multiply
**Subject Line Tips**
* **Be specific and descriptive** - "Action needed: Vote on contract proposal" is better than "Important message"
* **Use merge fields thoughtfully** - Personalized subjects can improve open rates
* **Keep it concise** - Aim for 50 characters or less for mobile visibility
* **Avoid spam triggers** - Don't use all caps or excessive exclamation points
**Design Considerations**
* **Mobile-first approach** - Most recipients will read on their phones
* **Use a single-column layout** - Easier to read on small screens
* **Make buttons large enough** - At least 44x44 pixels for easy tapping
* **Limit images** - Too many images can slow loading or be blocked
* **Test before using** - Send yourself a test email to check formatting
**Personalization Strategy**
* **Balance personalization with clarity** - Don't overuse merge fields to the point where text feels unnatural
* **Consider what data is available** - Merge fields only work if the data exists in worker records
* **Use organizer fields strategically** - Helps build the personal connection in organizing work
## Troubleshooting Common Issues
**Template won't save**
**Problem:** Clicking Save shows an error message.
**Solutions:**
* Ensure all required fields are filled in (template name, email subject, and email body)
* Check that the template name is unique (no other template has the same name)
* Verify you've added at least one content block to the email body
* If the error persists, try refreshing the page and recreating the template
***
**Merge fields not working**
**Problem:** Merge fields appear as `%field-name%` in sent emails instead of actual data.
**Solutions:**
* This typically means the recipient's record is missing that data
* Check a few recipient records to verify the data exists
* The issue may only affect some recipients, not all
***
**Images not displaying**
**Problem:** Images don't appear in the email editor or sent emails.
**Solutions:**
* Check that the image file is under 5 MB
* Verify the image format is JPG, PNG, or GIF
* Try uploading the image again
* Check your internet connection (images are uploaded to cloud storage)
* Some email clients block images by default - recipients may need to "show images"
***
**Template name error when saving**
**Problem:** Error says template name already exists.
**Solutions:**
* Another template in your campaign has the same name
* Choose a different, unique name
* Template names are case-insensitive, so "Welcome Email" and "welcome email" are considered duplicates
***
**Editor not loading**
**Problem:** The email editor doesn't appear or shows a blank screen.
**Solutions:**
* Refresh the page
* Clear your browser cache
* Try a different browser (Chrome, Firefox, or Safari recommended)
* Check that JavaScript is enabled in your browser
* Disable browser extensions that might interfere (ad blockers, privacy tools)
***
**Can't edit template content during email sending**
**Problem:** Want to modify the template's content when sending an email.
**Solution:**
* By design, templates cannot be modified during the sending process
* If you need to make changes:
* Cancel the email sending process
* Go back to the Templates page
* Edit the template and save your changes
* Return to sending the email
* Alternatively, choose "Compose it now" instead of using a template if you need a one-time custom message
***
**Template looks different on mobile**
**Problem:** Template formatting appears different on phones than on desktop.
**Solutions:**
* This is normal - the editor automatically makes templates mobile-responsive
* Test by sending yourself an email and viewing on your phone
* Use the editor's preview mode to see mobile layout
* Simplify complex layouts that don't translate well to mobile
* Avoid narrow columns or small text sizes
***
## Permission Requirements
To work with email templates, you need:
* **Mass Email feature enabled** for your project
* **Can send bulk emails** permission enabled on your project membership