> ## Documentation Index
> Fetch the complete documentation index at: https://help.broadstripes.com/llms.txt
> Use this file to discover all available pages before exploring further.
# Record your organizing info (data entry)
> Learn how to record organizing information like check-offs, assessments, notes, and contact timeline entries in Broadstripes.
## Overview
When you join an organizing project, you'll use Broadstripes to record organizing information as you collect it. You won't need to go to a special data-entry screen — you can update any records you see on-screen at any time.
This article walks you through recording a range of organizing information for contact records that *already exist in Broadstripes:*
* [Check-offs](#record-a-check-off)
* [Assessments](#record-an-assessment)
* [Detailed information about a contact or conversation](#record-a-detailed-conversation)
* [Notes and contact timeline entries](#using-notes-and-contact-timeline-entries)
Entering a *new* person or *new* organization in Broadstripes will be covered in another article.
## Get started - run a search and apply a layout
Recording information is always easiest if you aren't wading through unnecessary pages and fields just to get to the things that are pertinent to your work. That's where searches and layouts come in. Broadstripes' searches and layouts work together to provide a completely customized, spreadsheet-style interface to your organizing data.
A **search** filters the contacts that are displayed by the criteria you choose, while a **layout** determines which data columns are displayed for those contacts.
Most users find it easiest to record info like this:
1. **Run a search** to display just the records you want to work with. You can [search by workplace](/docs/getting-started/search-by-workplace) or, for custom searches, [create and save a search](/docs/search/save-and-share-searches).
2. [**Apply a layout**](/docs/getting-started/choose-a-layout) to display the exact information (contact information, assessments, events, etc.) that you plan to record or update for those records.
Once you have the records you want to work with on-screen, you can start recording your organizing information right away.
## Record a check-off
The simplest type of organizing information that Broadstripes can record is a **check-off**. Check-offs are easy and incredibly versatile for all types of organizing. Some examples of what to do with a check-off:
* Turn out members to an event
* Record whether someone has signed a union card
* Track petition signatures
* Track meeting attendance
* Track one-on-one meetings
Check-offs are often considered a **step** in one of the custom **events** that have been set up for your project, and can be added to any saved layout. If you're joining an existing project, there should already be **events, event steps,** and **layouts** created for your project. If that's not the case, you can talk with your project administrator or learn about creating them in the [Create and save a layout](/docs/customize/save-a-layout) and [Create an event](/docs/customize/create-events-to-track-goals) articles.
## Record an assessment
**Assessments** are an essential tool for keeping track of who has been organized on a push or idea.
Assessments are good for keeping track of opinions rather than more concrete data points. With assessments, this is done using a numeric assessment scale, with 1 indicating strong support, and the highest number in the scale (usually 5) indicating hostility. Assessments are more nuanced than event steps because they require you to assign each worker a numeric ranking along a continuum rather than show their support with a simple yes/no checkbox.
Some examples of how to use assessments include:
* Recording what workers think about a union (for instance, during a card check)
* Keeping track of worker approval of a contract draft
* Tracking worker political opinions during election season
Recording assessments can also be very useful for creating targeted lists of workers:
* If you want to reconfirm all your "lean yeses" for a dues vote, you could create a list of only those workers who are a "2 - Leaning union."
* If you didn't want to waste your time convincing those who strongly oppose, but wanted to talk to everyone else, you could create a list of everyone *except* "5 - Hostile."
### How to record an assessment from search results
Make sure your current layout includes the assessment column (your admin may have already set this up). Then:
1. Locate the worker's row in the search results. In the assessment column, you will see a small colored circle (called a **disc**). If the worker has no assessment, the disc appears as an empty dotted circle.
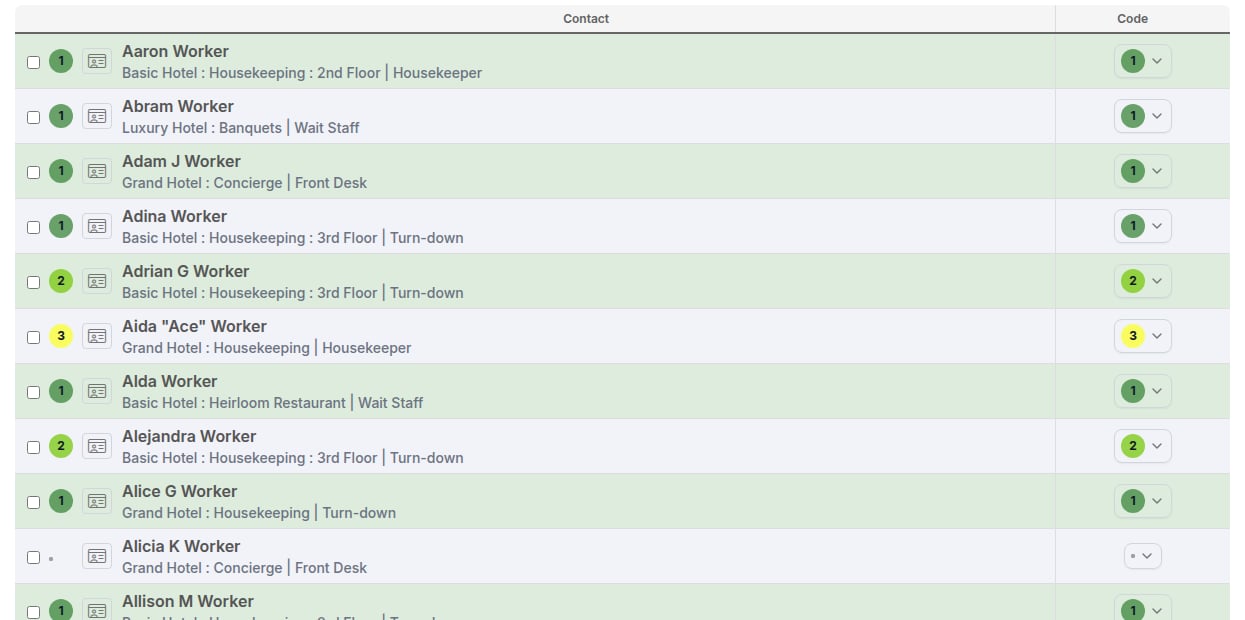 2. Click the disc to open the assessment dropdown. The dropdown lists every assessment code for your project, each shown with its colored disc and description.
3. Click the assessment code you want to assign. The disc in the row updates immediately to reflect the new code, and a confirmation appears at the bottom of the screen.
**Hover to see assessment history.** If an assessment has been set before, hovering over the disc shows a tooltip with the date and the name of the user who last changed it.
**If a timeline dialog opens instead of saving immediately:** your project administrator has turned on the **Display timeline dialog when the assessment is changed** setting. When this is on, changing an assessment anywhere in the app opens the timeline entry form with that code pre-selected, so you can add a note about the conversation before saving. Fill in any details you want to record, then click **Save** to apply both the assessment change and the timeline entry at once.
## Record a detailed conversation
Sometimes your conversations with workers will produce detailed information about them that you'll want to preserve for future use. Here's how to record that info, even if it's not displayed in your layout.
1. To enter detailed information about a worker, start by clicking on their **name** in the search results to open their record (if their record is not already on-screen, [search for them by name](/docs/getting-started/search-by-name)).
2. When their record opens, click the **Edit** tab.
3. **Scroll down** to the section that holds the type of information you want to update, such as **Contact Details**. Enter the new information and click **Save**.
4. You may need to open additional tabs from the worker's record, depending on the information you're recording:
* For **employment information**, use the **Employment** tab.
* To add a **timeline note** (for instance, to **record details of an email** or **phone conversation**), scroll to the bottom of the **Overview** tab, or use the **Quick view** dialog's **Quick actions** tab (see below).
## Using notes and contact timeline entries
Sometimes the information you get in a detailed conversation won't fit neatly into any built-in or custom field. In that case, it is best to take advantage of Broadstripes' notes functions. There are two different types of free-form notes that you can enter in Broadstripes:
* Notes
* Contact timeline entries
### Notes
The **Notes** function is best used to capture information that is *always relevant* when an organizer talks to a worker, for instance:
* "Wife is a supervisor."
* "Speaks Creole and English fluently, knows some Spanish."
* "Ring bell and go around to back door."
To add a note:
1. Click the contact's **name** in the search results to open their record, then click the **Edit** tab. You can also click the **Quick view icon** () next to the name and select **Edit** from the **Quick actions** tab.
2. Click the disc to open the assessment dropdown. The dropdown lists every assessment code for your project, each shown with its colored disc and description.
3. Click the assessment code you want to assign. The disc in the row updates immediately to reflect the new code, and a confirmation appears at the bottom of the screen.
**Hover to see assessment history.** If an assessment has been set before, hovering over the disc shows a tooltip with the date and the name of the user who last changed it.
**If a timeline dialog opens instead of saving immediately:** your project administrator has turned on the **Display timeline dialog when the assessment is changed** setting. When this is on, changing an assessment anywhere in the app opens the timeline entry form with that code pre-selected, so you can add a note about the conversation before saving. Fill in any details you want to record, then click **Save** to apply both the assessment change and the timeline entry at once.
## Record a detailed conversation
Sometimes your conversations with workers will produce detailed information about them that you'll want to preserve for future use. Here's how to record that info, even if it's not displayed in your layout.
1. To enter detailed information about a worker, start by clicking on their **name** in the search results to open their record (if their record is not already on-screen, [search for them by name](/docs/getting-started/search-by-name)).
2. When their record opens, click the **Edit** tab.
3. **Scroll down** to the section that holds the type of information you want to update, such as **Contact Details**. Enter the new information and click **Save**.
4. You may need to open additional tabs from the worker's record, depending on the information you're recording:
* For **employment information**, use the **Employment** tab.
* To add a **timeline note** (for instance, to **record details of an email** or **phone conversation**), scroll to the bottom of the **Overview** tab, or use the **Quick view** dialog's **Quick actions** tab (see below).
## Using notes and contact timeline entries
Sometimes the information you get in a detailed conversation won't fit neatly into any built-in or custom field. In that case, it is best to take advantage of Broadstripes' notes functions. There are two different types of free-form notes that you can enter in Broadstripes:
* Notes
* Contact timeline entries
### Notes
The **Notes** function is best used to capture information that is *always relevant* when an organizer talks to a worker, for instance:
* "Wife is a supervisor."
* "Speaks Creole and English fluently, knows some Spanish."
* "Ring bell and go around to back door."
To add a note:
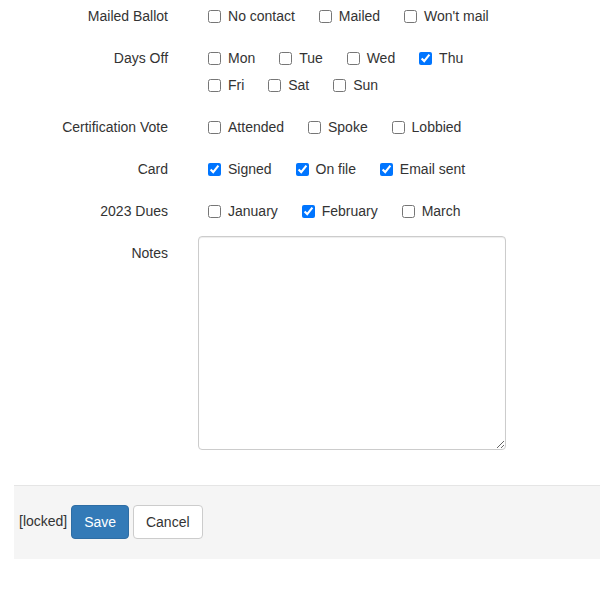
1. Click the contact's **name** in the search results to open their record, then click the **Edit** tab. You can also click the **Quick view icon** () next to the name and select **Edit** from the **Quick actions** tab.
 2. **Scroll down** to the **Notes** section at the bottom of the left column. Type your note in the notes text box, then click **Save**.
 ### Contact timeline entries
Information that is *fleeting* should not be put in Notes. That type of information should go in the **Contact Timeline**. Since contact timeline entries are more likely to get buried as the timeline grows, they are best used for time-sensitive information related to specific visits, meetings, or campaigns.
Examples of timeline entries:
* "Hector talked to about healthcare campaign during a one-on-one, and he said he had mixed feelings."
* "Talked to Alejandro's sister. She said he would be very interested in talking about the union and told me Tuesday is a good day to find him."
* "On vacation until Thursday 4/15, do not knock."
* "Expressed dismay at contract proposal in committee meeting — please follow up one-on-one."
Timeline entries allow you to choose from one of a few entry **types** (including Note, House visit, One-on-one, Meeting, Phone call, etc.)
To create a contact timeline entry, you have two options:
**From the Quick view dialog:**
1. Click the **Quick view icon** () next to the contact's **name** in the search results to open the **Quick view** dialog.
2. Click the **Quick actions** tab, then select **Add timeline item**.
**From the contact's record:**
1. Click the contact's **name** to open their record, then scroll to the **Contact Timeline** section at the bottom of the **Overview** tab.
2. Click the **New timeline item** button.
### Contact timeline entries
Information that is *fleeting* should not be put in Notes. That type of information should go in the **Contact Timeline**. Since contact timeline entries are more likely to get buried as the timeline grows, they are best used for time-sensitive information related to specific visits, meetings, or campaigns.
Examples of timeline entries:
* "Hector talked to about healthcare campaign during a one-on-one, and he said he had mixed feelings."
* "Talked to Alejandro's sister. She said he would be very interested in talking about the union and told me Tuesday is a good day to find him."
* "On vacation until Thursday 4/15, do not knock."
* "Expressed dismay at contract proposal in committee meeting — please follow up one-on-one."
Timeline entries allow you to choose from one of a few entry **types** (including Note, House visit, One-on-one, Meeting, Phone call, etc.)
To create a contact timeline entry, you have two options:
**From the Quick view dialog:**
1. Click the **Quick view icon** () next to the contact's **name** in the search results to open the **Quick view** dialog.
2. Click the **Quick actions** tab, then select **Add timeline item**.
**From the contact's record:**
1. Click the contact's **name** to open their record, then scroll to the **Contact Timeline** section at the bottom of the **Overview** tab.
2. Click the **New timeline item** button.
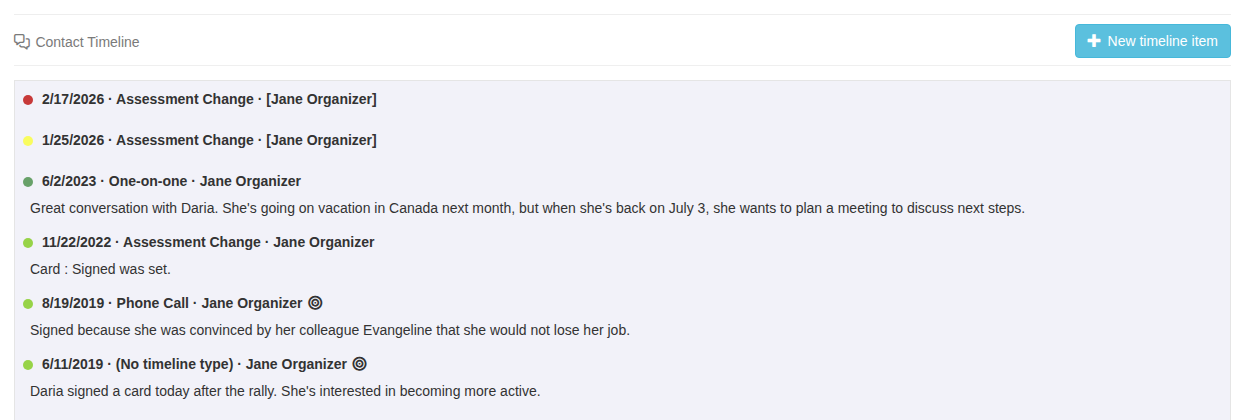 3. When the **Create contact timeline item form** opens, choose which **Type** of record you want from the drop-down list, then enter the detailed information you're recording in the **Notes** text box. Click the emoji button () at the bottom-left of the Notes field to insert an emoji at the cursor position.
4. Click **Save** to create the timeline entry.
3. When the **Create contact timeline item form** opens, choose which **Type** of record you want from the drop-down list, then enter the detailed information you're recording in the **Notes** text box. Click the emoji button () at the bottom-left of the Notes field to insert an emoji at the cursor position.
4. Click **Save** to create the timeline entry.