> ## Documentation Index
> Fetch the complete documentation index at: https://help.broadstripes.com/llms.txt
> Use this file to discover all available pages before exploring further.
# Limited visibility
## Overview
Sometimes an organizing team will include activists or volunteers who aren't well-known to the team's leadership or who, for other reasons, simply shouldn't have full access to the project's data. When this is the case, you can turn on Broadstripes' **"Limited Visibility"** feature in your project.
When the limited visibility feature is **"on"**, project admins can still see all the records in the project, but **basic users** can only see the people and organizations you make **"visible"** to them. This article covers managing basic users' visibility settings. If you'd like to learn how to turn on the limited visibility feature or the [temporary visibility](/docs/project-settings/temporary-visibility), check out the [general settings](/docs/project-settings/general-settings) article.
## View your basic users' limited visibility settings
1. To get started, access **Memberships.**\
Click the gear icon in the upper right corner of any page, then select **Members**.\\
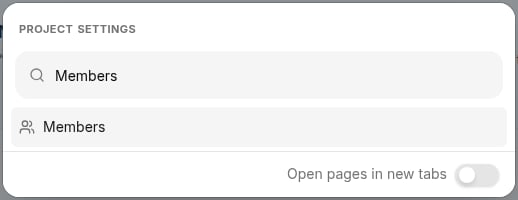 2. The **Members index page** will open, showing all of the people who have been invited to be part of your Broadstripes project.
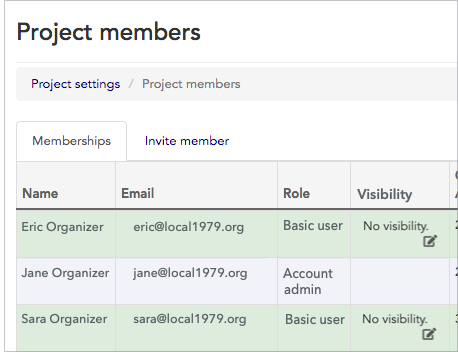 3. From the index page, you can see a range of information about each member (or invited member) laid out in a grid. We'll be looking at just a few of the first columns:
* **Name** of the member. Visibility is defined individually for each member.
* **Role** of the member. Limited visibility only applies to the **Basic user** role; see the [user and membership overview](/docs/start-project/user-and-membership-overview) section of the Users and Membership article to learn how to assign or re-assign roles.
* **Visibility** the shops, departments, sub-departments and/or people visible to the member in that row. This column is only shown if you have turned on the **"Limited Visibility"** feature in your project (see the Limited Visibility section of the [general settings](/docs/project-settings/general-settings) article for more information about turning on this feature).
* If you're interested in learning about the **"Temporary vis. (past 2 wks)"** column, please read the [temporary visibility](/docs/project-settings/temporary-visibility)
## Assign limited visibility: define what each basic user can see
By default, no shops or people will be visible to a basic user when limited visibility is on. **Limited visibility** controls the organizations and people **"visible"** to basic users.
Limited visibility is assigned:
* on a **project-by-project** basis (if you have multiple projects, you can have limited visibility activated in some projects but leave it inactive in others. If limited visibility is not activated, all basic users in the project will be able to view all people)
* within a project, visibility is assigned on a **user-by-user** basis (for projects where limited visibility has been activated, you'll need to assign what is visible to each user individually)
What determines visibility? On the **Memberships page** for the project, admins can define what a basic user can see in two ways:
* [Visibility by shop and department](#visibility-by-shop-and-department)
* [Visibility by custom search](#visibility-by-custom-search)
### Visibility by shop and department
The **simplest way** an admin can define what a user sees is by assigning them specific **shops** or **departments**.
**Visibility will be inherited by sub-departments**
Keep in mind that when you assign visibility to a shop that has **departments** or **sub-departments** under it, the visibility will cascade down to include all those entities below it.
**Example:**\
A basic user is assigned **"Big Shop."** This means the user will see the organization record for **Big Shop** itself, all of the records for all of Big Shop's **departments** and **sub-departments**, and all the **people** who work anywhere within Big Shop.
If the user is not assigned Big Shop, but only **"Department A"** inside Big Shop, they will see **Department A**, any **sub-departments**, and the **people** who work anywhere within Department A and its sub-departments. They will not see **"Department B"** or **"Department C"** or anyone who works there.
As an admin, you can assign as many shops or departments as you want to be visible to a user. The shops and departments you've assigned will appear in a list in the **"Visibility" column** of the member's row in the **Memberships table**.
### How to assign visibility by shop, department or sub-department
1. From the **Members index page**, find the member whose visibility you are assigning.
2. Click the **edit icon** in the **Visibility** column for that member.\\
3. From the index page, you can see a range of information about each member (or invited member) laid out in a grid. We'll be looking at just a few of the first columns:
* **Name** of the member. Visibility is defined individually for each member.
* **Role** of the member. Limited visibility only applies to the **Basic user** role; see the [user and membership overview](/docs/start-project/user-and-membership-overview) section of the Users and Membership article to learn how to assign or re-assign roles.
* **Visibility** the shops, departments, sub-departments and/or people visible to the member in that row. This column is only shown if you have turned on the **"Limited Visibility"** feature in your project (see the Limited Visibility section of the [general settings](/docs/project-settings/general-settings) article for more information about turning on this feature).
* If you're interested in learning about the **"Temporary vis. (past 2 wks)"** column, please read the [temporary visibility](/docs/project-settings/temporary-visibility)
## Assign limited visibility: define what each basic user can see
By default, no shops or people will be visible to a basic user when limited visibility is on. **Limited visibility** controls the organizations and people **"visible"** to basic users.
Limited visibility is assigned:
* on a **project-by-project** basis (if you have multiple projects, you can have limited visibility activated in some projects but leave it inactive in others. If limited visibility is not activated, all basic users in the project will be able to view all people)
* within a project, visibility is assigned on a **user-by-user** basis (for projects where limited visibility has been activated, you'll need to assign what is visible to each user individually)
What determines visibility? On the **Memberships page** for the project, admins can define what a basic user can see in two ways:
* [Visibility by shop and department](#visibility-by-shop-and-department)
* [Visibility by custom search](#visibility-by-custom-search)
### Visibility by shop and department
The **simplest way** an admin can define what a user sees is by assigning them specific **shops** or **departments**.
**Visibility will be inherited by sub-departments**
Keep in mind that when you assign visibility to a shop that has **departments** or **sub-departments** under it, the visibility will cascade down to include all those entities below it.
**Example:**\
A basic user is assigned **"Big Shop."** This means the user will see the organization record for **Big Shop** itself, all of the records for all of Big Shop's **departments** and **sub-departments**, and all the **people** who work anywhere within Big Shop.
If the user is not assigned Big Shop, but only **"Department A"** inside Big Shop, they will see **Department A**, any **sub-departments**, and the **people** who work anywhere within Department A and its sub-departments. They will not see **"Department B"** or **"Department C"** or anyone who works there.
As an admin, you can assign as many shops or departments as you want to be visible to a user. The shops and departments you've assigned will appear in a list in the **"Visibility" column** of the member's row in the **Memberships table**.
### How to assign visibility by shop, department or sub-department
1. From the **Members index page**, find the member whose visibility you are assigning.
2. Click the **edit icon** in the **Visibility** column for that member.\\
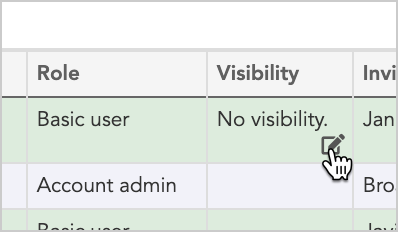 3. The **Edit visibility** panel will open. In the **Shops and departments** section, you can select which organizational units this user should be able to see.
4. Use the dropdown menus or search functionality to add shops, departments, or sub-departments.
5. Click **Save** to apply the visibility settings.
### Visibility by custom search
For more complex visibility requirements, you can define what a user sees using search criteria. This allows you to create dynamic visibility rules based on contact attributes, employment information, or other data fields.
1. From the **Edit visibility** panel, go to the **By search** tab.
2. Enter search criteria using Broadstripes search syntax to define which records this user should see.
3. Test your search to ensure it returns the expected results.
4. Click **Save** to apply the search-based visibility settings.
**Search text tip: Use Broadstripes' search builder**
Building a limited visibility search is a little different from using Broadstripes' search builder because you need to write the search using text only. You can build your search in the search builder first, then copy the search text to use in visibility settings.
If you need more help on building searches like this, the [broadstripes search reference v1.0.pdf](https://crm.broadstripes.com/broadstripes-search-reference-v1.0.pdf) explains Broadstripes' **search terms** and **syntax** and lists some of the most common fields used in searches along with examples of searches you are likely to use. You can also learn more about building searches that use AND/OR clauses in the [search builder build an advanced search](/docs/search/search-builder-build-an-advanced-search) article.
3. The **Edit visibility** panel will open. In the **Shops and departments** section, you can select which organizational units this user should be able to see.
4. Use the dropdown menus or search functionality to add shops, departments, or sub-departments.
5. Click **Save** to apply the visibility settings.
### Visibility by custom search
For more complex visibility requirements, you can define what a user sees using search criteria. This allows you to create dynamic visibility rules based on contact attributes, employment information, or other data fields.
1. From the **Edit visibility** panel, go to the **By search** tab.
2. Enter search criteria using Broadstripes search syntax to define which records this user should see.
3. Test your search to ensure it returns the expected results.
4. Click **Save** to apply the search-based visibility settings.
**Search text tip: Use Broadstripes' search builder**
Building a limited visibility search is a little different from using Broadstripes' search builder because you need to write the search using text only. You can build your search in the search builder first, then copy the search text to use in visibility settings.
If you need more help on building searches like this, the [broadstripes search reference v1.0.pdf](https://crm.broadstripes.com/broadstripes-search-reference-v1.0.pdf) explains Broadstripes' **search terms** and **syntax** and lists some of the most common fields used in searches along with examples of searches you are likely to use. You can also learn more about building searches that use AND/OR clauses in the [search builder build an advanced search](/docs/search/search-builder-build-an-advanced-search) article.