> ## Documentation Index
> Fetch the complete documentation index at: https://help.broadstripes.com/llms.txt
> Use this file to discover all available pages before exploring further.
# Components of the Address Form
Broadstripes uses powerful logic that helps you get the most out of the contact information you collect. Whether you are entering worker records through an import, or entering records manually, address information is key data – and you can view, enter, update, or delete any of it from the **address form**.
In this article, we'll take a closer look at how Broadstripes collects, displays, and utilizes the information in the **address form** including:
* recording and displaying **primary** and **secondary addresses**
* **geocoding** and **mapping** addresses
* tagging **bad addresses**
* tracking **address change history**
We'll start by opening the address form:
## Open the address form
1. The address **form** allows you to view or edit a person's complete address record.
2. For this example, we'll be looking at the **address form** of an **existing person** in our project. (If you want to [add a new person](/docs/working-with-records/add-a-new-person/), or [add a shop or department](/docs/working-with-records/add-a-shop-or-department/), that's fine. Once they are set up, their address forms will be identical.)
3. To open the form, start by **running a search** to filter for just the contact whose address you want to work with. (Learn more about creating custom searches in the [Search](/docs/search/search-builder-build-an-advanced-search) articles).
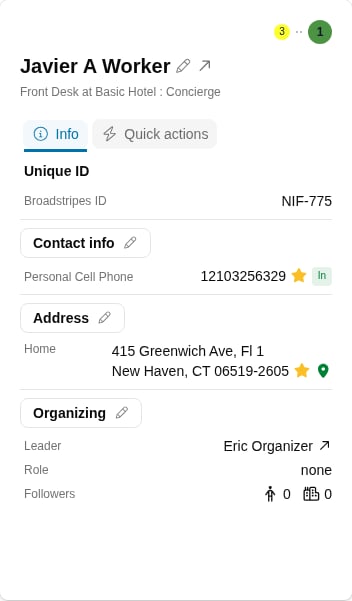
4. From the search results, **click** the **Quick view icon** () next to the worker's name. The **Quick view** dialog will appear, showing the worker's contact details including their addresses.
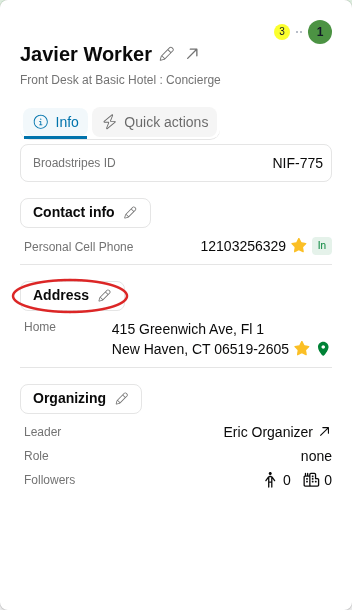
 5. In the dialog, **click** the **Addresses** section header (which displays a **pencil icon**) to open the address form.
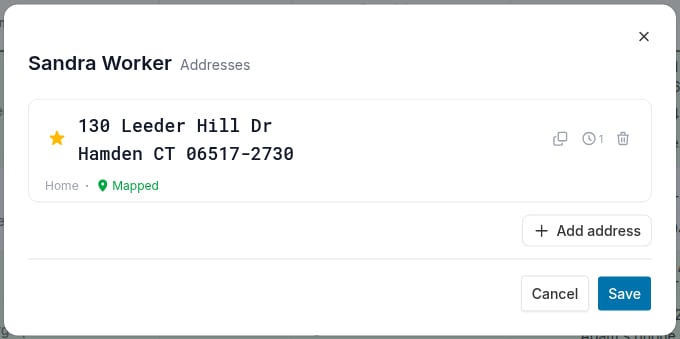
 6. The **address form** will open in a dialog. The person's name appears in the dialog header.
 ## Parts of the address form
Broadstripes gives you a lot of information to look at on the address form. Let's break it down so you know your way around.
### 1. Address pane
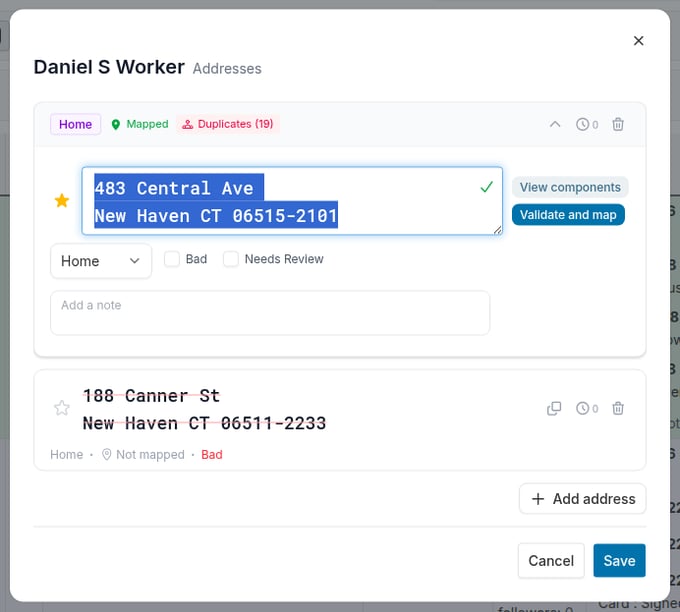
Broadstripes allows you to record an unlimited number of addresses for each person in your project. Each address will be displayed in its own pane. If you're editing an address, just place your cursor in address pane and type your changes.
You can use the drop-down menu above the address pane to specify if the address is for **Home**, **Business**, or **Other**. You can also add a **Note** below the address to help other organizers (e.g. "There's an unchained dog in the back yard" or "Lives with mother who usually answers the door").
## Parts of the address form
Broadstripes gives you a lot of information to look at on the address form. Let's break it down so you know your way around.
### 1. Address pane
Broadstripes allows you to record an unlimited number of addresses for each person in your project. Each address will be displayed in its own pane. If you're editing an address, just place your cursor in address pane and type your changes.
You can use the drop-down menu above the address pane to specify if the address is for **Home**, **Business**, or **Other**. You can also add a **Note** below the address to help other organizers (e.g. "There's an unchained dog in the back yard" or "Lives with mother who usually answers the door").
 **Address card action icons**
Each address card has three action icons on the right side:
* **Copy** (): Copies the full address text to your clipboard. This icon appears only when the address card is collapsed.
* **History** (): Opens the change history panel for that address. The small number next to the icon shows how many history entries exist. See [History panel](#4-history-panel-and-locked-indicator) for details.
* **Delete** (): Permanently removes the address from this person's record. This icon is hidden on addresses that are locked by an external system.
When you expand an address card for editing, the copy icon is replaced by a **Collapse** button () that returns the card to its compact view.
### 2. Validate and map
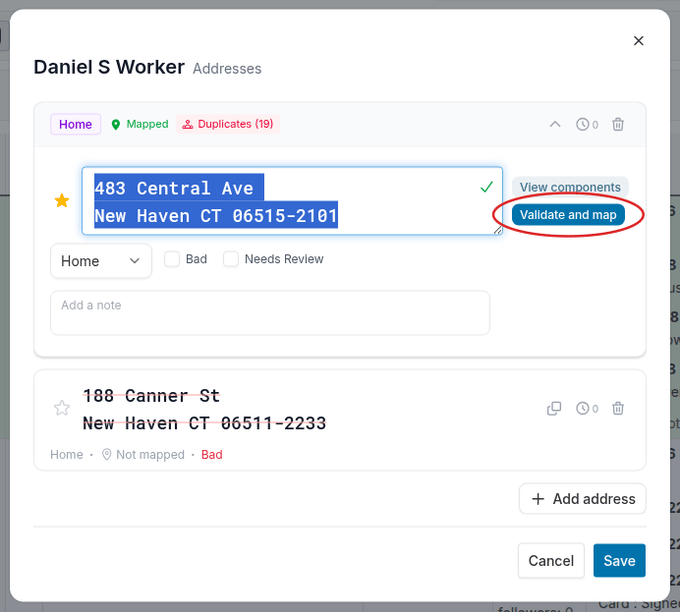
Each time you enter or edit an address, you'll need to validate and map it. Clicking the **Validate and map** button signals Broadstripes to do two important tasks:
1. **Validate** the address against a database of current US Postal Service (USPS) addresses to verify it as a deliverable address.
2. "**Geocode**" the address, essentially locating its GPS coordinates so that Broadstripes can generate highly accurate maps and driving directions. The colored globe icon next to the "Validate and map" button indicates an address that has been geocoded; a gray globe indicates one that has not.\\
**Address card action icons**
Each address card has three action icons on the right side:
* **Copy** (): Copies the full address text to your clipboard. This icon appears only when the address card is collapsed.
* **History** (): Opens the change history panel for that address. The small number next to the icon shows how many history entries exist. See [History panel](#4-history-panel-and-locked-indicator) for details.
* **Delete** (): Permanently removes the address from this person's record. This icon is hidden on addresses that are locked by an external system.
When you expand an address card for editing, the copy icon is replaced by a **Collapse** button () that returns the card to its compact view.
### 2. Validate and map
Each time you enter or edit an address, you'll need to validate and map it. Clicking the **Validate and map** button signals Broadstripes to do two important tasks:
1. **Validate** the address against a database of current US Postal Service (USPS) addresses to verify it as a deliverable address.
2. "**Geocode**" the address, essentially locating its GPS coordinates so that Broadstripes can generate highly accurate maps and driving directions. The colored globe icon next to the "Validate and map" button indicates an address that has been geocoded; a gray globe indicates one that has not.\\
 ### 3. Informational messages and flags
Broadstripes displays messages near the address pane if there's something that needs your attention.
### 3. Informational messages and flags
Broadstripes displays messages near the address pane if there's something that needs your attention.
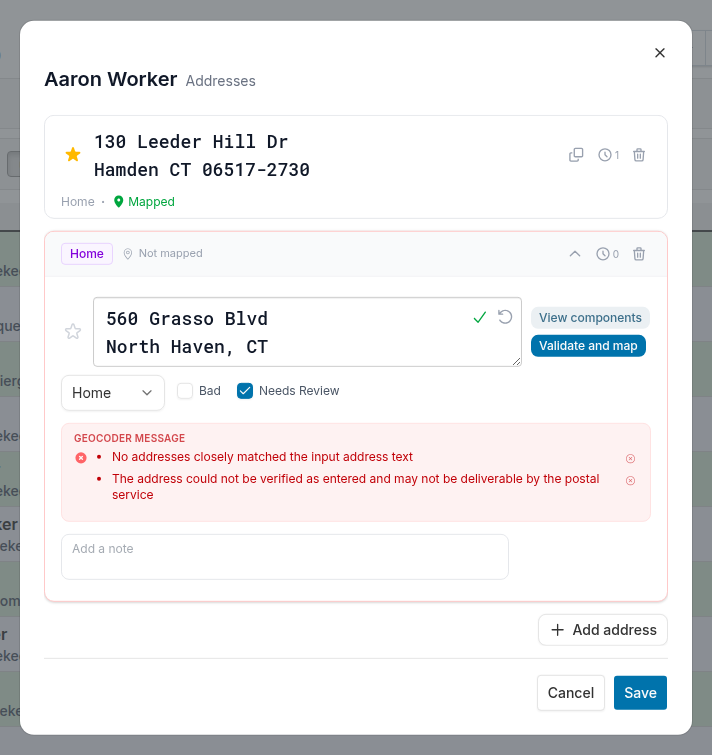 * "**Address has not been validated and mapped**": This message simply reminds the user that they have not yet clicked the **Validate and map** button, so Broadstripes has not yet processed the address. The message will disappear when the user clicks the button and Broadstripes launches its validation process.
* **Address has been mapped:** This address is valid and needs no further attention.
* **The address could not be verified as entered and may not be deliverable by the post office:** This address may contain a typo or be outdated; you may want to manually flag it by checking the "**Needs review**" checkbox to remember to correct it later. Depending on your organization's data entry policies, you may also want to flag it by checking the "**Bad**" checkbox which will cause the address to be displayed with strikethrough, and prevent it from being displayed on a map or exported to spreadsheet from the search results.
* Other validation and mapping warnings, such as "**The street was found, but not the number**" are also indications that the address you've entered is inaccurate. Follow your organization's rule of thumb to flag these correctly.
* “**Needs review**”: This flag (check box) is generally set by Broadstripes during a data import if an issue is encountered during the process of USPS-validating and geocoding an address. Sometimes an accompanying note will provide additional information about the exact issue encountered. You can also check the "**needs review"** flag **manually** to flag addresses about which you aren’t confident. The "needs review" flag has no effect on the address (it will still appear in maps and exports) — it’s simply a way to flag an address for later follow-up and verification.
* **Primary star** (): The gold star marks the person's **primary address** — the one Broadstripes uses for maps, mailing layouts, and data exports. Each person can have only one primary address. To change it, click the star next to a different address; Broadstripes will automatically promote that address to primary and use it going forward.
**How primary address works during data import**
When you import addresses via spreadsheet, Broadstripes will **never override** an existing primary address. If a person already has a primary address, imported addresses are added as secondary addresses.
If no primary address exists yet, Broadstripes automatically assigns one using this preference order:
1. Non-bad addresses first (bad addresses are never auto-assigned as primary)
2. Geocoded addresses first
3. Address type: Business → Home → Other
There is no column available in the spreadsheet import to explicitly set an address as primary. To set or change a primary address, use the address form after import.
* "**Bad**": In some cases, you may want to retain the details of an address even though you know it is not a valid or accurate address. For instance, this feature can be really useful in helping you catch (and disregard) the address if it ever appears again in an import or another list used by your campaign. Flagging an address as “**Bad**” will cause the address to be displayed with strikethrough, and prevent it from being displayed on a map or exported to spreadsheet from the search results (unless the export layout is specifically set up to include the column "Addresses - Bad").
* **"Item is a duplicate for this contact"**: A red warning banner appears on an address card when Broadstripes detects that the same address already exists elsewhere on the contact's record. The comparison is case-insensitive and ignores punctuation and spacing, so "123 Main St" and "123 main st." are treated as the same address. The banner is visible even when the card is collapsed, so you can spot duplicates at a glance. To resolve the warning, delete one of the duplicate addresses.
### 4. History panel and Locked indicator
Broadstripes knows how important address information is to your campaign. The **history panel** was introduced to help retain a record of all changes applied to a person's address data. Each time an address is created, modified, or matched during import, a new record is added to the history.
* "**Address has not been validated and mapped**": This message simply reminds the user that they have not yet clicked the **Validate and map** button, so Broadstripes has not yet processed the address. The message will disappear when the user clicks the button and Broadstripes launches its validation process.
* **Address has been mapped:** This address is valid and needs no further attention.
* **The address could not be verified as entered and may not be deliverable by the post office:** This address may contain a typo or be outdated; you may want to manually flag it by checking the "**Needs review**" checkbox to remember to correct it later. Depending on your organization's data entry policies, you may also want to flag it by checking the "**Bad**" checkbox which will cause the address to be displayed with strikethrough, and prevent it from being displayed on a map or exported to spreadsheet from the search results.
* Other validation and mapping warnings, such as "**The street was found, but not the number**" are also indications that the address you've entered is inaccurate. Follow your organization's rule of thumb to flag these correctly.
* “**Needs review**”: This flag (check box) is generally set by Broadstripes during a data import if an issue is encountered during the process of USPS-validating and geocoding an address. Sometimes an accompanying note will provide additional information about the exact issue encountered. You can also check the "**needs review"** flag **manually** to flag addresses about which you aren’t confident. The "needs review" flag has no effect on the address (it will still appear in maps and exports) — it’s simply a way to flag an address for later follow-up and verification.
* **Primary star** (): The gold star marks the person's **primary address** — the one Broadstripes uses for maps, mailing layouts, and data exports. Each person can have only one primary address. To change it, click the star next to a different address; Broadstripes will automatically promote that address to primary and use it going forward.
**How primary address works during data import**
When you import addresses via spreadsheet, Broadstripes will **never override** an existing primary address. If a person already has a primary address, imported addresses are added as secondary addresses.
If no primary address exists yet, Broadstripes automatically assigns one using this preference order:
1. Non-bad addresses first (bad addresses are never auto-assigned as primary)
2. Geocoded addresses first
3. Address type: Business → Home → Other
There is no column available in the spreadsheet import to explicitly set an address as primary. To set or change a primary address, use the address form after import.
* "**Bad**": In some cases, you may want to retain the details of an address even though you know it is not a valid or accurate address. For instance, this feature can be really useful in helping you catch (and disregard) the address if it ever appears again in an import or another list used by your campaign. Flagging an address as “**Bad**” will cause the address to be displayed with strikethrough, and prevent it from being displayed on a map or exported to spreadsheet from the search results (unless the export layout is specifically set up to include the column "Addresses - Bad").
* **"Item is a duplicate for this contact"**: A red warning banner appears on an address card when Broadstripes detects that the same address already exists elsewhere on the contact's record. The comparison is case-insensitive and ignores punctuation and spacing, so "123 Main St" and "123 main st." are treated as the same address. The banner is visible even when the card is collapsed, so you can spot duplicates at a glance. To resolve the warning, delete one of the duplicate addresses.
### 4. History panel and Locked indicator
Broadstripes knows how important address information is to your campaign. The **history panel** was introduced to help retain a record of all changes applied to a person's address data. Each time an address is created, modified, or matched during import, a new record is added to the history.
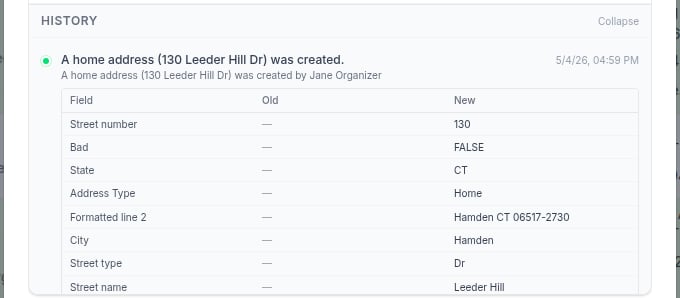
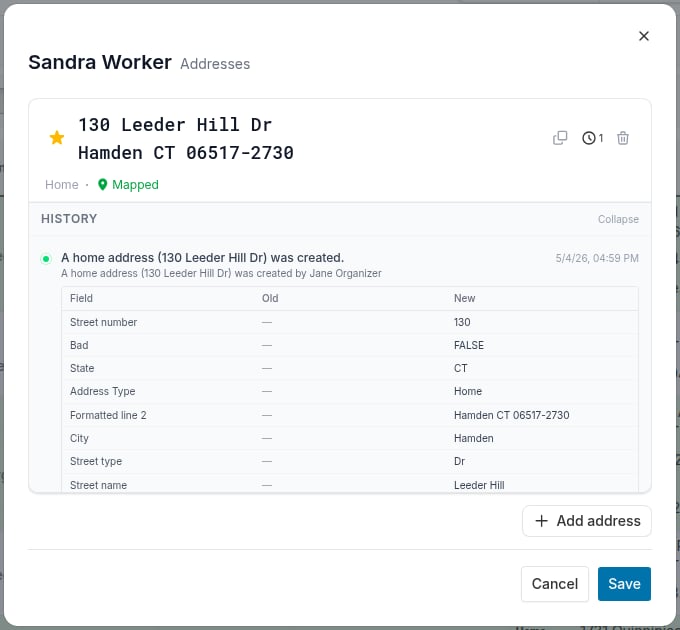 You can **expand all the history records** by clicking on the expand icon, or **expand an individual history record** by clicking on the down arrow icon.
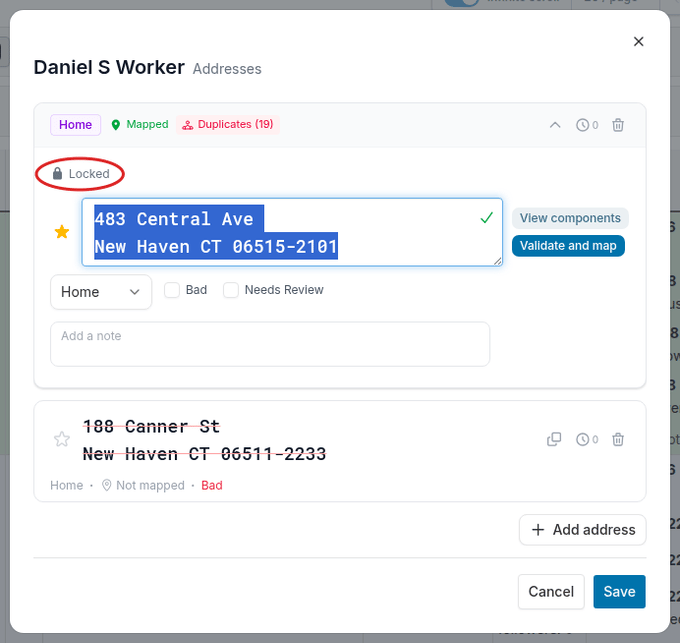
 **Locked indicator:** When an address is sourced from a locked external system — such as a payroll database, HR platform, or membership system — a **Locked** label appears at the top of the address pane. The name of the external system is displayed next to the label. Locked addresses cannot be edited in Broadstripes; they are updated only when data is synced from the source system.
 ### 5. View components
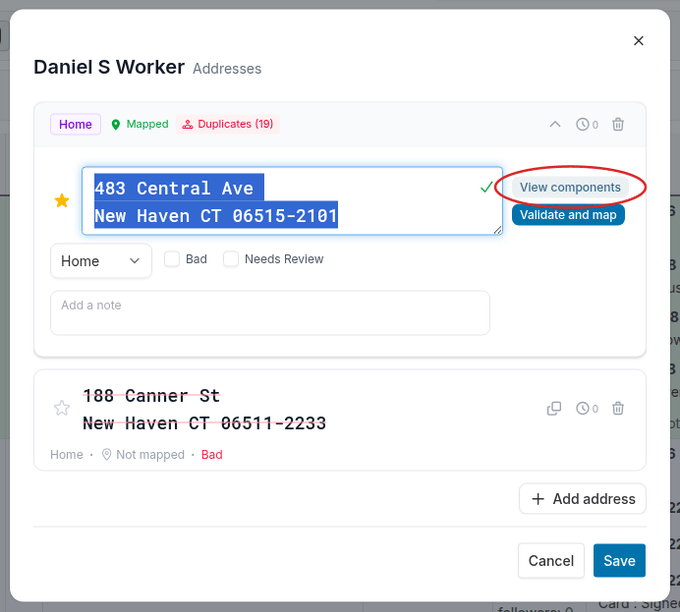
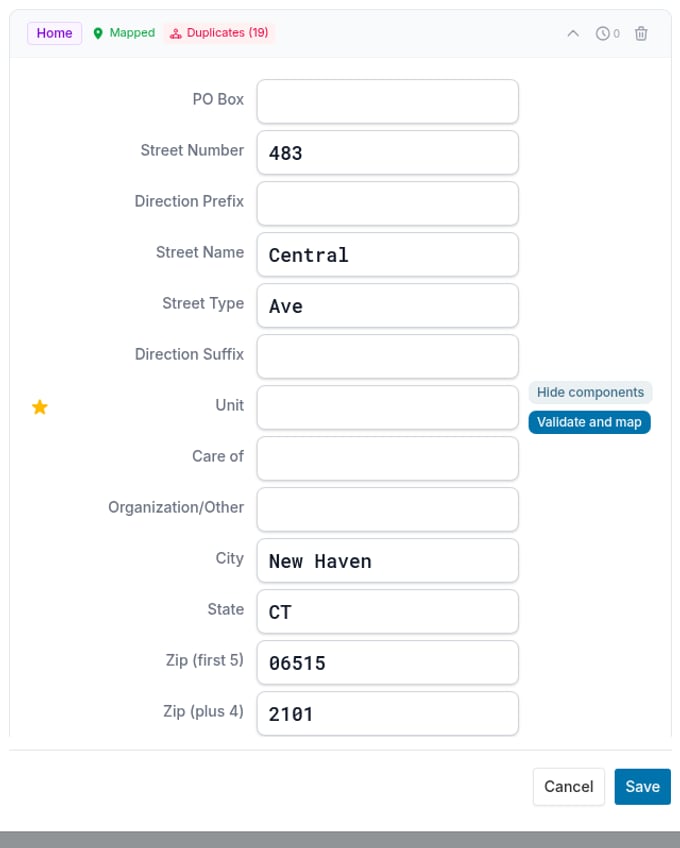
Clicking the **View components** button switches the address editor to a component view, displaying each part of the address in its own field (e.g. Street Name, Street Type, Street Number, Unit). In some cases, seeing the data in this format can help you troubleshoot a problematic address. You can also edit individual fields directly in this view. When you are done, click **Hide components** to return to the standard text editor and apply your changes.
### 5. View components
Clicking the **View components** button switches the address editor to a component view, displaying each part of the address in its own field (e.g. Street Name, Street Type, Street Number, Unit). In some cases, seeing the data in this format can help you troubleshoot a problematic address. You can also edit individual fields directly in this view. When you are done, click **Hide components** to return to the standard text editor and apply your changes.
 ## Learn more
Now that you know your way around addresses, learn the basics of adding, editing or deleting addresses in this article:
* [Add, edit or delete addresses](/docs/working-with-records/add-edit-or-delete-an-address/)
## Learn more
Now that you know your way around addresses, learn the basics of adding, editing or deleting addresses in this article:
* [Add, edit or delete addresses](/docs/working-with-records/add-edit-or-delete-an-address/)