

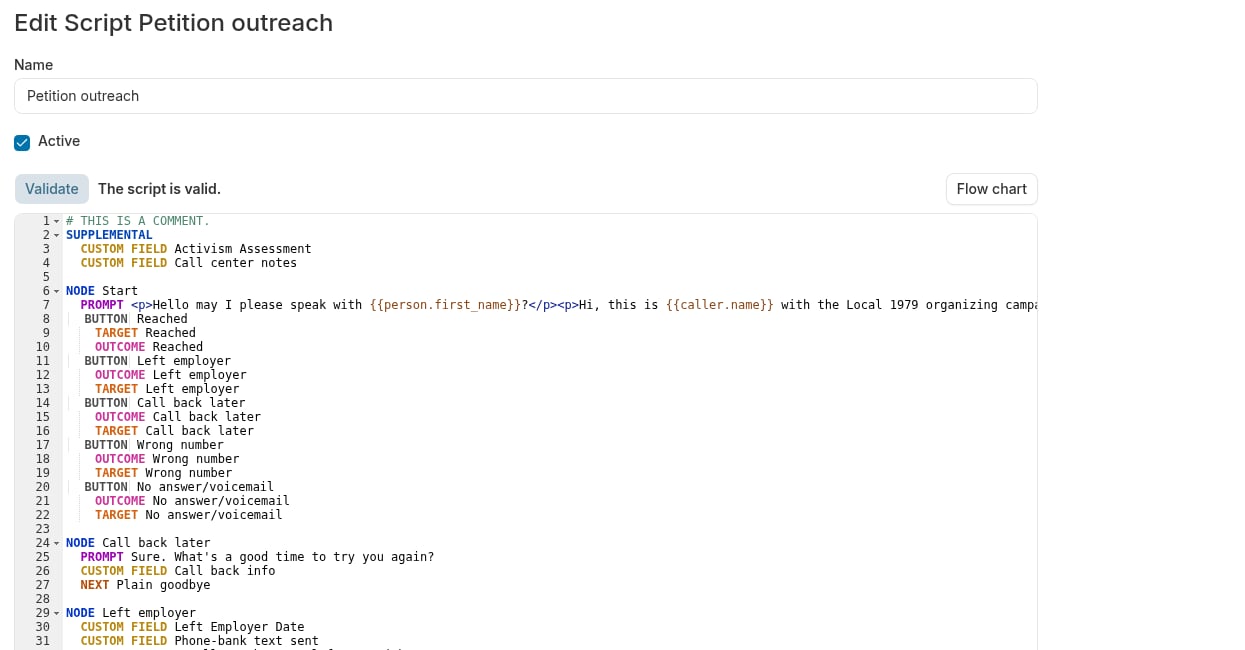
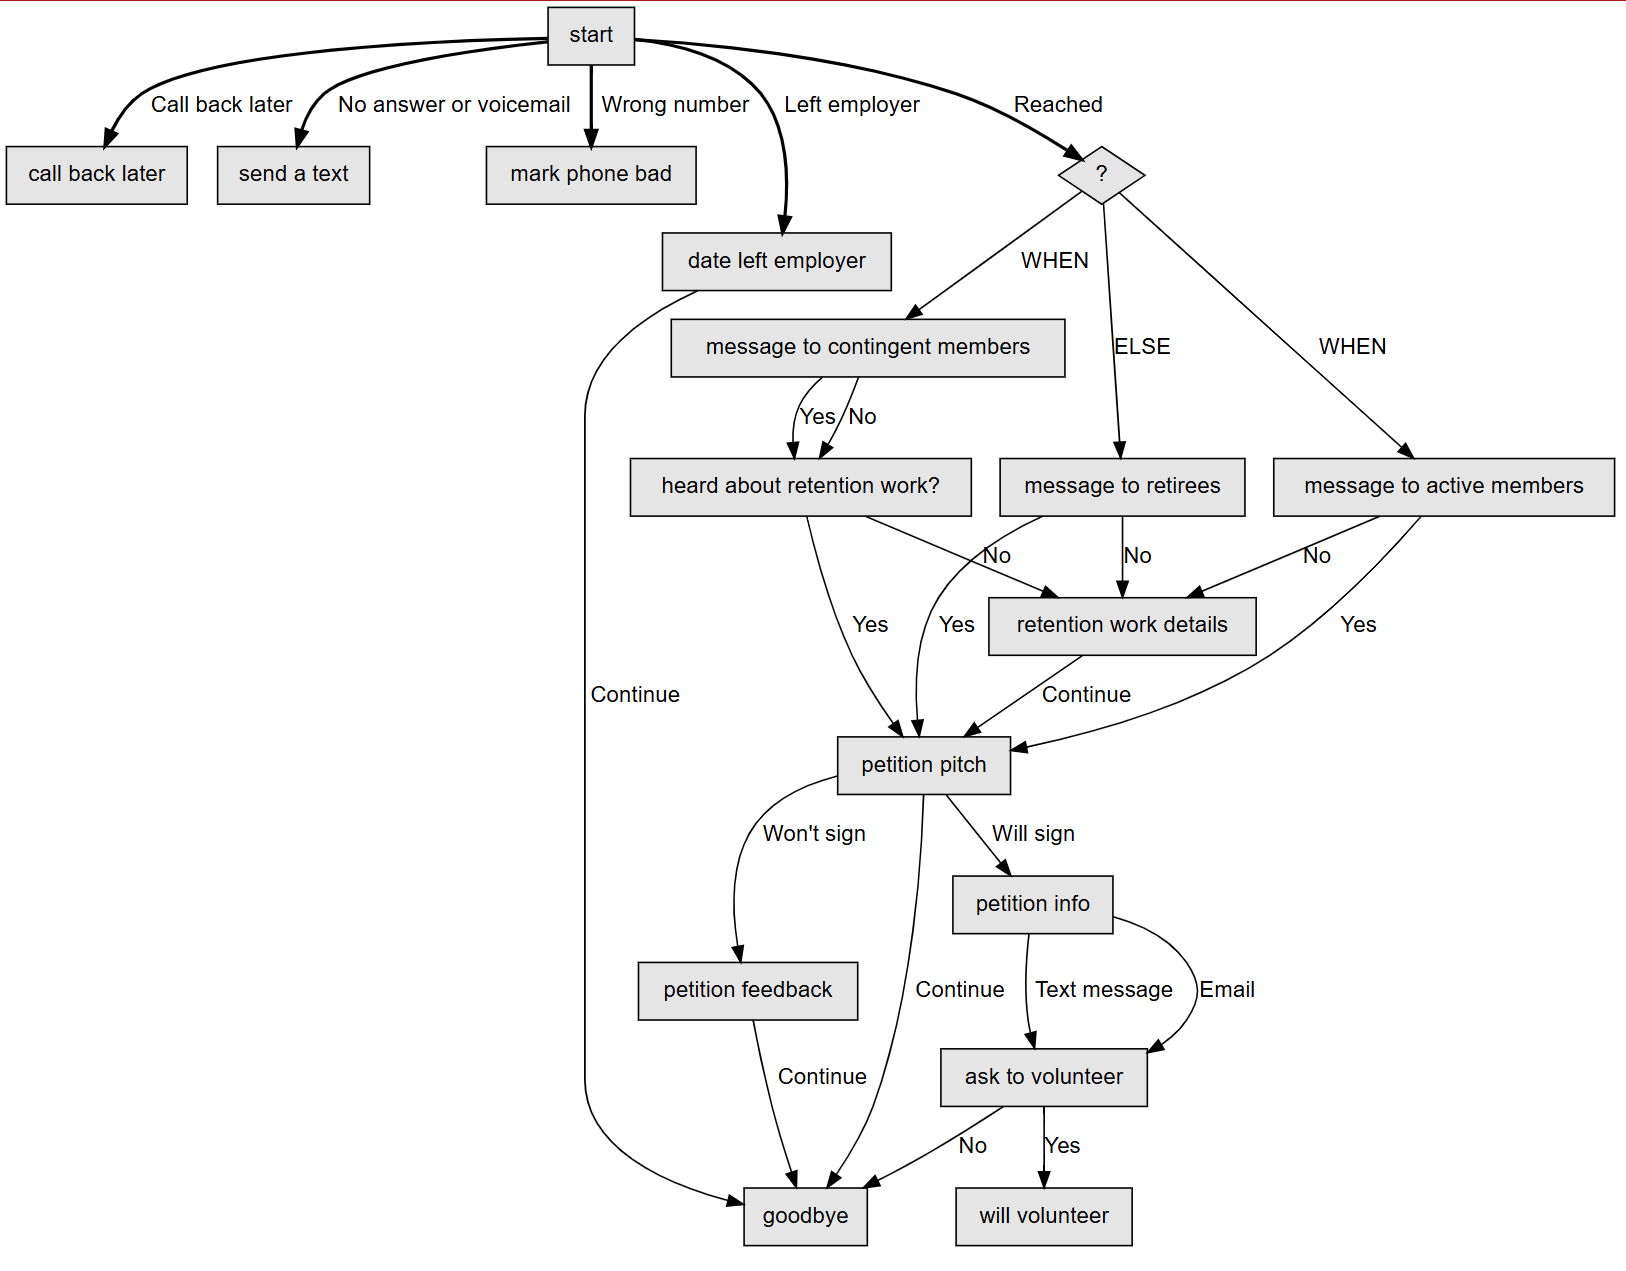
The script editor can generate a flowchart of your script after you validate it. This flowchart will help you visualize the conversation flow and make sure your script makes sense.
You can view the flowchart by clicking the Flow chart button, which appears on the right side of the editor’s toolbar row. The button is disabled until the script validates successfully.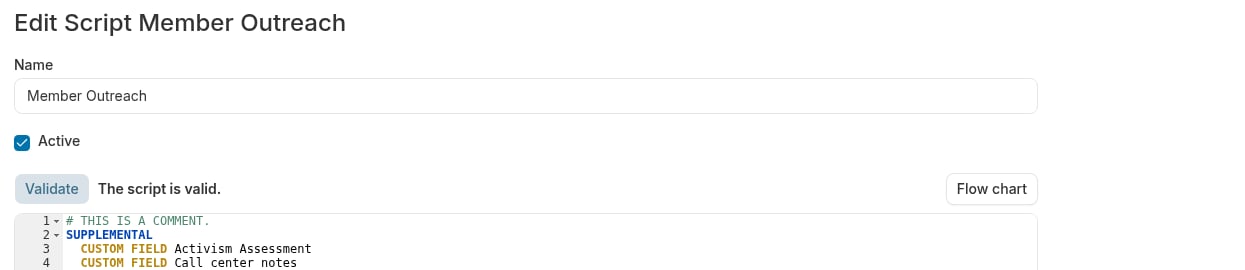
Where to create call scripts
Project admins create call scripts on the Call Center settings page. To get to the Call Center settings page:- Click the Project settings icon in the upper right corner of any page (or press Ctrl-K / ⌘K)
- Choose Scripts
- Then click the + New Call Script button to start a new script
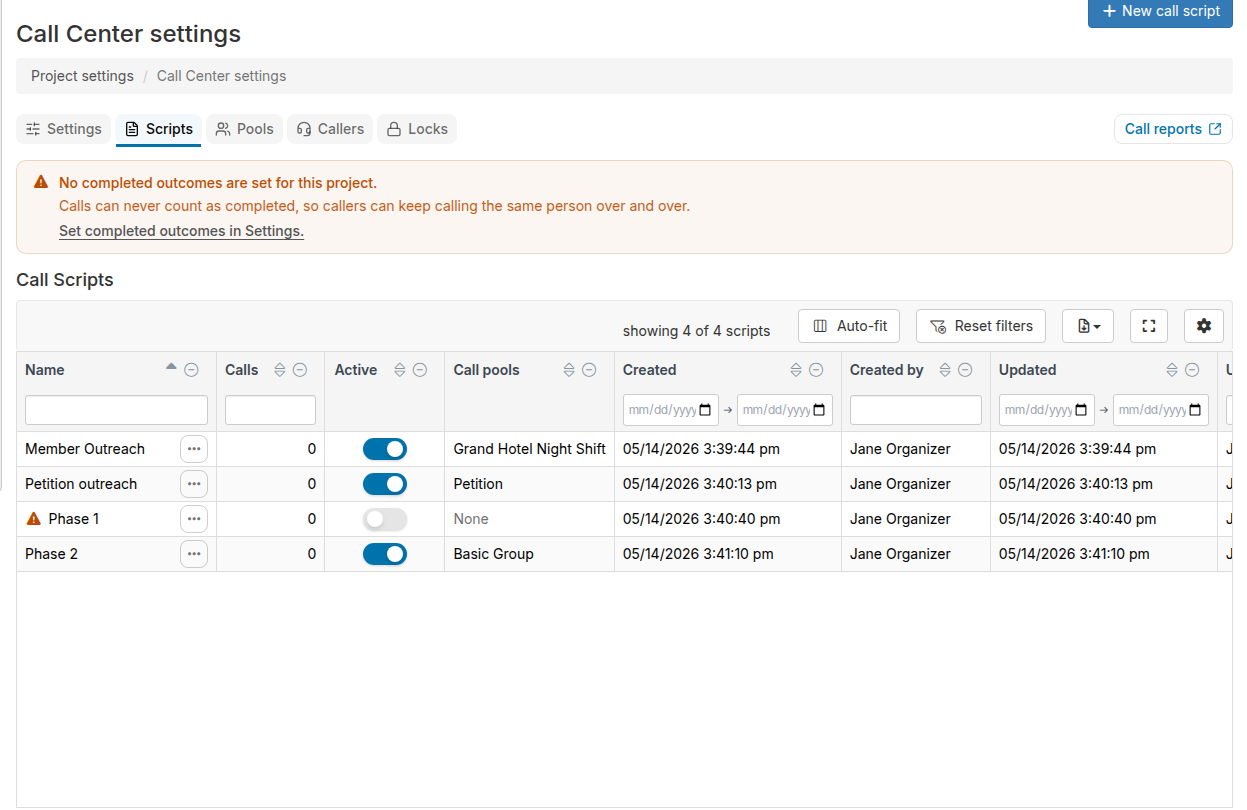
- Name — The script name. Click the ••• menu in this column to edit, delete, or view the script flowchart.
- Active — A toggle switch. Click it to activate or deactivate the script. The switch moves immediately and snaps back if the server rejects the change.
- Call pools — Lists every call pool that uses this script. Up to two pool names appear inline; click the +N chip for a popover listing all pools with edit links. A pool marked inactive next to its name in the popover is paused.
- Calls, Created, Updated — Counters and audit timestamps.
Script structure
Every script consists of:- Nodes: Individual screens or conversation points
- Prompts: Text displayed to the caller
- Buttons: Options the caller can click to move through the script
- Transitions: Connections between nodes
- Data collection: Custom fields, event steps, or outcomes
Basic BCSS syntax
NODE - Defining a page in the call scriptOUTCOME will be the outcome recorded on the person’s contact timeline.
Outcomes that are listed in the Completed Outcomes field of the Call Center settings page are not queued to be called again in a random pool using the same call script.
Completed Outcomes mark calls as finished and prevent people from being called again with the same script. You define these on the Settings tab of the Call Center settings page.
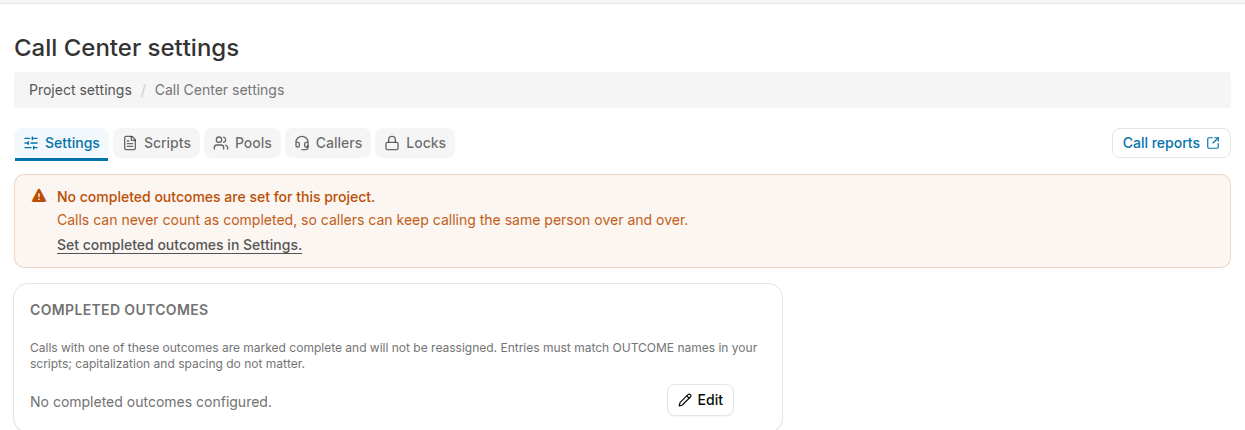
- Add to “Completed Outcomes”: Outcomes that mean “don’t call again” (e.g., “Already Voted”, “Not Eligible”, “Declined”)
- Don’t add to “Completed Outcomes”: Outcomes that mean “try again” (e.g., “Left Voicemail”, “No Answer”, “Call Back Later”)
A caller may potentially select several outcomes as they progress through the call/script. The last outcome selected will be the one recorded on the person’s contact timeline.
NEXT automatically moves to another node with a Continue button:
Field types
Text Fields:- Free-form text entry
- Best for: Comments, notes, open-ended answers
- Example: “What’s your biggest workplace concern?”
- Predefined options
- Best for: Standardized responses
- Example: “Shift: Morning, Afternoon, Night”
- True/false, yes/no
- Best for: Binary questions
- Example: “High risk worker”
- Numeric values only
- Best for: Counts, amounts, ratings
- Example: “Years of service”
- Best for: Dates of events, follow-ups
- Example: “Preferred callback date”
REQUIRED keyword means the caller must fill in the field before proceeding.
END - Auto “Call Complete” Button
END creates an exit node with an automatic “Call complete” button:
OUTCOME will be the outcome recorded on the person’s contact timeline.
A caller may potentially select several outcomes as they progress through the call/script. The last outcome selected will be the official outcome of the call and will be recorded on the person’s contact timeline.
CALL COMPLETE becomes the button label.
DEAD END - Blocking Call Completion
Sometimes you need to end a script path without allowing immediate call completion:
DEAD END hides the “Call complete” button and forces the caller to go back to the previous node, skip the person or click “Call interrupted”.- At least one active virtual SMS phone number
- SMS-capable numbers (not all phone numbers support SMS)
Including SMS in Scripts
AddSMS MESSAGE to any node:
Message guidelines
Length: Keep messages under 160 characters when possible (standard SMS length) Content:- Include the union name so they know who’s texting
- Be specific about action items (date, time, location)
- Make it personal with variables and merge fields
“Hi Maria! Local 123 meeting Thursday 6pm at 100 Main St. Bring your questions!”Bad Example:
“Meeting Thursday”Merge fields Use merge fields to include unique IDs in links:
- External system or custom field must have “Messaging merge token” enabled
- Person must have a value in that external system or custom field
- Token format:
%SystemName-ID%
BCSS Variables Scripts can display personalized information using these variables: Person Information
{{person.first_name}}- First name (e.g., “Maria”){{person.last_name}}- Last name (e.g., “Garcia”){{person.name}}- Full name (e.g., “Maria Garcia”)
{{caller.name}}- The person making the call
{{person.employer}}- Main employer{{person.department}}- Department or specific worksite{{person.job_title}}- Job title or classification
{{person.custom_fields.[field_name text]}}- Any custom field value (the field name must be lower case and followed by the word “text”)- Example:
{{person.custom_fields.[shift text]}}displays the shift custom field
{{person.event_steps.[event_name : step_name]}}- Event step status- Example:
{{person.event_steps.[One-on-One : Completed]}}shows if the step is checked (this will return true or false)
%ExternalSystemName-ID%- In SMS messages only- Example: “Visit https://vote.org/id/%VoterFile-ID%”
- The system replaces the token with the person’s external ID
Script elements in detail
Working with custom fields Custom fields let you collect project-specific data during calls. To use them:- The custom field must exist in your project (Project settings → Custom fields)
- Optionally mark it as “Display in Call Center” for easier access
- Reference it in your script:
- Use
REQUIREDfor critical data:CUSTOM FIELD REQUIRED MembershipNumber - Use clear field names that describe what you’re collecting
- Consider creating dropdown custom fields (using options) for consistency
Working with event steps
Event steps track activities and milestones. Buttons in scripts can automatically check event steps:- 0: Unassessed
- 1: Strong Union supporter
- 2: Union supporter
- 3: Undecided
- 4: Leaning Hostile
- 5: Hostile
Display assessment in the Call Center and Enable editing of assessment can be enabled in the Call Center Settings on the Settings tab.
Supplemental fields
Supplemental fields appear at the bottom of every node, regardless of which path the caller took through the script. Define them at the top of your script:Complete Example Scripts
Example 1: Union Organizing Outreach with Conditional Routing
Goal: Contact members about union organizing efforts, collect petition signatures, and recruit volunteers using conditional routing based on member status.- SUPPLEMENTAL section with labeled custom fields
- Advanced CONDITION with OR logic for member status routing
- EVENT STEP tracking throughout (Hours Reduced, Petition, Volunteer)
- NEXT instruction for automatic progression with “Continue” button
- HTML/CSS styling with colors, bold, lists, and blockquotes
- Person variables (
{{person.first_name}},{{person.employer}}) - Custom field variables in CONDITION (
{{person.custom_fields.[status text]}}) - Comments explaining script logic
- Multiple call outcomes (Reached, Left Employer, Call back later, Wrong number, No answer/voicemail)
- Three distinct messaging paths based on member status
Example 2: Basic GOTV Phone Bank
Goal: Remind voters to vote, confirm their plan, and collect vote intention.- HTML/CSS styling for emphasis (bold, colors, italics)
- Multiple paths based on voter status
- SMS MESSAGE for election reminders
- Person variables
{{person.first_name}} - Data collection for vote plans
- Clear outcomes for reporting
- Callback option for busy voters
Example 3: Member Survey and Issue Identification
Goal: Identify workplace issues, gauge union support, and recruit organizing committee members.- HTML/CSS styling with colors and emphasis
- Custom field variables (
{{person.employer}},{{person.department}}) - Issue identification and severity rating
- Union support assessment
- SMS MESSAGE with styling notes for callers
- Organizing committee recruitment path
- Multiple engagement levels captured
Example 4: New Member Onboarding
Goal: Welcome new members, collect information, and schedule orientation.- Welcome message with HTML/CSS styling
- SMS MESSAGE with custom field variables in message
- Multiple committee signup paths
- Custom field variable usage (
{{person.employer}},{{person.custom_fields.[best phone text]}}) - Contact preference collection
- Progressive engagement strategy
Example 5: Personalized Member Outreach with Conditions
Goal: Route calls based on member status, department, and previous engagement using advanced CONDITION logic.- Advanced CONDITION logic:
- Basic CONDITION with simple equality check
- OR logic to match multiple member statuses
- AND logic to combine multiple conditions (inactive AND not contacted recently)
- Extensive HTML/CSS styling throughout prompts
- Multiple custom field variables:
- Built-in fields (
{{person.employer}},{{person.department}},{{person.job_title}}) - Custom text fields (
{{person.custom_fields.[member status text]}},{{person.custom_fields.[current campaign text]}})
- Built-in fields (
- Personalized routing based on member data
- Dynamic messaging using person variables
- GeneralOutreach ELSE path for unmatched conditions
Troubleshooting
Script validation errors
Error: “Node ‘NodeName’ does not exist”
Cause: A button’sTARGET references a node that doesn’t exist.
Example:
- Find where the node is referenced
- Either create the missing node or change the target to an existing node
Error: “Duplicate node name”
Cause: Two nodes have the same name. Example:Error: “Missing PROMPT in node”
Cause: A node exists without a PROMPT statement. Example:Creating and Managing Scripts
Step-by-Step: Creating a Script
-
Navigate to script page
- Click the Project settings icon in the upper right corner of any page (or press Ctrl-K / ⌘K), then choose Scripts
- Click New call script
-
Name your script
- Enter a descriptive name (e.g., “GOTV 2024”, “Member Survey Fall”, “Pledge Card Collection”)
- Use names that make it clear what the script is for
-
Write your BCSS code
- In the BCSS editor, write your script using the syntax covered above
- Start with a simple flow and add complexity gradually
- Use the example scripts as templates
-
Validate your script
- Click Validate to check for syntax errors. The status line next to the button shows the result: “The script is valid.” or “You have N errors”.
- When validation finds errors, up and down arrow buttons appear next to the status. Click them to step through errors one at a time; the editor moves the cursor to each error line. A problems list below the toolbar also shows each error as a clickable link — clicking a link moves the editor cursor to that line.
- Common errors:
- Missing node names
- Duplicate node names
- Buttons pointing to non-existent nodes
- Missing PROMPT in a node
- After a successful validation, a warning callout also appears below the editor if the script has no
OUTCOMEsteps in any path, or if none of its outcomes match the project’s Completed outcomes list. This means calls using this script can never be marked completed. Fix the issue in the script and validate again to clear the warning.
-
View the flow chart
- Click Flow chart to see a visual representation. The button is only active after the script validates successfully; a hint next to it reads “Validate the script to display a flow chart” until then.
- This helps identify logic errors or dead ends
- Ensure all paths lead to either OUTCOME or DEAD END
-
Save as draft
- Click Save to save your script. The button changes to “Saving…” and the form fields are disabled until the save completes.
- If the server refuses the save (for example, because the name is blank or the flow is invalid), a red summary box appears at the top of the form. Each line in the box is a link that moves focus to the problem field.
- If you click Cancel after making changes, the editor asks you to confirm before discarding your unsaved work.
- If your session expires while you were editing, the save shows “Your session has ended, so this page can no longer save.” Copy your script text somewhere safe, then sign in again in a new tab and enter your work into a fresh form.
-
Test your script
- Before activating, test the script with a small call pool
- Have callers walk through different paths
- Collect feedback on clarity and flow
Best practices
1. Start with a clear goal Before writing a single line, answer:- What information do I need to collect?
- What action do I want people to take?
- How will I use the outcomes for follow-up?
- ❌ “Greetings. I am inquiring as to your availability for union participation.”
- ✅ “Hi! Do you have a few minutes to talk about union activities?”
- State the purpose upfront
- Offer an easy exit (“Is now a good time?”)
- Keep scripts under 5-10 minutes when possible
- Don’t collect data you won’t use
- ❌ “What do you think?”
- ✅ Clear buttons: “Very interested”, “Somewhat interested”, “Not interested”
- Enthusiastic supporters
- Undecided people
- Those who say no
- People who want callbacks
- Those who ask to be removed from lists
- Walk through every possible path
- Have a colleague test it
- Do a pilot with 5-10 friendly contacts
- Fix issues before full rollout
- Debrief with callers after phone banks
- Ask what was confusing
- Look at where people got stuck (check call duration)
- Update scripts between campaigns
Best practices for script design
Keep it conversational- Write prompts the way you would naturally speak
- Avoid overly formal or robotic language
- Example: “Hi Maria” not “Greetings, Ms. Garcia”
- Button text should make the outcome obvious
- Bad: “Option A”, “Option B”
- Good: “Yes, I’m interested”, “No, not interested”
- Include options for “I don’t know”, “Call me back”, “Remove from list”
- Don’t force people into binary choices when their situation might be more complex
- Every field you add increases call time
- Focus on the most important information
- You can always follow up later
- Including the person’s name and workplace makes the conversation feel more genuine
- Example: “Hi
{{person.first_name}}, this is{{caller.name}}from the union”
- Walk through your script as if you were different types of contacts
- Ensure positive, negative, and neutral paths all make sense
- Think about how you’ll use outcome data for follow-up
- Create specific enough outcomes to guide next steps
- Example: “Strong Support - Committee Interest” vs just “Completed”
Managing script versions
Editing active scripts- You can edit an active script, but changes affect all future calls immediately
- If making major changes, consider creating a new version instead
- To disable a script, uncheck Active in the Scripts tab of the Call Center settings page.
- Disabled scripts will disable call pools that use them.