

What are Turf Groups?
Turf Groups are collections of geographic territories (called Turf Lists) that divide contacts into manageable, geographically-clustered areas. Each turf group contains multiple numbered turf lists, with each list containing contacts that are geographically close to each other.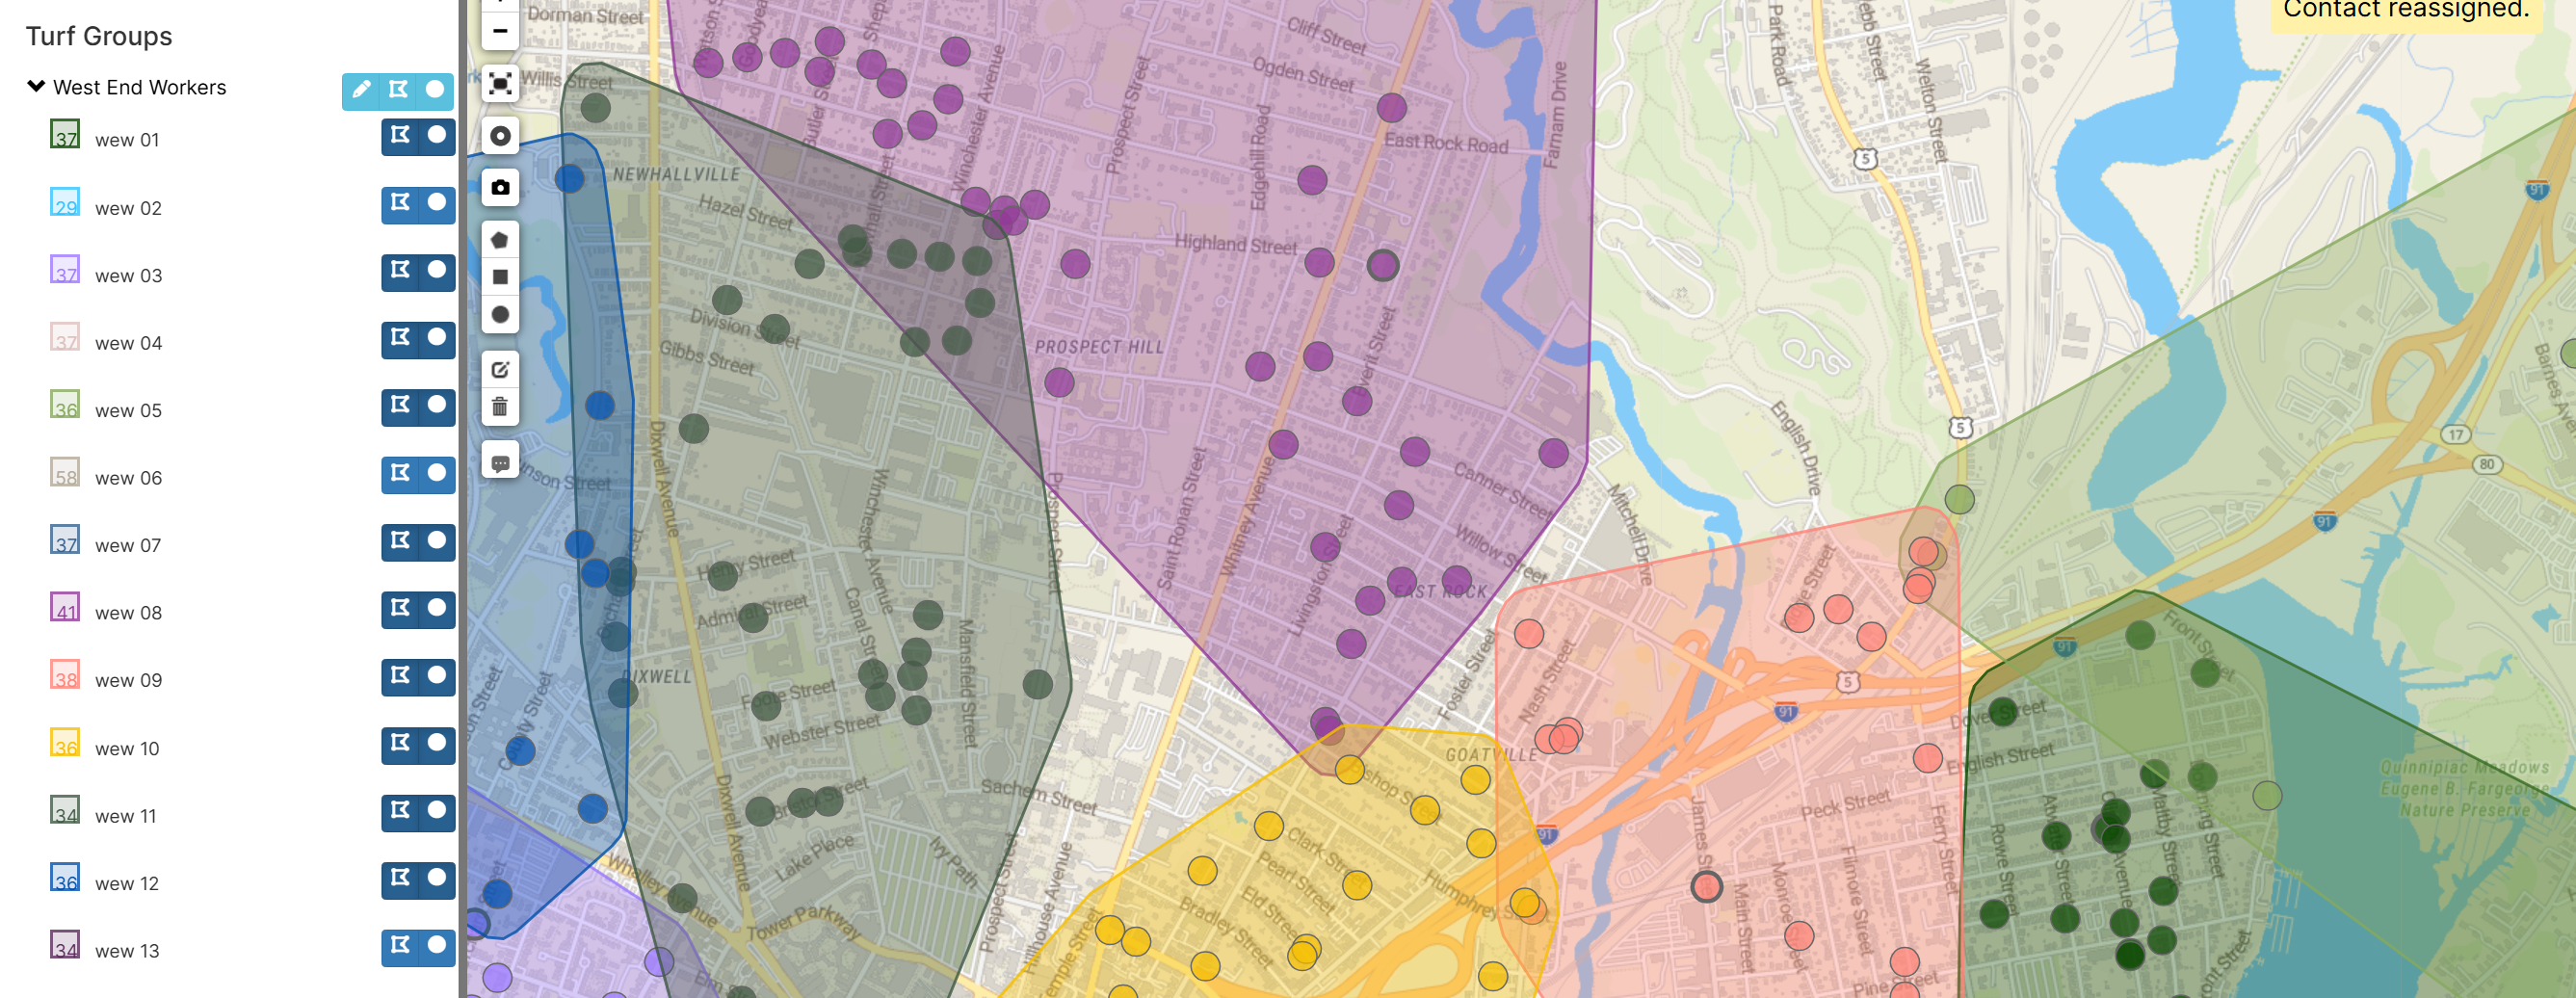
- Turf Group: A named collection of related territories (e.g., “Spring 2024 Canvass”, “Phone Bank Teams”)
- Turf List: An individual territory within a turf group, containing a specific set of contacts (e.g., “Team 01”, “Team 02”)
- Target Turf Size: The desired number of contacts per territory
- Geographic Clustering: Contacts are grouped based on their physical location to minimize travel distance
Prerequisites
Feature requirements
The Turf Groups feature must be enabled for your project. Contact Broadstripes support if you need this feature enabled.Permissions
- Create turf groups: Project administrators only
- View/edit turf groups: Users with turf group editing permissions can view turf groups and edit turf list properties
Data requirements
- Contacts must have valid geocoded addresses (latitude/longitude coordinates)
- Only contacts with location data can be included in turf groups
Accessing turf groups
- Navigate to Maps (Shape Builder) from the main navigation
- Look for the Turf Groups section in the left panel
- This section appears below the “Contacts” search area and above “Shape Groups”
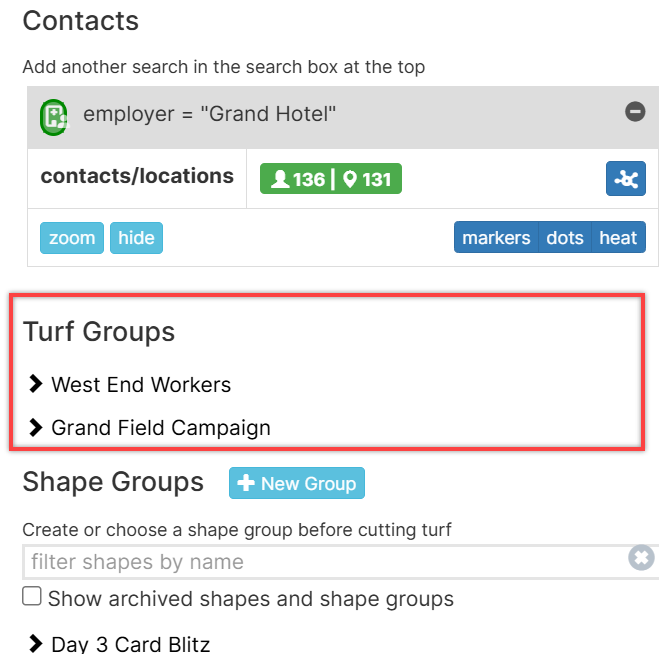
Creating turf groups
Step 1: Search for contacts- On the Maps page, use the search box at the top to find contacts
- Enter your search criteria (e.g.,
type:person memberstatus:"Active") - Click Add search or press Enter
- Your search results will appear as points on the map
- After adding a search, locate the search result box in the left panel
- Find the clustering icon button () next to the contacts/locations count
- Click the clustering icon to open the “Make a turf group” dialog
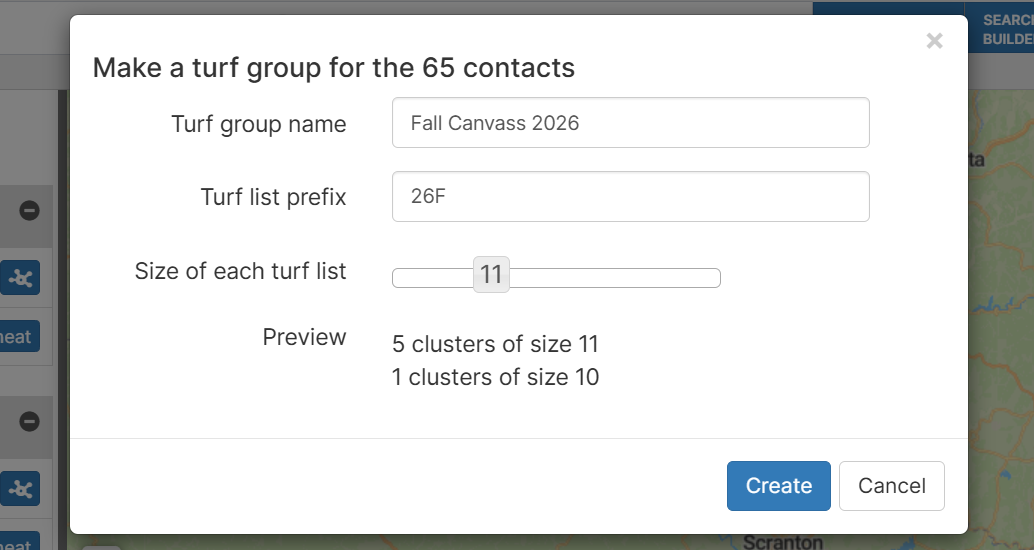
- A descriptive name for the entire collection of territories
- Example: “Summer 2024 Canvass”, “Phone Bank Campaign”
- Must be unique within your project
- A short prefix that will be used to name individual territories
- The system automatically appends numbers (01, 02, 03, etc.)
- Example: If you enter “Team”, territories will be named “Team 01”, “Team 02”, etc.
- Must not conflict with existing list names
- Use the slider to set the desired number of contacts per territory
- The preview area shows how many turf lists will be created
- Must be greater than 0
- A turf group named “Spring 2024 Field Campaign”
- 5 turf lists: “Field Team 01”, “Field Team 02”, “Field Team 03”, “Field Team 04”, “Field Team 05”
- Each list will contain approximately 50 geographically-clustered contacts
- Review the preview message showing how lists will be distributed
- Click Create
- The system will process your request in the background
Processing Time: Turf group creation happens in the background. It may take several minutes depending on the number of contacts. The new turf group will appear in the Turf Groups panel when complete.How clustering works The system uses a geographic clustering algorithm to create balanced territories:
- Location-Based: Contacts are grouped based on their geocoded addresses (latitude/longitude)
- Equal Sizing: The algorithm attempts to create territories with similar numbers of contacts
- Geographic Proximity: Contacts within each territory are geographically close to minimize travel
- Automatic Calculation: The number of territories is calculated automatically based on total contacts divided by target turf size
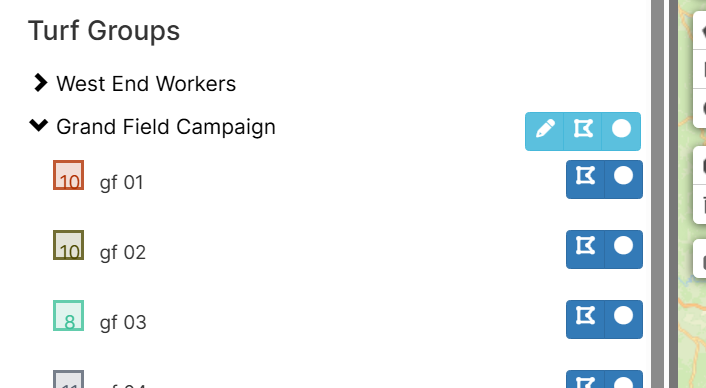
Viewing turf groups
- On the Maps page, turf groups appear in the Turf Groups section of the left panel
- Each turf group shows as a collapsible panel with a chevron icon
- Click the turf group name (or chevron) to expand and reveal the turf lists within
Viewing turf lists
When you expand a turf group, each turf list displays:- Color Indicator: A colored bar identifying this turf list on the map
- Contact Count: Number of contacts in this territory
- Name: The turf list name (e.g., “Team 01”)
- Toggle Buttons: Outline and marker toggle buttons
Displaying turf lists on the map
To visualize a turf list on the map, use the toggle buttons next to each turf list:
To show a turf list:
- Expand the turf group to see its turf lists
- Click the outline button (polygon icon) to show the geographic boundary
- Click the markers button (circle icon) to show individual contact markers
- Use the Toggle All Outlines or Toggle All Markers buttons in the turf group toolbar
- The map will zoom to fit all displayed territories
Interacting with turf list outlines
When you click on a turf list outline on the map, a popup appears with: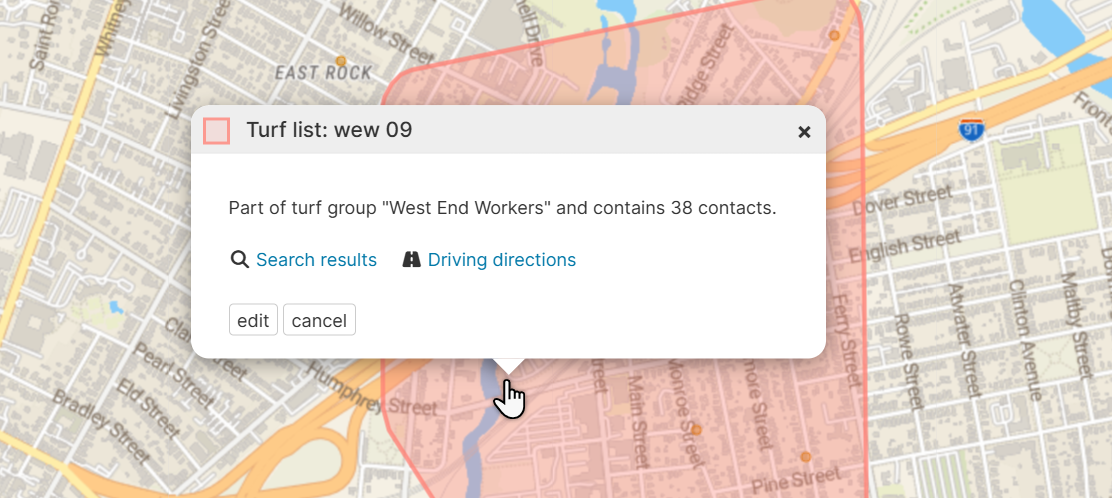
- Turf list name and the turf group it belongs to
- Contact count for this territory
- Search results link: Opens a new tab showing all contacts in this turf list
- Driving directions link: Opens the routing page for contacts in this turf list
- Edit button: Modify the turf list name or move it to a different turf group
- Cancel button: Close the popup
Editing turf lists
To edit a turf list:- Click on the turf list outline on the map
- Click the Edit button in the popup
- You can change:
- Name: The turf list name
- Turf group: Move the turf list to a different turf group
- Save your changes
Editing turf groups
To edit a turf group:- Click the Edit button (pencil icon) in the turf group toolbar
- You can change the turf group name
- You can also delete the entire turf group (this removes all turf lists within it)
Using turf lists for searches
Turf lists integrate with the search system. You can search for contacts in a specific turf list using:- Creating reports for specific territories
- Assigning work to team members
- Tracking progress by territory
Best practices
Naming conventions-
Group Names: Use descriptive names that include timeframe or campaign
- Good: “Fall 2024 GOTV”, “Q1 2025 Membership Drive”
- Avoid: “Test”, “Group 1”
-
List Prefixes: Keep prefixes short and meaningful
- Good: “Team”, “Zone”, “District”
- Avoid: “A Very Long Prefix That Makes Names Hard to Read”
- Outreach Method: Door-to-door canvassing may need smaller territories (25-50)
- Geography: Urban areas can support larger territories due to density
- Timeline: Longer campaigns can handle larger territories
- Team Capacity: Match territory size to your team’s capacity
Planning ahead
- Test First: Create a small test turf group to verify your settings
- Review the Map: Check the geographic distribution after creation
- Clean Data: Ensure contact addresses are accurate before clustering
- Coordinate with Team: Discuss territory sizes with your field team
Reassigning Contacts Between Turf Lists
After turf groups are created, you may need to move individual contacts from one turf list to another within the same turf group. This can be done directly from the map popup. Prerequisites- The contact must already be assigned to a turf list
- You can only reassign contacts between turf lists within the same turf group
- Display the turf list markers by clicking the markers button (circle icon) next to the turf list in the left panel
- Click on a contact marker on the map to open the contact popup
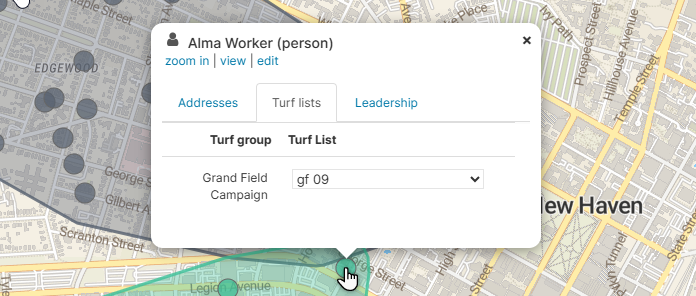
- Select the Turf Lists tab in the popup (if not already selected)
-
Locate the turf group in the table. You’ll see:
- The turf group name in the left column
- A dropdown showing the current turf list assignment in the right column
-
Select a new turf list from the dropdown menu
- The dropdown shows all available turf lists within that turf group
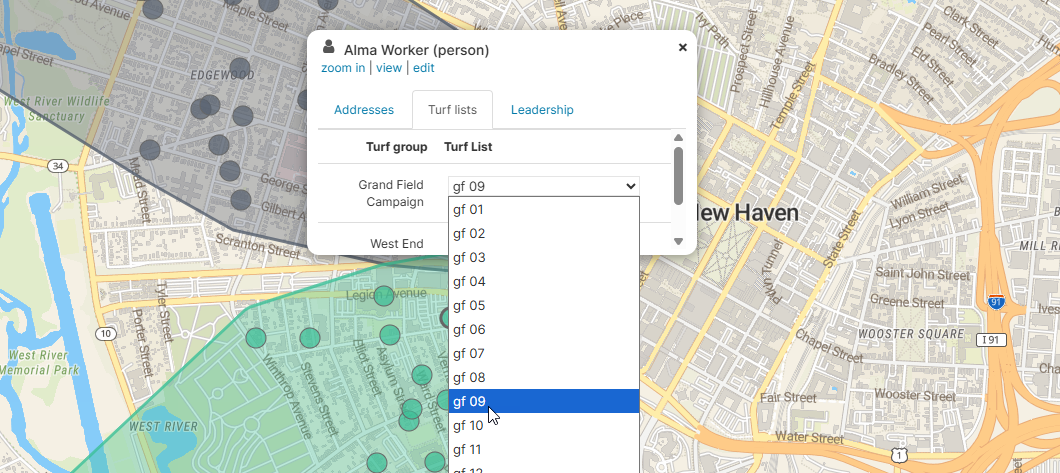
- The dropdown shows all available turf lists within that turf group
- The popup closes automatically and a message appears: “Reassigning turf list…”
- Confirmation appears when complete: “Contact reassigned.”
- Click the contact’s marker on the map
- In the popup, find the turf group (e.g., “Spring 2024 Field Campaign”)
- The dropdown shows “Team 03” as the current assignment
- Select “Team 05” from the dropdown
- The contact is now assigned to “Team 05”
- Balancing workloads: Move contacts between territories to even out team assignments
- Geographic adjustments: Reassign contacts that are easier to reach from a different territory
- Boundary corrections: Fix contacts that were assigned to a non-optimal territory by the clustering algorithm
Validation and error handling
Validation rules The system validates your configuration before creating turf groups:- Required fields: All three fields (group name, prefix, size) must be filled
- Positive Size: Target turf size must be greater than 0
- Unique Group Name: The turf group name cannot already exist
- Unique Prefix: The generated list names cannot conflict with existing lists
- Geocoded Contacts: At least some contacts in your search must have geocodes
Common errors
“Turf group name is already in use” Choose a different turf group name. Each turf group must have a unique name within your project. “Turf list prefix is already in use” The system detected that one or more of the generated list names would conflict with existing lists. Choose a different prefix. “Target turf size must be greater than 0” Enter a positive number for the target turf size using the slider. “No contacts with geocodes found” The contacts in your search don’t have valid geocoded addresses. Only contacts with location data can be included in turf groups.Limitations Technical limitations
- Geocoded Addresses Only: Contacts without geocodes are excluded from turf groups
- Processing Time: Large turf groups (1000+ contacts) may take several minutes to process
- Name Conflicts: List names must be unique within the project
- Static Territories: Turf lists don’t automatically update when contacts are added or removed from the system — Data Quality: Territory accuracy depends on the quality of geocoded addresses
Troubleshooting
Turf groups not visible Check:- Is the Turf Groups feature enabled for your project?
- Do you have the necessary permissions to view turf groups?
- Are you on the Maps (Shape Builder) page?
- Has the search finished loading? Wait for the contact count to appear.
- Do you have permission to create turf groups? (Admin only)
- Do contacts in your search have valid addresses?
- Have addresses been geocoded?
- Are you searching the correct entity type?
- Break large searches into smaller geographic areas
- Use more specific search criteria to reduce contact count
- Contact your administrator if processing consistently fails