

Overview
The Mailing Labels report generates a printable PDF of contact addresses from your search results, formatted to fit standard Avery label sheet templates. Use this report when you need to send physical mail — postcards, newsletters, flyers, ballot mailings, or contract packets — to a targeted group of contacts in your project. You print the resulting PDF onto a sheet of pre-cut label stock, peel, and stick.When to use it
- Direct mail campaigns: Send postcards, leaflets, or fliers to a targeted list of workers or members.
- Ballot or vote-by-mail packets: Address envelopes for ratification votes, officer elections, or surveys.
- Newsletters and member communications: Bulk-mail to a saved search of active members.
- House-visit kits: Pre-print address labels for a turf so organizers can drop materials quickly.
Generate a Mailing Labels report
- Run a search for the contacts whose addresses you want to print.
-
From the search results page, select the contacts to include:
- Click all in the toolbar to include every result in the search.
- Click page to include only the contacts visible on the current page.
- Or individually check the box next to specific contacts.
-
Click the Reports menu and choose Mailing labels.
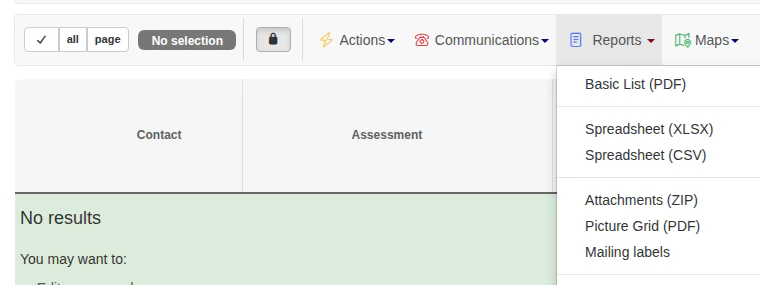
-
The Mailing labels dialog opens. Configure the report:
- Label: Pick the label template that matches the label stock you have on hand. Each option lists the Avery code and the label dimensions — for example, 5160 (2⅝” × 1”) for address labels, 30 per sheet.
- Start at label: Enter the position on the sheet where printing should begin. The text below the field tells you how many labels the selected template fits per sheet; set a higher number to skip labels you have already used on a partial sheet.
- Click Generate. The dialog closes and Broadstripes queues the PDF for download.
- When the PDF is ready, download it from the Reports page in the sidebar.
- Load your label sheets into your printer, open the PDF, and print at 100% / actual size — do not scale or shrink to fit, or labels will not align with the sheet.
Tips
- Always print one test sheet on plain paper first and hold it up against a label sheet to confirm alignment before printing on label stock.
- Match the template to your label stock exactly. Avery 5160 and Avery 5161, for example, look similar but use different layouts. Printing on the wrong stock wastes labels.
- Skip records without an address. If you select 500 contacts and only 480 have a printable address, the report includes only those 480, and the skipped contacts are listed on a summary page at the front of the PDF. To confirm coverage before printing, re-run your search with an address filter:
address=anyfinds contacts with any address, andaddress=nonefinds the contacts with none. - Combine with saved searches so you can re-run the same mailing list later (for example, monthly newsletter recipients) without rebuilding the criteria.
Related reports
- Basic List (PDF) — Printable list of records with the columns from your layout.
- Basic List (Spreadsheet) — Same data as a spreadsheet, useful for mail merge in Word or Google Docs.
- Scheduling reports — Automatically regenerate reports on a recurring schedule.