

Overview
The After submission tab configures what happens once a form is submitted: the message the submitter sees, plus the record-side outcomes — the event step automatically applied, the contact type assigned to the created record, and the confirmation PDF saved to that record. Key features you can configure:- Set the success message shown to the submitter after a successful submission
- Automatically apply event steps when forms are submitted
- Set the contact type for new and matched contacts
- Control PDF formatting (filename and show or hide blank fields)
Configure after-submission options for your public form
Follow these steps to set up after-submission options:Step 1: Navigate to the After submission tab
To get started, select the After submission tab in the public form editor.Step 2: Set a successful submission message (optional)
In the “Successful submission message” field, enter the message that will appear after the recipient submits the public form. This could be a simple thank you or additional instructions. This text displays on the confirmation page after someone successfully submits the form. Example custom messages: After interest card submission:- Confirm that the submission was successful
- Set expectations about next steps (“We’ll contact you within X days”)
- Thank the submitter
- Keep it brief — 1-3 short sentences
Step 3: Set an event step (optional)
In the “Automatically check event step” drop-down menu, select an event step that will automatically be applied to the contact record upon form submission.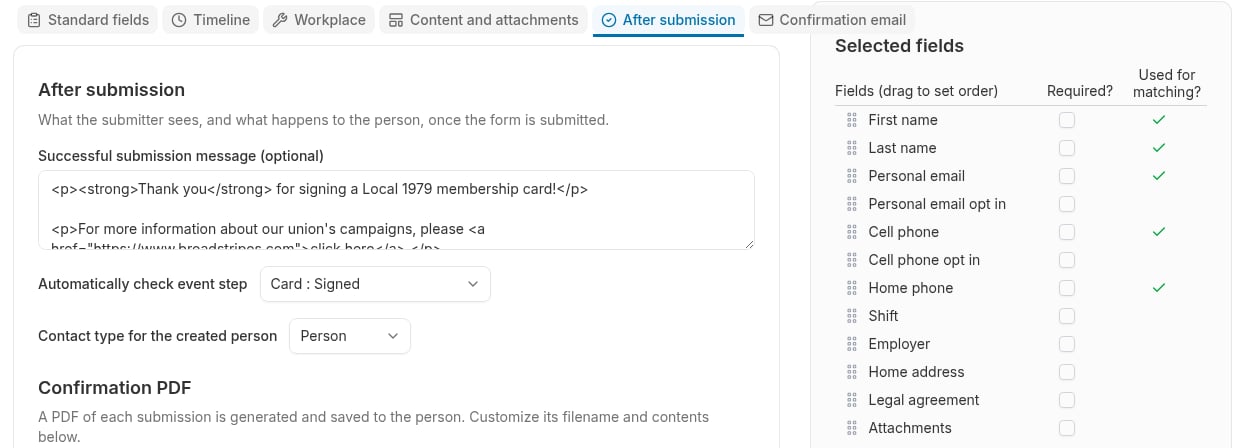
- The contact record is created or updated
- The selected event step is automatically applied to the contact
- The contact’s event status is updated accordingly
- Mark all form submitters as “Attended Training” if this is a training registration
- Set status to “Interested” for interest card submissions
- Apply “Contacted” status for cold contact forms
- Mark as “Recruited” when someone signs up through an organizer’s unique link
- You want to track form submissions as a specific milestone
- The form represents a specific stage in your organizing pipeline
- You want submitters to appear in reports filtered by event step
- The form is general-purpose and doesn’t represent a specific event
- You’ll manually set event steps after reviewing submissions
- Event tracking isn’t relevant to this form
The dropdown only shows events marked as “active” in the Events page. If you don’t see the event you need, go to Events in the left navigation and ensure the event is activated.
Step 4: Select the contact type
Next, select the contact type that will be created or matched when the form is submitted. The data submitted in the form will be created as this contact type. This dropdown controls which contact type is assigned to the contact after form submission. Options:- Person or Organization (default) - Contact type matches the form type
- Any internal contact type - Choose from your project’s configured contact types
- By default, person forms create contacts with “Person” contact type
- By default, organization forms create contacts with “Organization” contact type
- But you can override this to use a specific contact type instead
- “Volunteer” form creates contacts with “Volunteer” contact type
- “Member” form creates contacts with “Member” contact type
- “Prospective Member” form creates contacts with “Prospective Member” contact type
- Contact types help you categorize and filter contacts in Broadstripes
- Reports and searches can filter by contact type
- Different contact types may require different workflows
The dropdown only shows contact types configured for your project. If you need a new contact type, create it in Settings > Contact Types before configuring your form.
Step 5: Configure the confirmation PDF
A PDF of each submission is generated and saved to the contact record. You can customize its filename and contents.Hide blank fields on the PDF
If you prefer not to show any fields that were left blank on the form, check the “Hide blank fields on the PDF” box. This will remove any empty fields from the final PDF. This controls how the generated PDF displays form data. When enabled:- Fields that were left empty by the submitter don’t appear in the PDF
- Cleaner, more compact PDF
- Only shows data that was actually provided
- All form fields appear in the PDF, even if empty
- Empty fields show as blank lines or “[no data]”
- Longer PDF that shows the complete form structure
- Enable for most forms (cleaner PDFs)
- Disable if you need to see the full form structure even for blank fields (audit purposes)
Customize the PDF filename (optional)
You can customize how generated PDF files are named by creating a filename pattern using tokens. Tokens are placeholders that get replaced with actual values when the PDF is generated.Insert tokens using the dropdown
Click the Insert token button to open a dropdown menu with available tokens: System tokens (always available):- First name - Submitter’s first name
- Last name - Submitter’s last name
- Date (YYYY-MM-DD) - Submission date (e.g., 2026-02-09)
- Time (HH-MM-SS-AM/PM-TZ) - Submission time (e.g., 10-30-45-AM-EST)
- Any field you’ve added to your form in the Standard fields tab appears as a token option
- Custom fields, person/organization fields, and employment fields are all available
- Tokens are automatically generated from field labels (e.g., “Shift” becomes
%shift%)
How tokens appear in the editor
Tokens display as badges in the editor, making them easy to identify and manage. For example, if you insert the First name and Last name tokens with an underscore between them, you’ll see:[First name]_[Last name]
Each badge shows the human-readable label for the token. You can type regular text between tokens to create separators like underscores, hyphens, or other characters.
Remove tokens
To remove a token from your pattern:- Hover over the token badge
- Click the x button that appears on the right side of the badge
Orphaned tokens
If you remove a form field from the Standard fields tab that’s being used in your PDF filename pattern, the system will alert you. You have three options:- Remove token and field - Automatically removes both the token from the filename pattern and the field from the form
- Edit filename - Navigate to the filename pattern editor to manually adjust the pattern
- Cancel - Keep the field on the form
Example filename patterns
The
.pdf extension is added automatically — you don’t need to include it in your pattern. Field values are sanitized (special characters replaced with hyphens) and truncated if too long to ensure valid filenames.Step 6: Save your work
Once you’ve configured the options, click Save to finish customizing your public form.Configuration Examples
Basic Worker Interest Card
Successful submission message: “Thank you! An organizer will be in touch soon.” Event step: “Interest Card : Submitted” Final contact type: “Prospective Member” Hide blank fields on PDF: Yes Result: Form submitters are marked with “Submitted” event status and “Prospective Member” contact type. PDFs are clean and concise.Volunteer Application
Successful submission message: “Thanks for applying! We’ll review your application and contact you within one week.” Event step: “Volunteer Application : Applied” Final contact type: “Volunteer Applicant” Hide blank fields on PDF: Yes Result: Form submitters see a custom confirmation message and are assigned “Volunteer Applicant” contact type.Simple Event RSVP
Successful submission message: “You’re registered! We’ll send you event details by email.” Event step: “March Meeting : Registered” Final contact type: “Member” Hide blank fields on PDF: Yes Result: Clean, simple confirmation. Submitters are marked as registered for the March meeting.Grievance Form
Successful submission message: “Your grievance has been filed. A representative will contact you within 48 hours.” Event step: “Grievance : Filed” Final contact type: “Member” Hide blank fields on PDF: No (show complete form for records) Result: Grievants receive clear confirmation. Complete form is preserved in PDF for legal records.Best Practices
Confirmation messages: Always set a message — the default is generic. A specific, warm message builds trust. Event steps: Use specific event steps for each form to track your funnel Contact types: Use contact types to categorize your universe (prospective members vs. members vs. volunteers) PDF formatting: Enable “hide blank fields” for most forms to keep PDFs concise Test thoroughly: Submit test forms to ensure automations (event steps, contact types) work as expected Document your approach: Keep notes on which event steps and contact types you use for which formsTroubleshooting
Event step not applying:- Verify the event is marked as “active” in the Events page
- Check that you saved the form after selecting the event step
- Submit a test form and check the contact record’s Events section
- Check that you selected the correct contact type in the dropdown
- Remember: the contact is created first, then the contact type is applied
- Verify the contact type exists and is configured for the right entity type (person/organization)
- Toggle “hide blank fields” to see if it improves layout
- Review the PDF generation job logs if available
- Submit test forms with different data to see what affects layout