

- Maintain cross-system references: Keep track of which records correspond between Broadstripes and your other systems
- Import data more intelligently: Match and update existing records using external IDs instead of creating duplicates
- Deduplicate records: Use external IDs to find and merge duplicate entries
- Personalize communications: Include external system IDs in emails and text messages
- Search efficiently: Find records quickly using external system IDs
Real-world examples
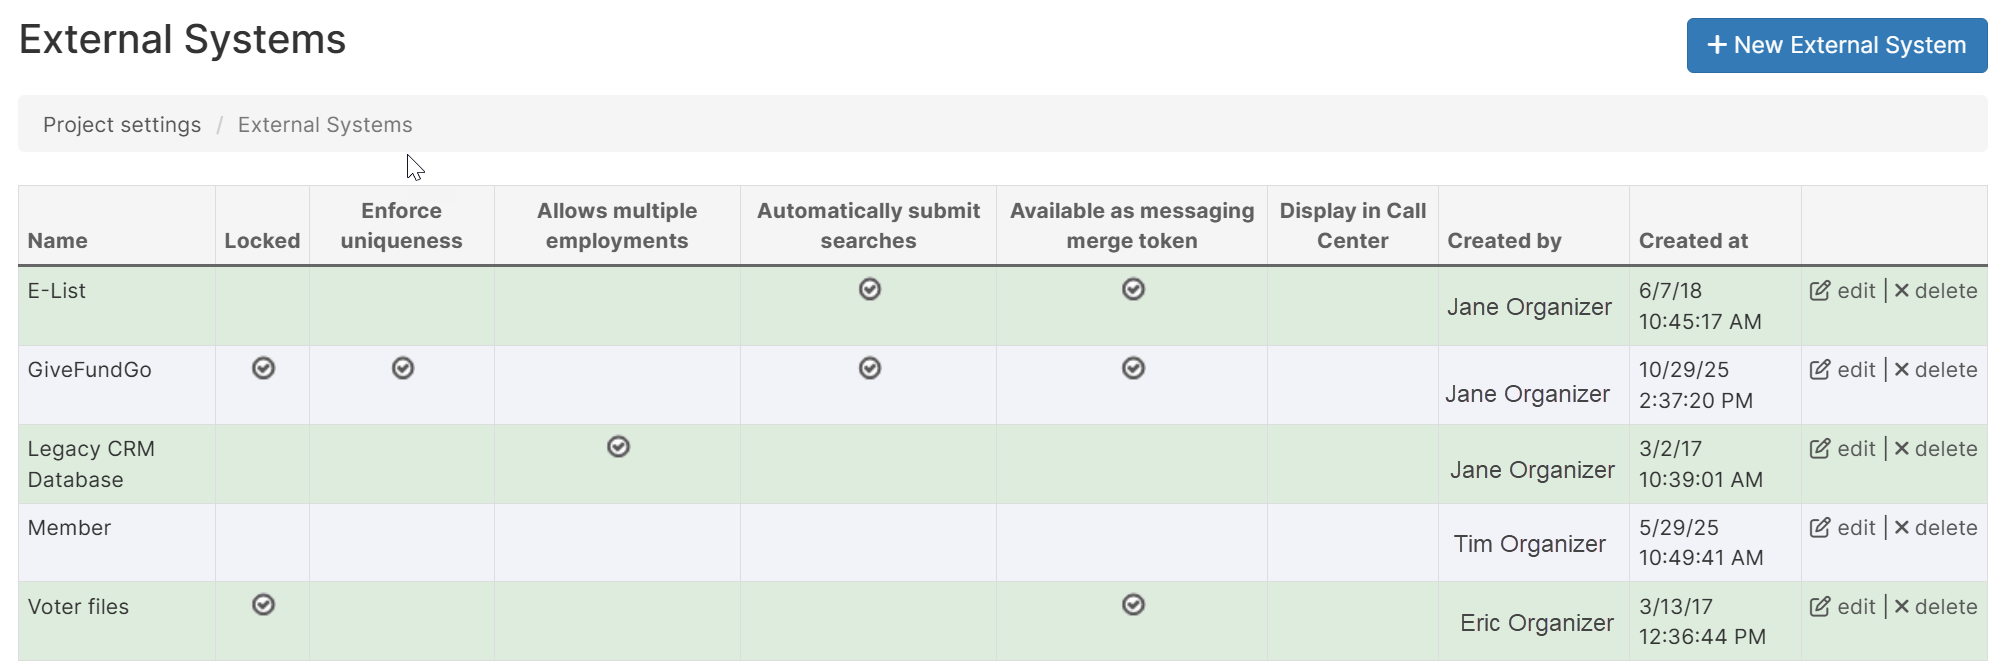
Example 1: External Platform Integration Your organization uses another platform for fundraising (Let’s call it “GiveFundGo”) but Broadstripes for organizing. You can create a “GiveFundGo” external system to store donor IDs from GiveFundGo. When importing donor data, you can match records by GiveFundGo ID to update existing people instead of creating duplicates. Example 2: Payroll System You maintain employee records in both Broadstripes and an external payroll system. Create a “Payroll System” external system to store employee IDs. When payroll information changes, you can import updates that match by employee ID. Example 3: Multiple Data Sources A union local tracks members in Broadstripes, but also receives data from their national office’s membership database and their health benefits provider. They create external systems for “National Database” and “Benefits System” to maintain connections between all three systems.Creating an external system
-
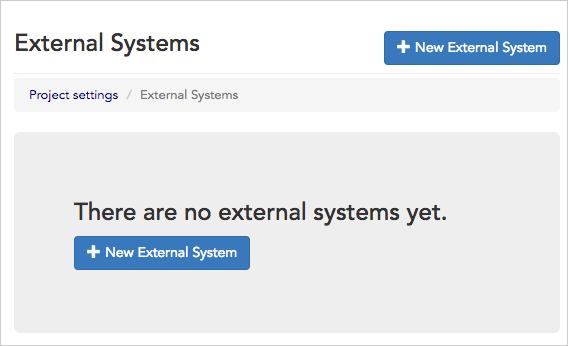
Navigate to External Systems
- Click your Settings menu
- Find “External Systems” in the drop-down menu
- Click “External Systems” to view all existing external systems
-
Create a New External System
- Click the “New External System” button
- You’ll see a form with several configuration options
- Click the “New External System” button
-
Configure Basic Settings
System Name (Required)
- Enter a clear, descriptive name for the system (e.g., “Salesforce”, “Highrise”, “QuickBooks”, “National Membership Database”)
- This name will appear throughout the app, so choose something recognizable
- Examples:
- “GiveFundGo”
- “Payroll”
- “National Database”
- “Benefits Provider”
No need to add “ID” to the system name, as it will be added automatically.
-
Configure external system settings
Each external system has several optional features you can enable:
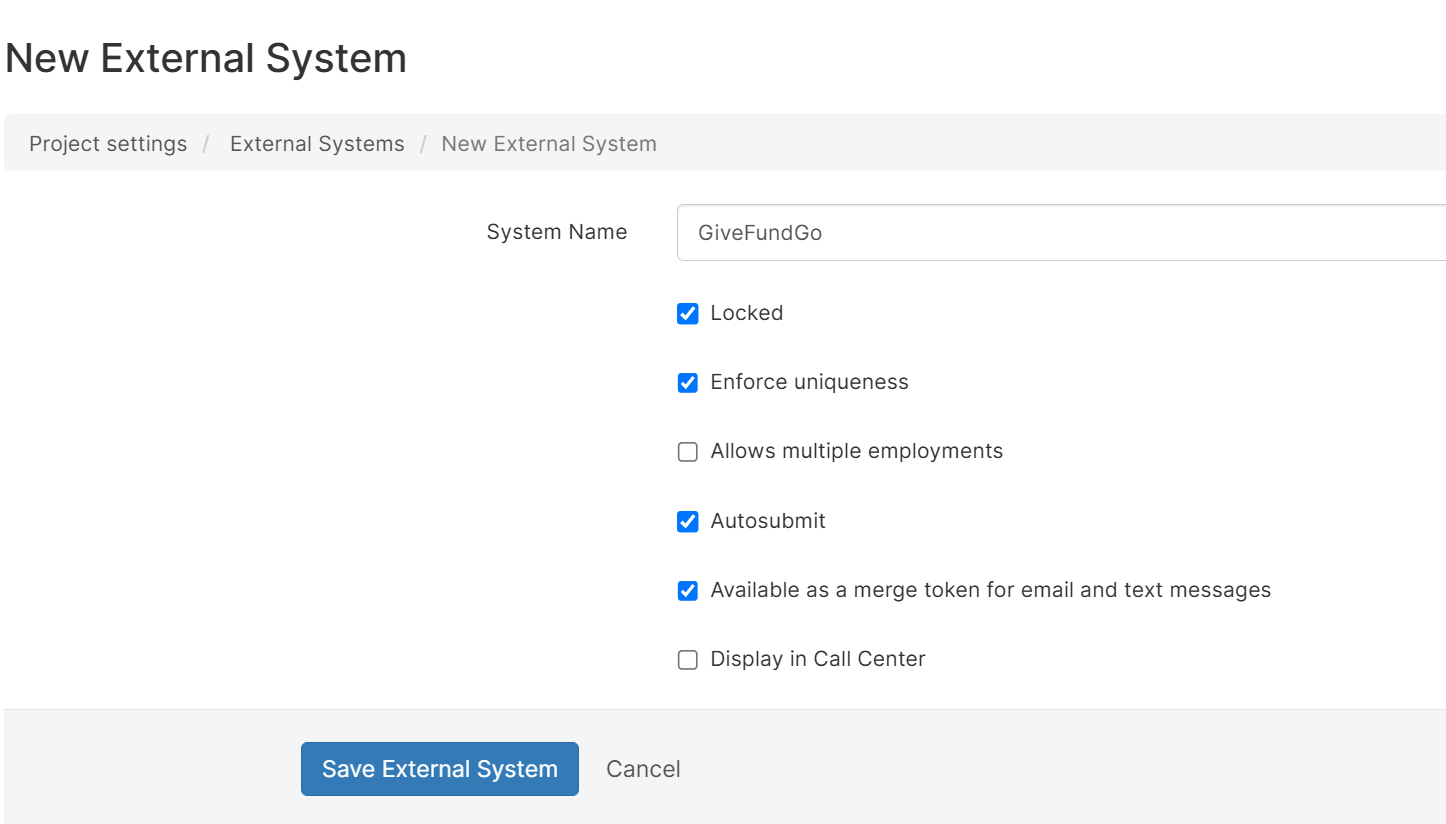
Locked
Locked
What it does: Prevents users from manually editing or deleting external system ID values.When to use it:
- ✅ Use when external system IDs should only be updated via data imports or automated processes
- ✅ Use when you want to prevent accidental changes to critical reference data
- ❌ Don’t use if users need to manually enter or correct external system IDs
Enforce uniqueness
Enforce uniqueness
What it does: Ensures that every external system ID is unique across all people and organizations in your project.When to use it:
- ✅ Use when IDs in the external system are guaranteed to be unique (like Payroll IDs)
- ✅ Use when you want to prevent duplicate entries
- ❌ Don’t use if the same external ID might legitimately appear on multiple records
Allows multiple employments
Allows multiple employments
What it does: Allows a person to be linked to multiple employers through this external system.When to use it:
- ✅ Use when workers might have jobs at multiple employers
- ✅ Use when your project supports multiple employments
- ❌ Don’t use if each person should only have one employer
Autosubmit
Autosubmit
What it does: When a user types an external system ID in the search box and it matches this system’s format, the search automatically executes.When to use it:
- ✅ Use when your external IDs have a distinctive format
- ✅ Use when users frequently search by this external ID
- ❌ Don’t use if the ID format might match other search terms
Available as a merge token for email and text messages
Available as a merge token for email and text messages
What it does: Allows you to insert external system ID values into email and SMS templates using merge tokens.When to use it:
- ✅ Use when you want to include external system IDs in communications
- ✅ Use when recipients need to reference their ID in another system
“Dear %first-name%, your member ID is %member-id%. Please reference this when calling the benefits hotline.”How to use the merge token:
- The token format is
%system-name-id%where spaces become hyphens and everything is lowercase - “GiveFundGo” becomes
%givefundgo-id% - “Local Member” becomes
%local-member-id%
Display in Call Center
Display in Call Center
What it does: Shows the external system ID field in the call center interface for quick reference during calls.When to use it:
- ✅ Use when call center staff need to see or reference external system IDs during calls
- ✅ Use when external IDs help verify caller identity
- ❌ Don’t use for systems that aren’t relevant to phone conversations
- Save the External System
- Review your configuration
- Click “Create External System”
- The system is now available throughout your project
Using external systems in data imports
External systems are most powerful when used in data imports. They allow you to intelligently match and update existing records instead of creating duplicates.How external system matching works in imports
When you configure an import to use external system matching:- During import, Broadstripes reads the external system ID from each row
- The system searches for existing people or organizations with that exact external system ID
- If a match is found: The import updates the existing record with new data from the file
- If no match is found: The import creates a new record and stores the external system ID
- The external system ID is stored on the record for future matching
Setting up external system matching in an import
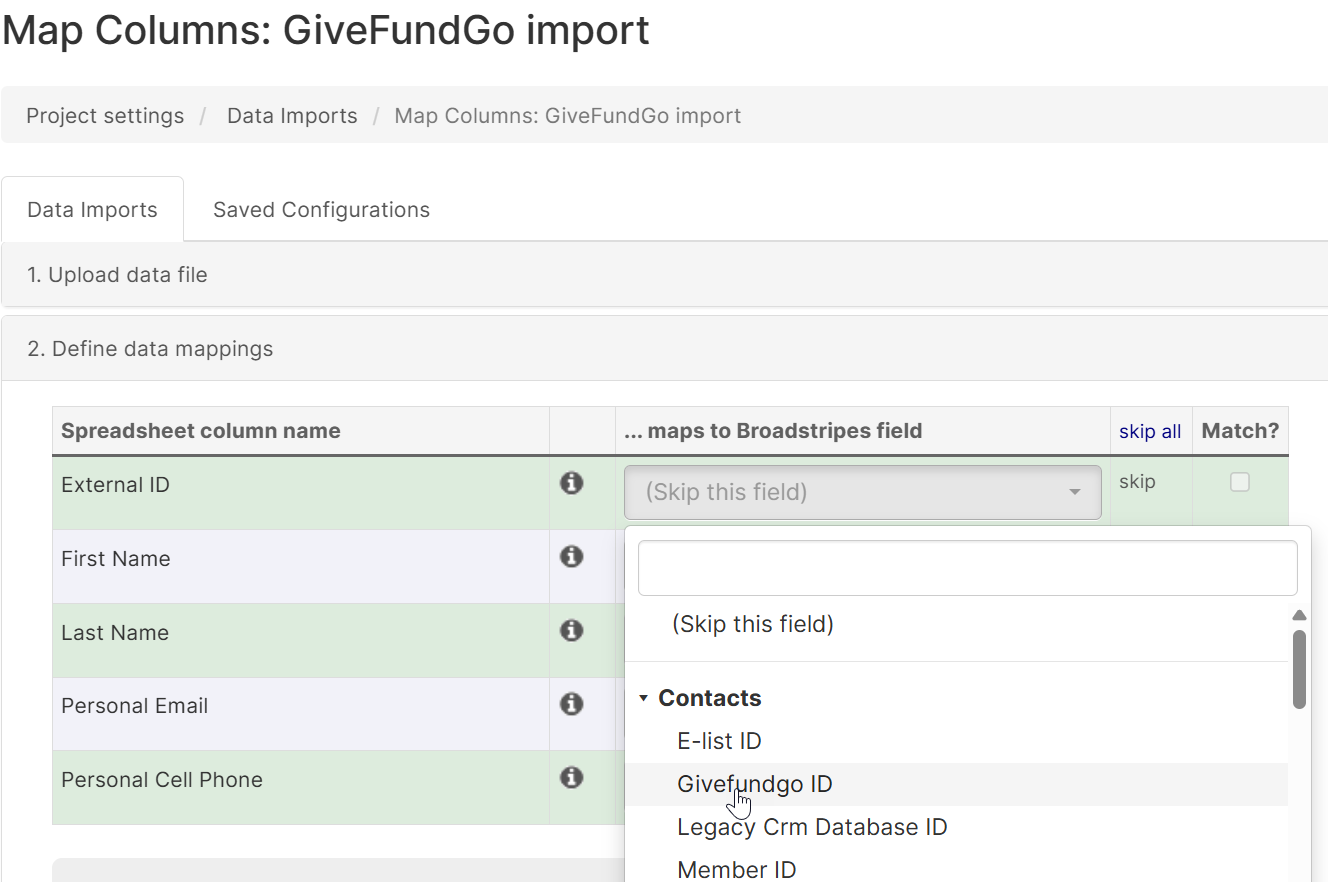
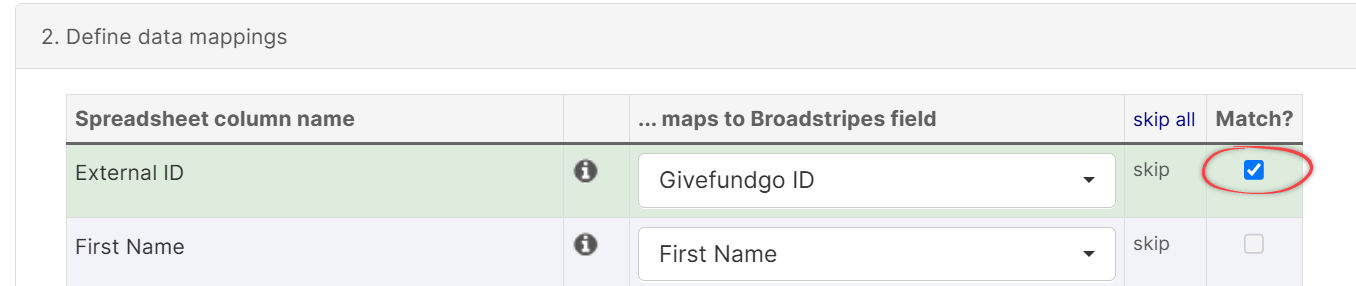
Step 1: Prepare your import file Your import file should include a column with external system IDs. For example:- Start your import (People Import or Organizations Import)
- Map your columns as usual
- In the field mapping section, look for your external system in the dropdown menu
- Map the column containing external IDs to your external system field
Example mapping:
-
Checkoff “Match?”
- Check the box for your external system in the “Match?” column
- This tells the import to search for existing records using the external system ID
-
Choose update behavior in the configuration
- Update existing records: If match found, update the record with new data
- Skip existing records: If match found, don’t change the existing record
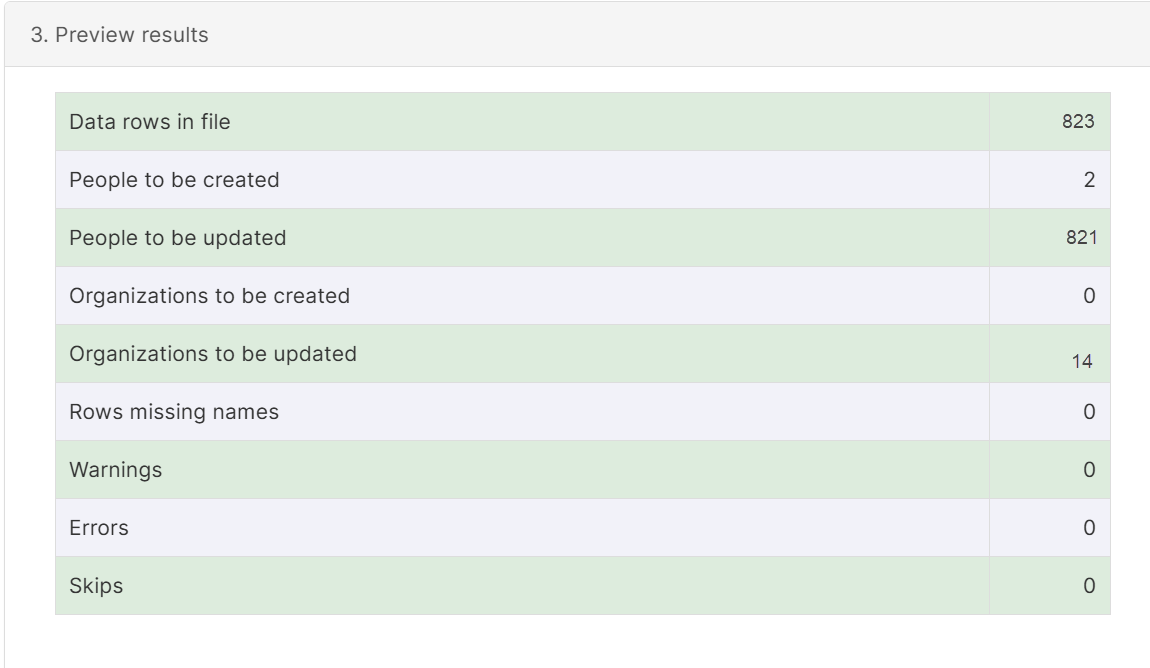
- Preview the import to see what will happen
- The preview shows which records will be matched vs created new
- The preview shows which records will be matched vs created new
- Review the match results
- Check that external system IDs are matching as expected
- Click Submit
- Review the results
- The import summary shows how many records were matched vs created
Import scenarios and examples
Scenario 1: Initial Import with External IDs Situation: You’re importing data from Salesforce for the first time. Configuration:- Map your Salesforce ID column to the “Salesforce” external system
- Enable matching on the external system in the Match? column
- Some records might already exist from manual entry or other imports
- Records with matching external IDs are updated
- Records without matches are created as new
- All records now have Salesforce IDs stored for future imports
Scenario 2: Regular Update Imports Situation: You import updated data from your payroll system weekly. Configuration:
- Map employee ID column to “Payroll System” external system
- Enable matching on the external system in the Match? column
- Choose “Update existing records”
- Each week, existing employees are updated with current information
- New employees are added automatically
- No duplicates are created because matching is by employee ID
Scenario 3: Employment Import with External Systems Situation: You’re importing employment records where employers are tracked in an external system. Configuration:
- Create external system for “Employer Unit ID”
- Map employer ID column to external system
- Enable “Allows Multiple Employments” if people can have multiple jobs
- Configure employment matching rules (Update or Append)
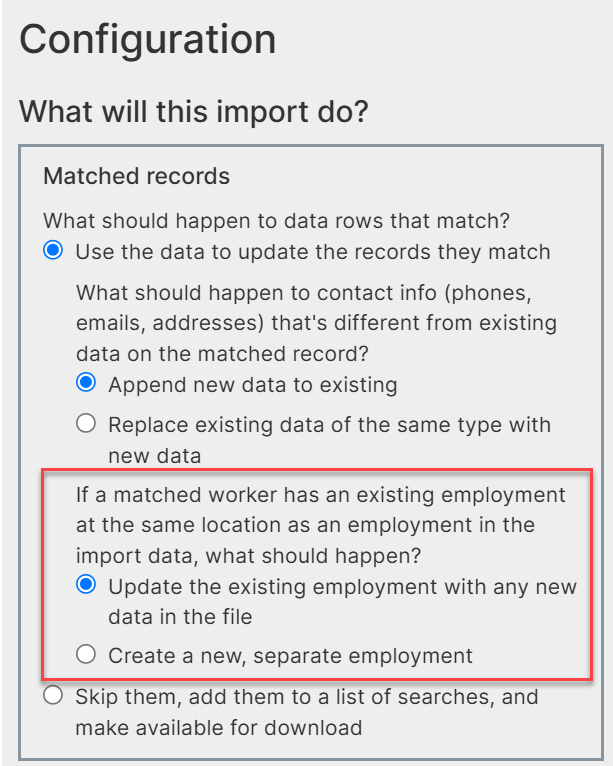
Employment matching rules
- People are linked to organizations using external employer IDs
- Employment records are created or updated based on external system matching
- Both person and organization records can be matched by external IDs
Troubleshooting import issues
Problem: Records not matching when they should
Possible causes:- External system IDs in import file don’t exactly match stored IDs
- Extra spaces, different capitalization, or different formats
- External system matching not checked in mapping section
- Check that ID values are exactly the same (Broadstripes normalizes some differences)
- Verify external system matching is checked in mapping section
- Review import preview to see why matches aren’t being found
- Check that the correct external system is selected in field mapping
Problem: Multiple records matching the same external ID
Possible causes:- “Enforce Uniqueness” was not enabled when creating the external system
- Duplicate external IDs were stored before uniqueness was enforced
- Data quality issues in the source system
- Run a report to find duplicate external system IDs
- Clean up duplicates by merging entities
- Enable “Enforce Uniqueness” to prevent future duplicates
- Fix data issues in the source system
Problem: External system IDs not being stored after import
Possible causes:- Field mapping not configured correctly
- Import errors preventing external system ID storage
- Verify field mapping includes the external system
External systems on public forms
Public forms are web forms that allow external users to submit information to your Broadstripes project. External systems can be integrated with public forms for two purposes:- Collecting external system IDs from form submitters
- Matching existing records using external system IDs and name to prevent duplicates
How external systems work on public forms
When you add an external system field to a public form:- The field appears as a text input on the form
- Form submitters can enter their external system ID (e.g., “Enter your member ID”)
- On submission, Broadstripes searches for existing records with that external system ID
- If a single match is found: The form data is merged with the existing record
- If no match or multiple matches: A new record is created (with potential_matches tracked)
Setting up external system fields on public forms
Step 1: Create or edit a public form- Navigate to Public forms in the Settings menu
- Create a new public form or edit an existing one
- Go to the Standard fields tab of the public form editor
- In the public form editor, look for available field types in the Unique IDs section

- Find your external system in the list (e.g., “GiveFundGo ID”, “Member ID”)
- Add the external system field to your form
- Be sure that “Attempt to match to existing contact” is checked for the form
- Submit test entries with known external system IDs
- Verify that matching works correctly
- Check that new records are created when no match exists
- Confirm that existing records are updated when matches are found
Enforce Uniqueness Restriction
You cannot enable “Enforce Uniqueness” on an external system that is used on a public form
Public form scenarios and examples
Scenario 1: Membership Update Form Situation: Members can update their contact information using a web form. Configuration:- Create “Member ID” external system
- Add “Member ID” field to public form
- Enable matching
- Form includes fields for address, phone, email
- Member visits form: “Update Your Contact Information”
- Member enters Member ID: “MEM-12345”
- Member updates their phone number
- On submission:
- Broadstripes finds existing record with Member ID “MEM-12345” and name
- Updates the phone number on that record
- No duplicate record created
- Create “Event System” external system (not enforcing uniqueness)
- Add “Event System ID” field to registration form (optional field)
- Enable matching by Event System ID and email
- Form includes event-specific fields
- User visits registration form
- User optionally enters external system ID (if they know it)
- User enters email and other information
- On submission:
- If external ID provided and matched: Links to existing record
- If email matched but no external ID: Links to existing record
- If no matches: Creates new record with the external ID stored
Locking data fields with external systems
The “Locked” setting on external systems provides a way to protect critical external system ID values from accidental modification or deletion.What “locked” means
When an external system is marked as “Locked”:- Users cannot manually edit or delete external system ID values through the UI
- External system IDs can still be updated through data imports
- External system IDs can still be set when creating new records
- The protection prevents accidental changes to critical reference data
When to lock an external system
Lock when:- ✅ IDs should only be updated through data imports
- ✅ You want to prevent staff from accidentally changing critical reference IDs
- ✅ The external system is the primary key for integration with another system
- ❌ Users need to manually enter or correct external system IDs
- ❌ External system is only for reference and not critical
- ❌ You’re still setting up the project and need flexibility
How locking affects different operations
User experience with locked external systems
What users see:- External system ID field appears as read-only
- Users can view the external system ID but not modify it
- The ID is visible in search results and on person/organization overview pages
- Admins can unlock the external system if corrections are needed
- After making corrections, re-lock the external system
Fields that can be locked
Here’s a comprehensive overview of what can be locked with external systems:How locking affects different operations
User experience with locked external systems
What users see:- External system ID field appears as read-only
- Users can view the external system ID but not modify it
- The ID is visible in search results and on person/organization overview pages
- Admins can unlock the external system if corrections are needed
- After making corrections, re-lock the external system
- Import processes work normally regardless of lock status
Linking and locking custom fields
Custom fields can be linked to an external system to indicate that their values come from that system and should only be updated via import.How to link a custom field to an external system
-
Navigate to Custom Fields
- Go to Project Settings → Custom Fields
- Find the custom field you want to link (or create a new one)
-
Configure the Custom Field
- Edit the custom field
- Look for “External System” dropdown menu
- Select the external system from the dropdown
- Save the custom field
-
Enable Locking
- Edit the external system
- Check the “Locked” checkbox
- Save the external system
[locked by Payroll System]
Custom field locking scenarios
Scenario 1: Payroll Data Fields You import employee salary, hire date, and job classification from your payroll system weekly. Configuration:- Create external system: “ADP Payroll” (Locked ✓)
- Create custom fields:
- “Salary” → Link to “ADP Payroll”
- “Seniority Date” → Link to “ADP Payroll”
- “Job Level” → Link to “ADP Payroll”
- Staff can view these fields but cannot edit them
- Values update only through weekly payroll imports
- Prevents manual changes that would conflict with payroll records
- Create external system: “National Database” (Locked ✓)
- Create custom fields:
- “Member Status” → Link to “National Database”
- “Local Assignment” → Link to “National Database”
- “Dues Current” → Link to “National Database”
- Local staff can see member data but cannot change it
- Only national office imports can update these fields
- Ensures consistency across all locals
Unlinking custom fields
If you need to unlink a custom field from an external system:- Edit the custom field
- Clear or change the external system selection
- Save the custom field
- The field becomes editable again
Linking and locking contact information
Email addresses and phone numbers can be sourced from external systems to ensure contact information stays synchronized with authoritative sources.How contact information locking works
When you import email addresses or phone numbers through an external system import:- Map Email/Phone Columns: Map email/phone columns to the import
- Include External System Column: Include the corresponding external system ID values in the import
- Import Executes: Contact information is created/updated
- Automatic Linking: Each email/phone is linked to the external system ID
- Locked Display: If the external system is locked, contact info shows as read-only
User experience with locked contact info
Locked Email Display: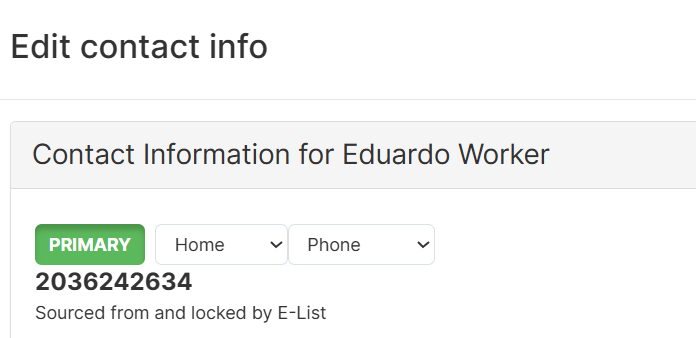
Linking and locking employment records
Employment records (the relationship between a person and an organization) can be linked to external systems to ensure job data matches HR or payroll systems.How employment locking works
Employments support multiple external systems - a single employment can be linked to several external systems simultaneously (e.g., both Payroll and HR systems). When importing employments:- Map columns for person identifier, organization identifier, and job details
- Select which external system(s) are the source
- System creates or updates employment records
- Employment is linked to the specified external system(s)
- If any linked external system is locked, the employment becomes protected
Locked employment restrictions
When an employment is linked to a locked external system: Cannot Delete:- Delete button is hidden on employment records
- Prevents accidental removal of employment relationships
- Employment must be removed from external system first
- Termination button is hidden or disabled
- Termination dates can only be set via import
- Ensures termination is processed in HR/payroll system first
- For projects with multiple employments, primary employment may be locked
- Prevents manual changes to which job is primary
- Primary status determined by external system logic
- All employment details remain visible
- Job title, department, hire date, etc. are displayed
- Users can see which external system controls the employment
Displaying external systems in search results
External system IDs can be displayed as columns in your search results, making it easy to find, reference, and sort by external system IDs.Adding external system columns to search
Step 1: Access search layout configuration- Go to your search results page by running a search
- Look for the Layout dropdown menu just above the search results
- Click and select “Modify layout”
- In the available “Basic” column options, click “Unique IDs”
- Arrange column in your preferred order
- Apply or Save as new layout The Unique IDs column will display all external system IDs (and the Broadstripes ID) for the record
Using external system IDs in messaging
When “Available as merge token for email and text messages” is enabled for an external system, you can include external system ID values in bulk emails and text messages.Setting up external system merge tokens
Step 1: Enable the feature- Edit your external system
- Check “Available as merge token for email and text messages”
- Save the external system
%system-name-id%
Conversion rules:
- Convert spaces to hyphens
- Convert to lowercase
- Add
-idsuffix
Using merge tokens in messages
In email templates
Example 1: Membership Card EmailIn SMS/text messages
Example 1: Reminder TextWhat happens if a recipient doesn’t have an external system ID?Broadstripes handles this by replacing the token with a blank space if the person doesn’t have the external system ID.