

Manage the job titles (also called classifications) you have created for your project.
What’s the difference between “Job titles” and “Classifications”?
To give a short answer — nothing! “Job title” and “Classification” refer to the exact same piece of employment information in Broadstripes; it’s just a matter of how it is labeled. In fact, you may use “Job title” in one Broadstripes project and “Classification” in another.You can change this label at any time in your General Settings.Open the Job titles dialog
- Click the Project settings icon in the upper right corner of any page (or press Ctrl-K / ⌘K).
- In the Project settings menu, click Job titles (or Classifications) under the Customization group. You can start typing to filter the list.
- The Job titles dialog opens, showing a table of all job titles in your project — including those used by current employments, terminated employments, and any titles that were once assigned but are no longer linked to any employment.
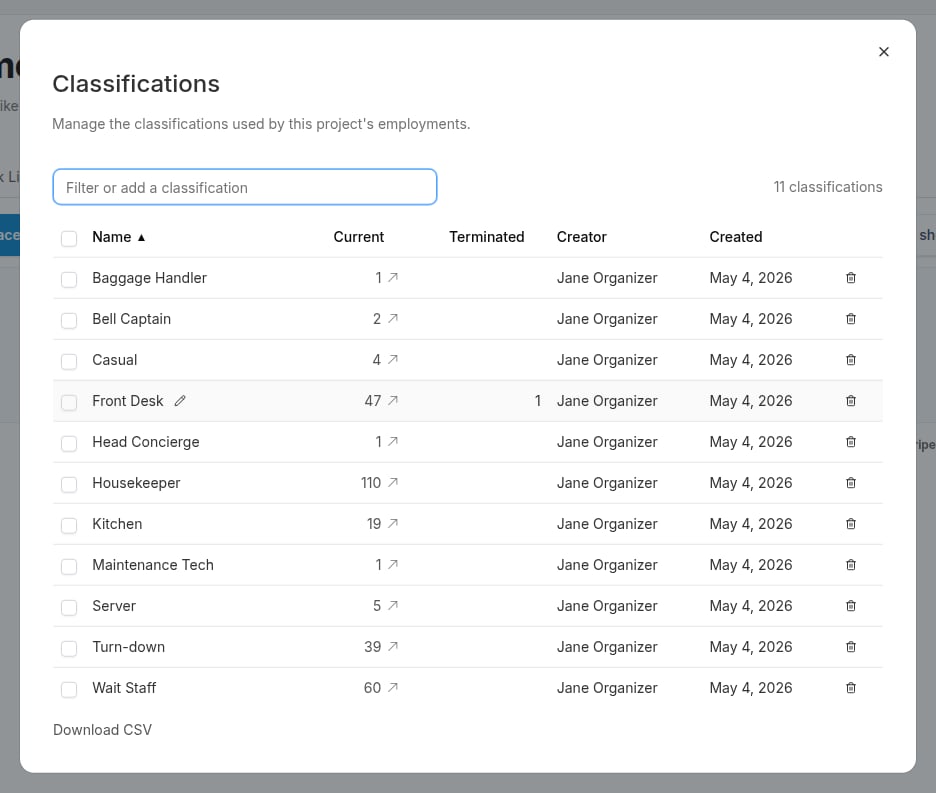
You can click any column header to sort by that column. Click again to reverse the sort order.
Add a job title
You can create a new job title directly from the filter input at the top of the dialog without opening a separate form.- In the Job titles dialog, type the name of the new job title in the Filter or add a job title field at the top.
-
Broadstripes checks whether that name already exists (the check is case-insensitive). If it does not match any existing title exactly, an Add "" as a new job title button appears below the table.
- If your typed text partially matches some existing titles, those titles remain visible above the button so you can compare them before deciding to add.
- If your typed text matches no existing titles at all, you can press Enter to add without clicking the button. When partial matches are shown, you must click the button — pressing Enter in that case does nothing, so a quick Enter cannot accidentally create a near-duplicate.
- After Broadstripes creates the title, it clears the filter, adds the new row to the table in the correct sort position, and briefly highlights it so you can see where it landed.
Filter the list
Type in the Filter or add a job title field at the top of the dialog to narrow the table by job title name or creator name. The field doubles as the place to add new titles — see Add a job title above.Rename a job title
- In the Job titles dialog, click the pencil icon next to the name you want to rename (or double-click the name itself). The name becomes an editable text field.
- Type the new name and press Enter (or click elsewhere) to save. Press Escape to cancel without saving.
Merge job titles
Merging combines two or more job titles into one, and automatically re-assigns any affected current and terminated employments to the surviving title.Merge by renaming into an existing title
When you rename a job title to a name that already exists, Broadstripes detects the conflict and asks whether you want to merge. Confirm to proceed; the renamed title is removed and its employments are moved to the existing one.Merge selected titles
- Check the box next to each job title you want to merge (select at least two).
- Click Merge (n) in the toolbar that appears above the table.
- In the Merge dialog, choose which title to keep as the survivor — Broadstripes pre-selects the most-used one — or type a new name for the merged title.
- Click Merge to confirm. All selected titles are combined into the survivor, and all employments are updated automatically.
Delete job titles
Delete a single job title
In the job titles table, click the trash icon on the row you want to remove. Confirm the deletion when prompted.Delete multiple job titles
- Check the boxes next to the job titles you want to delete.
- Click Delete (n) in the toolbar above the table.
- Confirm the bulk deletion when prompted.